The Athlete's Diary ™ for iPhone
from Stevens Creek Software
Go to the iTunes store to purchase a copy of this software
Latest released version: 2.3
The Athlete's Diary from Stevens Creek Software is designed to let you keep track of athletic activity in multiple sports. You can log your activities, see the pace automatically calculated when relevant, example weekly, monthly, or yearly totals of time and distance in different sports, look at graphs of those totals and also at graphs of any other numeric quantities you have logged - your weight, your resting heart rate, the total ascent you've run or biked, and so on. You can also search for activities based on virtually any criteria (such as the sport, the time, the distance, words found in the description of the route or comment), and look at sub-totals (or graphs of those sub-totals) based on only the selected activities. The Athlete's Diary for iPhone is designed to produce log files in the same format as The Athlete's Diary for other formats. You can upload and download data to and from your desktop computer or a website, importing or exporting from the desktop versions of The Athlete's Diary, available (sold separately) for Macintosh or Windows, as well as the PalmOS version of the software.
This manual presents the program in a more-or-less sequential order. When you start using the program for the first time, you'll need to do one of two things. If you have not been using The Athlete's Diary for Macintosh or Windows, you must set up your sports list (described below in the Adding an Entry section), so the software knows what sports you do (running, cycling, swimming, etc.) and what units of distance and pace (speed), you like to use to measure them. Until you add at least one sport to your sports list, you won't be able to add an entry. If you have been using our desktop version (or our Palm version, and have transferred the data from your Palm to your desktop using the conduit), then you'll probably want to start by downloading your existing log. That function is described in the last section of this manual, Uploading and Download Data.
Registering the Software
On the Files tab you'll find an "information" ("i") icon in the upper-right hand corner. Be sure to tap on it to register your copy of The Athlete's Diary for iPhone, entitling you to discounts on the desktop versions of the software.
The Log Screen
The main screen of the software, which you will see when you open the software, looks like this:
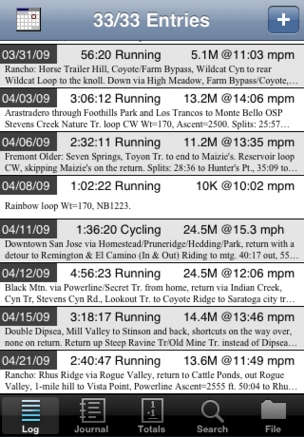
On the bottom of the screen are five tabs which take you to the five main areas of the program - Log, Journal, Totals (and Graphing), Search, and File. The Log screen shows the entries in your log in an abbreviated form. When the program opens it will automatically be scrolled to the bottom, where your latest entries appear. You can scroll the log in the usual way, with a flick of the finger, but once your log contains data going back several years, you'll find it easier to scroll based on date. To do so, tap the Calendar icon on the upper left of the screen, and a "date picker" will appear. Dial in the date you are interested in, tap Go, and the log will scroll to the chosen date.
Adding an Entry
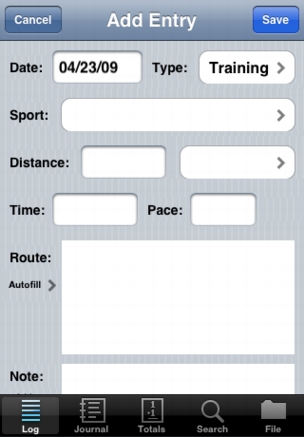
To add an entry, tap the + button on the upper right of the screen, and a blank Add Entry screen will appear:
The different fields are as follows:
Date: When the screen appears, the date will be set to the current date, which is most likely the date of the activity. If it isn't, tap in that field, and a "date picker" will appear, in which you will dial in the date, and then tap the Select button.
Type: There are three "types" of workout - Training, Intervals, and Race (these are fixed in the current version of the software). Training is set as the default; to change it, just tap in the field and pick from the list which appears.
Sport: Tap in the field and select the appropriate sport from the list. The first time you use the program, you will need to enter one or more sports in the list. To do so, tap the Edit button in the upper left of the Select Sport screen, and then the + button to get to the Add Sport screen (Note: the first time you do this, when you have no sports set up, the software immediately advances to the Add Sport screen; you'll only need to tap the Edit and then the + button when you add further sports):
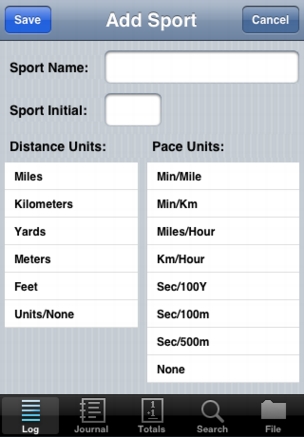
On the Add Sport screen, you enter the Sport Name (whatever you wish), a one-letter Sport Initial (which must be unique, i.e., no two sports can use the same initial), and the select the appropriate Distance Units and Pace Units from the lists, tapping Save to add the sport to your list of sports. For users of The Athlete's Diary for Windows, Macintosh, or Palm, if you start the program by importing an existing log (which will be described later in the manual), then your sports will be imported along with the log, so you won't need to worry about adding sports within the iPhone version.
Distance: The distance is entered as a number, either an integer or a number with one or more decimal places, as you wish. The field to the right of the distance field is for the Distance units. When you select a sport, the default units for the distance will appear here, but you can change it if you wish. For example, your default units for Running might be miles. However, if you run a 10K race, after selecting Running from the list of sports, and entering 10 in the distance field, you can tap in the distance units field (which will read Miles), and select Kilometers from the list which appears.
If you don't know the distance, but you do know the time and can estimate the pace, you can leave it blank, enter the time and pace, and the distance will be automatically calculated.
You can mark the distance as estimated by preceding it with the approximate sign, ~.
Time: Time is entered in the form Hours:Minutes:Seconds, e.g., 1:03:43, or Minutes:Seconds, e.g., 42:17, but you only enter the numbers; the colons are added automatically as you enter the numbers. Tenths of seconds can be entered if you wish (you can enter hundredths as well, but the entry will be rounded to the nearest tenth). Using the approximate sign ~ makes this an estimated time, e.g., ~34:30.
Pace: Normally, you will not enter a value into the Pace (speed) column; rather, the program will calculate it for you after you have entered your sport, distance, and time. It is possible, however, to reverse the process. If you exercise over an unknown distance, enter a time and an estimated pace, and the program will calculate the approximate distance. If you exercise for a known distance but don't have an accurate time, just enter the distance and an estimated pace, and the program will calculate the approximate time. The program knows that if you are entering pace it must be an estimate, so don't put a ~ when you enter it. The program will place a ~ in front of the data it has estimated (time or distance).
The program will not let you enter a pace unless you have entered a sport. If you enter a pace, it must be in the relevant format. If the pace for that sport is a speed (miles per hour or kilometers per hour), the entry will look like a simple number, e.g., 21.3. If the pace is in minutes per mile or kilometer, pace must be entered in the time format, e.g., 7:45 (again, the colons are automatically entered; you just enter the numbers).
Some people prefer to enter just the time for their workouts, even for sports like running. This is permissable, but your totals and averages will be more useful if you enter a pace estimate and let the program calculate your estimated distance. Most people can easily estimate their pace to within 15%, and isn't that better than no estimate at all?
Route: This is a free-form entry where you can describe the route you took, the workout you did, or the name of the race you participated in.
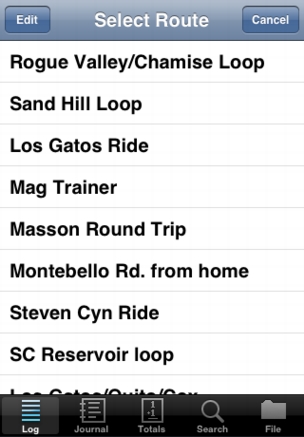
Autofill: The Athlete's Diary can memorize your "standard workouts," workouts or routes that you repeat frequently. To do this, first begin a new entry, and enter whatever information will be common from workout to workout. For a running route, for example, the distance would be standard, but not the time or pace, so you would enter the sport, the distance, the route description, and even a note if that repeats each time (for example, the ascent of the route). After you have done this, but before you tap Save, tap on Autofill to get to the Select Route screen.
To add a new route, tap Edit on the upper-left of that screen, and then the + button on the upper-right of the Edit Routes screen (which can also be used to re-arrange or delete routes) to get to the Memorize Routes screen. Enter the name that you have chosen for that route; once you do that, and tap Save, the new route will be added to your list of memorized routes.
Now, whenever you do a memorized route or workout, before entering any other information except the date, tap Autofill on the main screen. Tap the route or workout you just did, and all the memorized information will be filled in on the main data entry screen. Add the "changeable" information (today's time, a note perhaps) and tap Save to save the workout.
Note: This is a free-form entry where you can add whatever notes you want. The weather, your companions, your intermediate splits at various points on the route, etc.
Keywords: In addition to free-form comments, there is one other kind of information that goes into the Note field. In addition to time, distance, and pace, The Athlete's Diary will allow you to analyze any other kind of numeric information — your weight, your resting heart rate, the ascent of your routes, and so on. To do this, it uses a concept it calls "keywords." To create a new keyword, first tap on Add Keyword underneath Note. A Select Keyword screen will appear which, once you have established some keywords, is used to add that keyword to the Note field. To add a new keyword, tap Edit on the upper-left of that screen, and then the + button on the upper-right of the Edit Keywords screen (which can also be used to re-arrange or delete keywords) to get to the New Keyword screen:
On this screen, you have three things to do. First, enter an abbreviation for the keyword. For example, you might abbreviate "Weight" as "Wt". Keep this short but recognizable, because it will be what actually is entered into the Note field of your entry. Next, enter a more complete description, e.g, "Weight (lbs)" or something like that. This description is what appears on the list that you select from when you insert keywords into your log, and it is also used to label graphs.
Beneath the Keyword Abbreviation and Keyword Description there are three choices for the type of keyword: Total, Average, or Non-Numeric. Some types of numeric quantities are meant to be totalled. For example, if your bike ride includes 2500' of ascent one day, and 1700' another, you want to know that your total ascent for the week was 4200'. Other numeric quantities, like your weight, are meant to be averged. If you weight 172 one day, and 174 another, it's only the average (173) which is interesting, not the total.
And finally, there are Non-Numeric keywords, which are primarily used for selection (described later in the manual). For example if your dog's name is Nicky and you always enter "with Nicky" in the comment when you run with him, you'll be able to look at all the runs you've done with him, and even total up his mileage as well as your own! If you wrote "with the dog" in the comment one day, however, that run wouldn't be included in Nicky's totals if you select looking for "with Nicky." Using "non-numeric keywords" for phrases like this that you enter frequently will assure consistency. A very common use of non-numeric keywords is to keep track of shoe mileage. Create an abbreviation for each pair (e.g., "NB1", "NB2", etc.) and make those into keywords. Now you'll be able to select entries containing that keyword and see the total mileage on that pair of shoes. Be aware as you do so that you need to pick unique abbreviations. If you used "N" to represent your pair of Nike shoes, for example, then every Note in which the letter "n" appears would be selected – not what you want, obviously!
Save: Tap the Save button on the upper-right of the screen to save the workout once you have finished entering it. Note that the data entry screen, which is larger than the size of the iPhone screen, scrolls by flicking your finger, so you can go back and forth to the different fields. The screen will also advance automatically as you enter data in each field if you tap the Next button in the lower-right-hand corner of the keyboard.
Beginning with version 2.0, if you have started data entry, but are interrupted by, for example, a phone call, and need to exit the application, your partial data will be remembered, and when you next start the program, you will be returned to the data entry screen with your partial entry filled in.
Examining and Modifying Entries
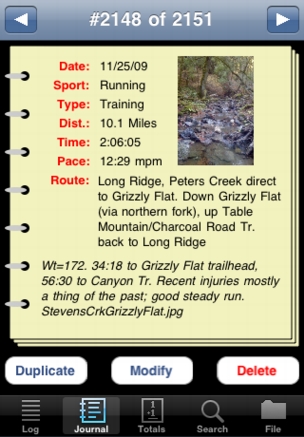
The main log screen shows the date, sport, and numeric information from the entry (time, distance, pace), but, depending on how verbose you were with the Route and Note fields, may show all or only part of those fields, and even when it shows the complete entry, the type is fairly small. To examine entries more closely, tap on an entry on the main screen and you'll get to the daily Journal screen (you can also tap the Journal tab on the bottom of the screen, which will automatically show the last entry in the log):
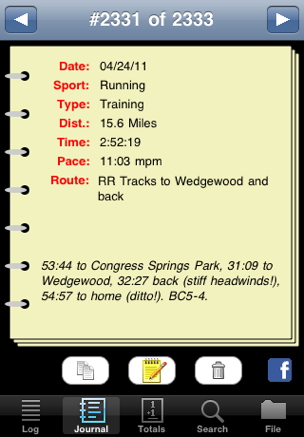
On top of the screen, you see an indication of the "page number" of your log, and also left and right arrows which let you move backwards and forwards through your log, "page" by "page". You can also flick your finger horizontally in either direction on the log itself to change "pages," but only on the top portion of the screen (above "Route"), because finger motions on the bottom part of the screen are reserved for scrolling the Route and Note fields, which are scrollable (vertically) if the amount of text exceeds the available space on the screen.
On the bottom, you see three buttons:
Duplicate takes you back to the Add Entry screen, filling in all the information with a copy of the information from the workout in question (but with the date as today's date, not the old date). This is a useful feature if you have repeated (exactly or even roughly) a previous workout, but one which isn't in your list of memorized (Autofill) workouts. Note that the workout is not actually added to the log until you tap the Save button.
Modify also takes you back to the Add Entry screen, filling in all the information (exactly this time, including the date), but the screen will be labelled Modify Entry (instead of Add Entry) to make clear what will happen when you tap the Save button (after, presumably, changing some piece of information).
Delete is self-explanatory. You will be asked to confirm that you really mean to delete the entry, because the action is not "un-doable."
Embedding Photos and HTML Links
Beginning with Version 2.0, you can embed HTML links and/or photos in your log entry, in either the Route or Note fields. An HTML link, which should be a complete URL like "http://myblog.com/myracereport.htm", will appear in blue on the daily Journal page, and, if you tap on it, you'll be transferred to Safari to view the web page. This is a great way to attach a long race report to your log.
Pictures are a great way to save Google Map views of the route you took, or altitude profiles or heart rate traces from your GPS- or HR-enabled watch, or race photos or other photos you took during the course of a workout or race. Pictures work differently than simple HTML links. First of all, in the iPhone Settings application, you'll see this section at the bottom of The Athlete's Diary section (labelled "Athlete Diary" because of limitations of the iPhone with respect to application names):
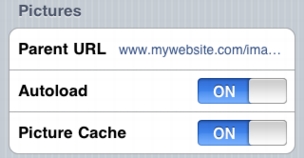
The Parent URL is the location where your pictures are stored; this can be a website or a local URL for your desktop or laptop computer (see the section below on "Uploading and Downloading Files" for more information about that). Unfortunately it cannot be a reference to the iPhone Photo library itself because of current limitations in the iPhone OS. To embed a picture, you'll simply enter the actual filename like "myracephoto.jpg" which the software will expect to find at that Parent URL. The filename can be entered into either the Route or Note fields, as you prefer. Filenames can be part of Autofill workouts (described above), so that everytime you do one of those workouts, you'll see the picture associated with that workout (for example, a map of the route might be appropriate).
Autoload tells the program if you want to automatically load the pictures from that website when you display the Journal page for that entry, and Picture Cache lets you save the pictures on the iPhone itself (after they have been downloaded the first time) for instant future viewing (but, of course, taking up available memory space on the iPhone).
One unfortunate aspect is that, if you store pictures on websites such as Flikr, the Parent URL you would need is not a constant for all your pictures, because of the way such websites parcel out photos among various servers. If you cache the photos on the iPhone, however, you'll be able to change the Parent URL periodically to match the current needed value for new photos.
Beginning with version 2.2, you can add pictures into the Picture Cache on the iPhone using Apple's File Sharing technique rather than downloading them from the web. How to do so will be described later in the manual.
Pictures can be any size, but the larger they are, the more room they will occupy on the iPhone, obviously. The Athlete's Diary will display photos up to the full screen size, 320x460, so if you are cropping or resizing photos, that's a good size to aim for.
When you view a Journal page with an embedded photo the first time, assuming you don't have Autoload set to On, you'll see a view like this:
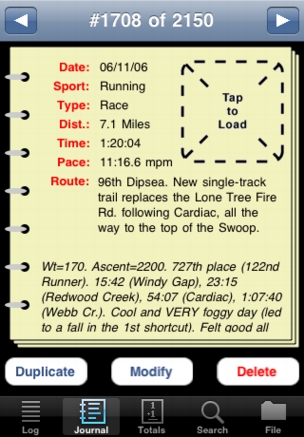
Now if you want to view the picture, you'll tap in the square, which will display the photo. If Picture Cache is set to On, the photo will be saved on the iPhone (not in the Photo library, but within The Athlete's Diary software itself), so that subsequent viewings will simply display the picture.
Now if you tap on the picture itself, the picture will slide in to occupy the full screen (or as much of the screen as possible, if the aspect ratio of the picture doesn't match the aspect ratio of the screen), automatically rotated if the picture has a horizontal rather than vertical format.

Expansion of the picture is not supported at this time. Tap anywhere on the picture to return to the Journal screen. (That's a picture of the real Stevens Creek, by the way, taken, as the Journal entry indicates, on a recent run!)
Beginning with version 2.1, photos of size 320x460 (or of an aspect ratio identical to that) take up the entire screen except the "status bar" (the bar on top showing your connectivity, the time, and the battery level), while photos of size 320x480 (or aspect ratio 1.5) take up the entire screen (eliminating the status bar, which will of course return once you dismiss the full picture).
Selecting Photos from the iPhone Photo Library
Beginning with version 2.1 of The Athlete's Diary (currently under review by Apple, not yet in the App Store), you can also add pictures to the log straight out of the iPhone Photo Library, rather than by downloading from the web or a local computer. There is, however, a major limitation on this ability. Because of the limitations imposed by the current version of iPhone OS, applications cannot maintain permanent "links" to photos in the photo library. For this reason, the capability to add photos from the library is only enabled if you have "picture caching" (see above) enabled, so that The Athlete's Diary can make a copy of the photo and put it into its own storage. This also means that if you ever decide to purge the cache (described below), you will have to re-link your log to the desired photo in the Photo Library (assuming it's still there).
With those limitations, if you have picture caching enabled, when you add a new entry to your log, at the very bottom, you'll see a button enabling you to select a photo from the library:

Tap the Photo Library button, and a standard "photo browser" will appear allowing you to select (and edit by expansion if you choose) a photo. When you have selected the photo and tapped the Choose button, the data entry screen will reappear but will look like this:

As indicated, you now must enter a name into the appropriate space by which the photo will be saved. The name must end in ".jpg", but you needn't enter that part yourself if you don't want to; the software will determine if you have and will add the ".jpg" itself if you haven't. Now when you hit the Save button to save the new entry, the filename for the picture will be added to your Note field automatically. If you prefer to add the filename to the Route field, you can do so yourself, before you tap the Save button (and in addition to entering the same name in the field at the bottom); in that case it must be the full name, including the ".jpg" extension.
Note that, when selecting photos from the current roll on the iPhone, the iPhone always displays and selects for you a 320x320 portion of the image, which is the perfect aspect ratio (1:1) to display in small format on the Journal screen, but only occupies a portion of the screen when you display it in large form. On the other hand, photos downloaded into the iPhone from iPhoto on the desktop generally allow you to select the entire photo. Why this is, we don't exactly understand, but after a little experimentation you'll figure out what is and isn't possible.
Totals and Graphs
Tap the Totals tab on the bottom of the screen and you'll see the Totals screen:
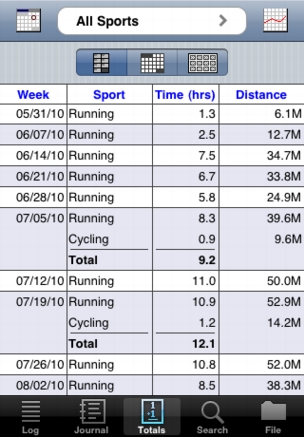
You can switch between Weekly, Monthly, and Yearly totals using the three icon buttons. The list of totals, separated by sport (and totalled for time only if there are more than one sport in a given time period), is scrollable with a flick of the finger. As with the Log, you can also scroll directly to a particular date by tapping the Calendar icon on the upper-left of the screen, and then choosing the date from the date picker which appears.
On the top of the screen is a selector, showing All Sports in the example above. Tap on it and a selection screen will appear, containing a list of each of your sports (as well as "All Sports") along with a list of all your keywords (with non-numeric keywords grayed-out), supplemented by one additional choice - # Workouts. Choosing a single sport will limit the totals screen (and, as we'll see shortly, the graph screen as well) to displaying just that one sport. Choosing numeric keywords like Weight or Ascent will give you the corresponding totals or averages (as appropriate) for those quantities, while choosing "# Workouts" will display the number of workouts in each sport for each time period.
The Settings application lets you select the starting day of the week, with choices of Monday, Saturday, and Sunday. Choosing Monday or Saturday is generally the best choice for athletes who do long runs or rides, because that way, if you do a long run or ride which may happen on Saturday or Sunday depending on the week, your weekly totals will be more consistent. With weeks starting on Sunday, If you do your long run on Sunday one week and then Saturday the next, that week will have a particularly high total, while the surrounding weeks will be lower.
Tap the Graph button on the upper-right, and the same information which appears numerically on the Totals screen will be presented on the Graph screen:
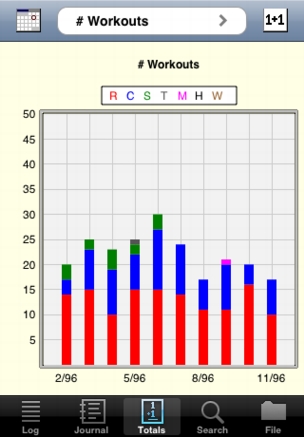
The graph of the data is color-coded by sport, with the "key" shown above the graph. In this graph, running (abbreviated "R") is in red, cycling (abbreviated "C") is in blue, swimming ("S") is in green, and so on. You can scroll the graph horizontally to go to different time periods by flicking your finger horizontally across the graph, or go directly to a desired date using the Calendar icon on the upper-left. You can change the vertical scale of the graph (which is automatically calculated so that the tallest point on the graph, which may be "off to the left" or "off to the right", will fit) by flicking your finger up or down. To change the expansion along the horizontal (time) axis, you can use "pinching" (or "expanding") motions in a horizontal direction. Putting two fingers on the far left and right of the graph and then pulling them in towards each other will give you twice as many time periods on the graph. Putting two fingers near the center and then pushing them apart from each other displays fewer time periods. You are limited to displaying 10, 21, or 43 time periods.
When you graph multiple sports, or graph a keyword or #workouts, there is only one type of graph. If you graph individual sports, you will be given a choice of graphing time or distance by selected the appropriate icon:
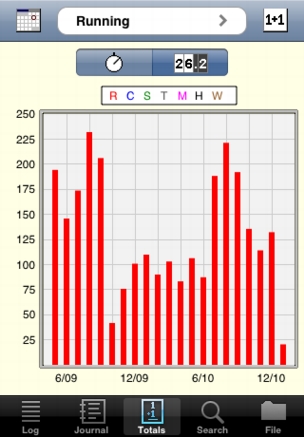
Return to the Totals screen by tapping the 1+1 icon.
Selection
Tap the Search tab on the bottom of the screen and you'll see the Select screen:
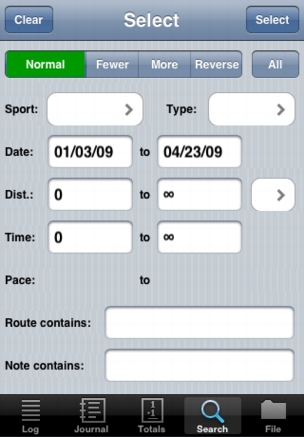
You can select by Sport, by Type (Training, Interval, Race), by Date (the "From" and "To" dates are automatically filled in with the earliest and latest dates in your log; change one or both to select data before a certain date, after a certain date, or between two specified dates), by Distance or Time (automatically initialized to 0 to infinity, so you can change one or both to select distances or times less than, greater than, or between two values), by Pace (but only if you enter a Sport), or by a word or phrase contained in the Route or Note fields.
The type of selection is controlled on the top of the screen:
Normal is the usual selection mode. Enter one or more criteria with Normal highlighted, tap Select, and entries meeting those criteria will be selected (displayed in the log, totalled on the totals screen, graphed on the graph screen).
Fewer and More only make sense after you have done another selection. After you have selected by one set of criteria, return to the Select screen. Enter a different set of criteria, tap Fewer and then Select and then a subset of the entries previously selected, which also meet the new set of criteria, will be selected. Tap More and the Select and entries which match the new set of criteria will be selected in addition to those previously selected.
Reverse selects entries which do not match the criteria. Set Running as the Sport, for example, tap Reverse and then Select and you will see all the entries in your log for sports other than running.
All is an action button all by itself (i.e., you don't need to follow it by tapping Select). Tap All and all previous selections will be nullified and all entries will be selected, displayed, totalled, and graphed. All ignores whatever criteria you have on the screen.
Finally, Clear on the upper-left clears the criteria, making it easier for you to switch from one set of criteria to another.
Input ("Downloading") Data
Athlete's Diary provides three ways to input or download data into the software — by wireless download from a computer or website via the standard "http" protocol, by cabled transfer from a desktop via Apple's iTunes File Sharing, or via the iPhone clipboard. In all cases, the data need to be in the format the software is expecting. For users of the desktop versions of the software for Macintosh or Windows, the data will automatically be in the correct format.
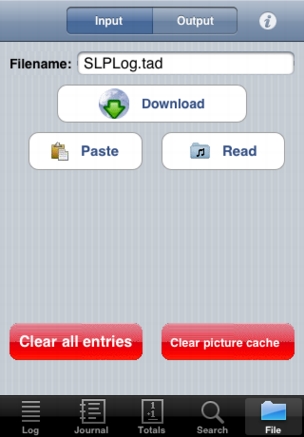
Tapping the File tab displays the screen, shown here in Input mode:
For all methods of input:
No matter which of the three methods of input you are using, there are two parameters that need to be first set in the Settings app (and typically never changed again, which is why they are in the Settings app and not in the Athlete's Diary software itself):

The desktop versions of Athlete's Diary support only two date formats: Month/Day/Year and Day/Month/Year. If you are reading in data from your desktop log, you need to select the appropriate one of these two choices. The third choice provided is iPhone Native. The iPhone itself has a wide variety of date formats, depending on your locale. The year may appear first, or dashes ("-") may be used instead of slashes ("/"). iPhone Native is provided for those users who have data in a text file on the desktop that uses a date format corresponding to the one on the iPhone, and will only be needed if you are not using the desktop version.
Encoding is a complex subject, and it is addressed fully here. Suffice it to say that if you are using the Macintosh desktop version of Athlete's Diary, you should select ASCII/UTF-8 for the value of Encoding, and not Mac (MacOS Roman). If you are using the Windows desktop version of Athlete's Diary, you should select Windows (ISO Latin-1) for this parameter. The other two choices, Unicode (UTF-16) and Mac (MacOS Roman), will only apply to those who have text files of data not originating in the desktop version of Athlete's Diary.
With those parameters set, you can proceed to inputting data.
Input using iTunes file sharing: (this is probably the simplest method for most people)
Adding pictures to the Athlete's Diary picture cache on the iPhone:
In addition to the plain files you see in the list shown by iTunes, you'll also see one folder: Pictures. This is the "picture cache" where, if you have the Picture Cache turned on using the Settings app, the software stores your pictures to display on your Journal entries. It turns out that Apple's iTunes File Sharing won't let you add pictures directly into that folder, but Athlete's Diary will do it for you. Follow these steps:
- In iTunes on the desktop, click on the Add button, find the picture you want to use (.jpg only), select it and click on Choose. That file will now appear in the list of files on the screen, and will simultaneously be downloaded into the iPhone.
- The first time Athlete's Diary attempts to access that picture (which will occur when you display the Journal entry for an entry which references that picture, and immediately if you have Autoload turned on or, if you have Autoload turned off, after you tap the "Tap to Load" area of the screen), the file will be moved into the Pictures folder (the picture cache), and will disappear from the list of files displayed by iTunes.
Input via the Clipboard:
The Paste button can be used to add data into your log, either an entire log including information about sports, keywords, and routes (in which case, the previous log and information will be replaced), or just one or more individual entries which will be added into the existing log. There are two basic methods you might use to copy data onto the clipboard to prepare for this "paste" operation:
Input via http download:
Wireless download is by far the most convenient and fastest way to input data into the software, but requires some configuration and setup which may be intimidating to some people (you're not alone if you're one of those people, we assure you). The key is configuring your computer to act as a "web server," that is a computer which from which other computers (like your iPhone) can read files. The process is explained in detail here. Once you have done so, go to the Settings app and look for the Input section of the Athlete's Diary settings:
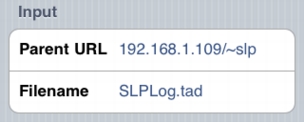
The Filename parameter can be entered here, or in the Athlete's Diary software itself, but the key parameter is the Parent URL. This tells the software the directory in which it will find the file. In the example shown, on a Macintosh, this would be the "Sites" folder in the home directory of user "slp". Note that if the Parent URL parameter is blank, the Download button will not be active.
With the Parent URL configured, and a Filename entered, simply tap the Download button to read the data into the iPhone. If you are mostly using the iPhone version of the software as a viewer, and inputting most or all of your data on the desktop, then you can simply do this periodically to make sure the current version of the log is in your iPhone. Note that, for most people, this will only be possible when your iPhone is on the same "local network" as your desktop or laptop computer, which pretty much requires that you have a WiFi network in your home or office.
If you want to first try the program with some sample data, before entering your own, you can set the Parent URL to www.stevenscreek.com/iPhone (note the upper-case "P"s), and Filename to SampleLog.tad (you'll also need the Date Format set to Month/Day/Year and Encoding to ASCII/UTF-8 for this particular file). Downloading your own file from a website of your own is identical, with obvious changes.
Clearing data:
Two other buttons on the bottom of the screen should be self-explanatory. Clear all entries (yes, you will be warned and given a chance to change your mind) does what it says and clears all the entries you have made in your log. When you download data to the iPhone, previous data is automatically cleared, so for most normal circumstances, you will not need to use this button. Clear picture cache clears all the pictures you have downloaded into the iPhone, should you decide they are taking up too much room.
You can't remove a single picture from the picture cache. If you tap Clear picture cache button on the File screen, you will delete all of them, at which point you can reload (using the method described above under File Sharing) just the ones you want saved. How relevant this will be to you depends on how many pictures you associate with your log, how big they are (i.e., how many kB or MB they take up), and how much free memory you have on your iPhone. Most people probably won't need to worry about this, since your Athlete's Diary picture cache will occupy only a tiny fraction of your total iPhone memory.
Tapping the information ("i") icon on the upper-right of the screen gives you two options. One is to read this online manual on your iPhone, and the second is to register your copy of the software with Stevens Creek Software. Doing so makes you eligible for a discount on the desktop versions of The Athlete's Diary.
Output ("Uploading") Data
Athlete's Diary provides four ways to output or upload data from the software — by wireless upload to a computer or website via "ftp" (file transfer protocol), via email, by cabled transfer from a desktop via Apple's iTunes File Sharing, and via the iPhone clipboard.
Tapping the File tab displays the screen, shown here in Output mode:
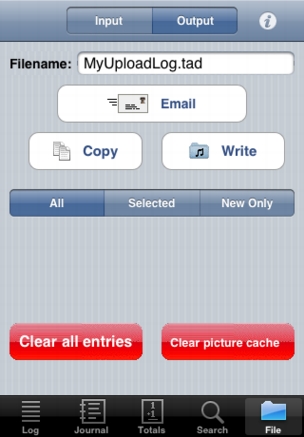
No matter what method is used to output the data, there are three alternatives. All outputs the entire log, which includes not only the entries themselves, but also all of the Sports, Routes, and Keywords, all in a single file in a format appropriate for use by the desktop versions of Athlete's Diary. Selected outputs only the currently selected entries (based on the Search tab), while New Only outputs only those entries which have been added or modified since the last time the data were output. The latter two cases output only the entries themselves. New Only is especially useful if you have added some entries on the iPhone that you wish to add in to your desktop log. Upload the new workouts, open your desktop log, and then use the File->Merge menu to merge in the file of new entries.
Several of the parameters needed to output data are configured in the Athlete's Diary section of the iPhone Settings app. Two of them — Date Format and Encoding — were discussed above. The others are found in the Output section:
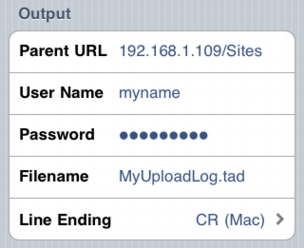
Filename and Line Ending are common to all methods of output. Set Line Ending to match the type of computer on which you'll be reading the file. The remaining three parameters aren't relevant to all methods, and will be discussed below.
The two simplest methods of output will be iTunes file sharing and email.
Output using iTunes file sharing:
Output via Email:
Output via Clipboard:
Output via Wireless FTP:

Interfacing with other versions of The Athlete's Diary
If you have been using the Windows or Macintosh versions of The Athlete's Diary (any version, not just the latest), you will have a file on your desktop named XXX.tad (for Mac version 4.x), XXX.dat (for Windows versions), or just XXX (for Mac version 1.x-3.x). When you first purchase The Athlete's Diary for iPhone, you'll be able to download that file directly into your iPhone using the instructions in the previous section. This will not only install your log into the iPhone, but also your sports, memorized routes, and keywords.
If you have been using the Palm version of The Athlete's Diary without using the desktop version of the software, there are two possibilities. If you installed the Athlete's Diary conduit, whether or not you were using it in conjunction with the desktop version, and you have it set to "Handheld overwrites Desktop," then on your desktop (in an appropriate folder, as shown in The Athlete's Diary for Palm manual), you'll have a file entitled Palm Log (Macintosh) or PalmLog.dat (if you had the conduit set to something else, like "Do Nothing," then set it to "Handheld overwrites Desktop" now and do a HotSync to create that file. That file can be directly downloaded into your iPhone version as described in the previous section. If, on the other hand, you never installed the Athlete's Diary conduit, your Palm data has been backed up on the desktop but only in a "Palm-internal" format which is of no use to us. You'll need to now install the Athlete's Diary conduit (if you have lost it, you can download it from our download page), set it to "Handheld overwrites Desktop," do a HotSync, and then proceed as above.
Moving data back to the desktop requires more thought. Of course if you are only using the iPhone version for data review, and not data entry, this isn't a problem. A perhaps more common case is that you use your iPhone version for review in most cases, but use it for data entry while on vacation or a business trip, so that when you return you have five new entries. In this case, the simplest option is to select New Only on the Output section of the File tab, and output a file which will contain just those five new entries. Now you can use the File->Merge feature of the desktop versions to import those new workouts into your desktop log. If you use this technique, the upload filename should not be the same as your desktop log, but something suggestive of what it is (e.g., iPhoneEntries.tad).
The alternative is to upload (or email) the entire log. This is fine too, and will work best if you do so using the same name you are using on the desktop, and upload the file (or save the email attachment) to the same place as your desktop log, thus overwriting your old log with the new, updated log.
If most of your data entry is done on the desktop, as is true for most users, then one good habit is to do a download of that log into your iPhone each day, or each week, or each time you make a new entry. For sure, if you use the technique of uploading the entire log from the iPhone, then you will definitely need to make sure that you download into the iPhone each time you add to your desktop log.
Automerging on the desktop
As described in the manual for the desktop (Macintosh or Windows) version of The Athlete's Diary, the desktop version includes an "automerge" feature for files of new workouts which have been uploaded the Palm or iPhone versions of the software. The way this works is that the uploaded file containing the new entries must have a specific name: Palm Log on Macintosh, or PalmLog.dat on Windows. Now in the desktop version, you use the Configure->Set Palm Folder menu to select the folder in which you will save the file uploaded from the iPhone, either directly by FTP or indirectly by saving the attachment you email to yourself into that folder. Now with that folder configured, any time you start the desktop version, it will look in that folder, and if it finds a file named Palm Log (Mac) or PalmLog.dat (Windows), it will merge the workout(s) in that file into your desktop log. As it does so, it will rename the file so that it won't be merged twice. Note that this technique only allows for a single file to be merged, which means that if you do upload a file of new workouts from the iPhone, you must run the desktop version before uploading another file of new workouts from the iPhone, or else the previous file will be overwritten. Of course you could change the name of the file to be uploaded, but then the automerge feature won't work.
One subtle note: yes, you can upload a file named Palm Log via FTP, even though it has a space in the name.
Visit the Stevens Creek Software iPhone Software Support Page
© 2009-11 Stevens Creek Software LLC