 PlotView Users GuidePlotView Users Guide
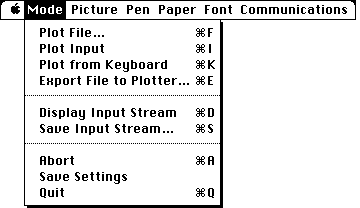
Requests the name of a stored file for input. This file must be a TEXT file, which may have been transferred to the Macintosh from another computer via floppy disk or network, created by a word processing program like MacWrite and stored in "TEXT only" format, created by a simple text editing program like SimpleText, or saved by PlotView. The HP-GL commands contained in this file will then be interpreted and the resulting plot displayed on the screen.
Plot File terminates in one of three ways: The occurance of a "page" command in the file (PG, AF, or AH in HP-GL), the end of the file, or an Abort by the user (see below).
Puts the system into a mode into which commands are read from the modem port of the Macintosh and interpreted as HP-GL commands. Some output may also be sent out the modem port if a request is made by the remote computer for plotter status. Plot Input mode should be invoked before the data stream from the remote computer (or other device) is initiated.
Plot Input terminates upon receipt of a page command, or by a user-initiated Abort.
Opens an input window on the screen for direct input from the Macintosh keyboard. Characters are continuously interpreted as they are entered (no backspace or other line editing is permitted); as soon as a legitimate HP-GL command and appropriate parameters have been entered, the "pen" is moved accordingly. HP-GL commands can be entered as upper- or lower-case, and must be terminated with a semicolon (;) or the Return key. Plot from Keyboard terminates upon receipt of a "page" command ("PG;"), or by a user-initiated Abort.
Two special (non-printing) characters are used in HP-GL. One, the ESC or Escape
character, is used to initiate special modes of operation. Although it is not particularly
useful in the Plot from Keyboard mode, ESC can be entered from the keyboard using
the combination ![]() [. The second special character, known as ETX, is used as the termination
character for labels (alphanumeric strings to be plotted on the plotter). The combination
[. The second special character, known as ETX, is used as the termination
character for labels (alphanumeric strings to be plotted on the plotter). The combination
![]() C
is used to produce ETX (this will not copy anything to the Clipboard, because the
Picture Menu which contains this keyboard equivalent is inactive at this time).
C
is used to produce ETX (this will not copy anything to the Clipboard, because the
Picture Menu which contains this keyboard equivalent is inactive at this time).
Requests the name of a stored file to be sent to a plotter. This file must be
a TEXT file, which may have been created by a word processing program like MacWrite
and stored in "TEXT only" format, created by a simple text editing program
like Edit, or saved by PlotView. This file is then sent character by character out
the modem port (presumably to an HP plotter) until either the end of file is reached,
or Abort is used to prematurely terminate the process. If the transmission process
"hangs," press Command-Period (![]() .) to cancel the transmission. If this occurs,
it is likely either that you do not have a correct hardware connection, or that your
baud rate or other communications parameter is incorrect.
.) to cancel the transmission. If this occurs,
it is likely either that you do not have a correct hardware connection, or that your
baud rate or other communications parameter is incorrect.
Please note that various other menu choices have no effect on files which are sent to an HP plotter from PlotView using the Export File to Plotter mode. This mode simply exports the original file, exactly as captured by PlotView; choices of paper size, font, color, etc., are not relevant.
Opens a small window on the top of the screen to display the input data stream, which may be coming from either a file, the modem port, or from the keyboard (in the latter case, the window is opened automatically when Plot from Keyboard is selected, so that use of Display Input Stream is not necessary). Three special, non-printing characters are displayed in inverse video mode (white on black) to highlight their special character. The character "ETX", which is used to terminate alphanumeric strings, is displayed as ETX, the Escape character is displayed as ESC, and the Backspace character is displayed as BS.
The display window is normally made just large enough to display two lines of input. If desired, the window can be moved and resized in the usual fashion. After being moved or resized, the display window will undoubtedly obscure some portion of the "paper." Although this may interfere with your ability to monitor the plot as it is being drawn, it does not interfere with the actual plot itself. After the input is finished, you will be able to close the display window and redisplay the plot so that the entire plot is visible. Even if you should not close the display window, a plot which is then saved to the Clipboard will still be saved correctly.
To terminate the input stream display, either click in the close box of the Output window, or select Display Input Stream from the menu a second time. Note that input stream display mode can be toggled on and off during a plot; that is, you can start or stop the display at any time, not just before or after a plot is in progress.
Requests the name of a file into which the input data stream will be saved. Save Input Stream saves data which is input either from the modem port in Plot Input mode or from the keyboard in Plot From Keyboard mode; in Plot File mode it is ignored.
Save Input Stream does not terminate when a plot is finished, whether the plot finishes due to receipt of a "page" command or an Abort from the user. This allows multiple successive plots to be saved into a single file for later use, either for replotting with PlotView or for retransmission to an HP plotter. To close the file which has been opened with Save Input Stream, either select Save Input Stream a second time (which will remove the checkmark from the menu item to show it is no longer active), or exit from PlotView with the Quit command.
Note that Save Input Stream mode can be toggled on and off during a plot, that is, you can start or stop the saving to file at any time, not just before or after a plot is in progress.
If the disk becomes full during the process of saving the input stream, a "beep" will sound, and PlotView will automatically disable the Save Input Stream mode.
Aborts any "plotting" which is in progress, whether plotting from a file, RS-232, or keyboard, or outputting a plot to an HP plotter. The Abort menu key will only be active when one of these actions is in progress, and can be selected at any time.
In some cases, Abort is required to terminate a plot. In Plot Input mode, if the remote computer does not send a "page" command, PlotView assumes that more input will be coming and continues to wait for further commands. Similarly, Plot from Keyboard mode can either be terminated by entering a "page" command from the keyboard, or by using Abort.
Abort does not destroy a plot in progress, it merely terminates it prematurely. Thus the plot which has drawn up to the moment of the Abort command will be intact, and can be saved to Clipboard, printed, etc.
A wide variety of settings may be made within PlotView: the number of pen "colors" to use; the exact mapping of different screen colors to different pens; whether or not to draw paper, group lines, ignore page commands, use the full screen, or use high resolution mode; the paper size, the choice of font and size, the ownership of PICT files created by PlotView, and the various communications settings. All of the current settings can be saved at any time by selecting Save Settings.
Settings are saved to a file named PlotViewô Prefs in the Preferences Folder in your System Folder. This file is a text file you can read if you're interested. Only one set of settings can be saved in this way; no provision is made to save different sets of preferred settings (although you could do so by making a duplicate copy of PlotView by a different name or in a different folder).
Exits from PlotView, closing any open files and also closing the communications port (if open).
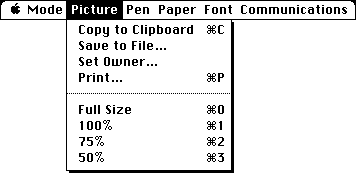
Copies the current "plot" or picture to the Macintosh Clipboard for subsequent pasting into other programs or into the Scrapbook. The size of the plot which is saved to the Clipboard is affected by the current size of the plot on the screen, which is controlled by the three menu choices described below.
Saves the current "plot" or picture into a file, after first requesting a filename. The size of the plot which is saved is affected by the current size of the plot on the screen, which is controlled by the menu choices described below. The plot is saved in the object-oriented standard Macintosh PICT format, which can be read directly by numerous graphics and page layout programs.
Please note that Save to File does not have a keyboard equivalent,
and that ![]() S
is the keyboard equivalent which toggles on and off the Save Input Stream mode. The
rationale behind this is that one wants the ability to rapidly activate the Save
Input Stream mode, and furthermore that the Save to File command will be used less
extensively (compared to Copy to Clipboard and also compared to Save Input Stream).
S
is the keyboard equivalent which toggles on and off the Save Input Stream mode. The
rationale behind this is that one wants the ability to rapidly activate the Save
Input Stream mode, and furthermore that the Save to File command will be used less
extensively (compared to Copy to Clipboard and also compared to Save Input Stream).
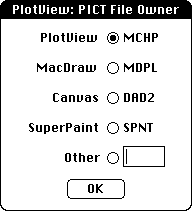
Before saving a screen picture as a PICT file from PlotView, Set Owner allows you to set the "ownership" of the file which is created. The "owner" of a file on a Macintosh is the application (program) which opens when you double-click on the file. Set Owner, which only becomes active when a picture is present, brings up a dialog box (Figure 3) in which you can set the owner of the files to be PlotView itself or to the most popular drawing programs: MacDraw, SuperPaint, and Canvas. A fifth choice allows you to set the ownership to any other program, if you know the four-letter "signature" of the program. Select which program will be the owner of the PICT file by clicking on the appropriate radio button (and typing in the signature in the "Other" case).
Prints the currently active plot to the currently selected printer (ImageWriter, LaserWriter, or StyleWriter). A standard Page Setup Dialog box first appears, followed by a standard Print Dialog box. Output can be produced in the portrait or landscape mode by selecting the appropriate Orientation in the Page Setup Dialog box; other user selections in the two dialogs (including number of copies, percent reduction, etc.) are ignored. If the picture is displayed full size (100%), the output is automatically scaled to use as much of the page as possible while maintaining the correct aspect ratio.
If you interpret the plot in High Resolution mode, the "real" plot is four times bigger than the page. When the Page Setup configuration screen appears, enter 25% into the "Reduce or Enlarge" field, and the printed output will exhibit the highest possible resolution.
Selecting Cancel in either the Page Setup Dialog or the Print Dialog will cancel
the plot before it begins. Once a plot is in progress, it can be aborted using the
Command-Period (![]() .) function.
.) function.
These menu choices affect the size of the plot which is displayed on the screen, and which will subsequently be copied to the Clipboard or saved to a file. Full Size (which is only active in high resolution mode) and 100% appear identical on the screen, but Full Size selects the high resolution data which occupies (approximately) four pages.
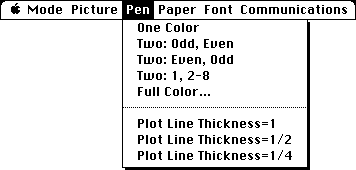
Pen settings can be changed at any time, but, the change only takes effect at the time of the next pen selection command. In other words, if a plot is in progress, changing the pen selection will affect future pen commands, but will not change the "pen" which is in use. Furthermore, the pen setting has no effect on a plot which has already been created.
Uses a single "pen" color, black, to represent all pens on the HP plotter.
Uses two colors, black and gray, to represent pens on the HP plotter. Odd-numbered pens (1, 3, 5, 7) are represented by black, while even-numbered pens are represented by gray.
Uses two colors, black and gray, to represent pens on the HP plotter. Even-numbered pens (2, 4, 6, 8) are represented by black, while odd-numbered pens are represented by gray.
Uses two colors, black and gray, to represent pens on the HP plotter. Pen #1 is represented by black, while pens #28 are represented by gray.
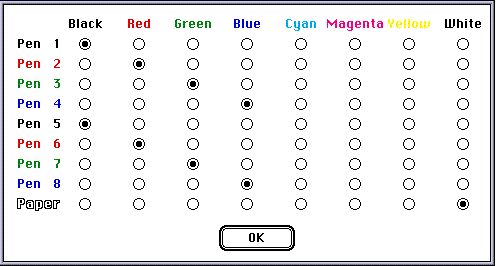
PlotView can create pictures with a maximum of eight colors. Each pen (up to eight, the maximum number supported by most HP plotters) and the "paper" can be mapped to a selected color using the Full Color choice.
Selecting Full Color will result in the display of a series of buttons as shown in Figure 4. Select one choice for each pen and for the paper, then click on the "OK" button to record your choices (you'll probably want to make use of Save Settings to save these choices).
Pen "width" is an issue depending on what you are doing with the output. PICT resolution, which is screen resolution, is 72 dpi, so that the narrowest line that can be drawn on the screen is 1/72nd of an inch. For many purposes, this will produce a line which appears thick and "crude" when printed on printers which typically have 300 or 600 dpi resolution. The three choices available here let you select pen "widths" of 1, 1/2 or 1/4 thickness. This setting has no effect on what will appear on the screen, but when you print (to a PostScript printer only), the lines will become narrower the smaller the Plot Line Thickness you have selected.

PlotView will by default draw a piece of "paper" around each plot, which will provide you with a more attractive plot for inclusion in your reports. If you wish to suppress this paper, uncheck the Draw Paper selection.
PlotView allows you to automatically "group" continuously drawn lines (lines drawn without lifting the "pen"), as well as to group the entire picture into a single "object." Both line grouping and the overall grouping make it easier for you to manipulate pictures created by PlotView when you move them into other software (e.g., MacDraw). Some printers, however, have trouble with continuously drawn multisegment lines which exceed a certain (indeterminate) number of segments, and will produce PostScript errors when attempting to print the plots. If you encounter this problem, you should re-interpret the plots with "Group Lines" turned off; this should eliminate the problem.
By default PlotView terminates each plot when it receives an HP-GL "page"
command (usually PG, but also AF or AH). If you wish to concatenate several plots,
this can be done by checking the Ignore Page Commands selection. Termination of a
plot will now have to be accomplished in different ways depending on the source of
the plot. In Plot File mode, the plot will still terminate at the end of the file.
In Plot Input or Plot From Keyboard modes, you will have to terminate the plot manually
using Abort (![]() A).
A).
PlotView normally attempts to use the full display screen which is available to it when producing its "plot." If you are going to paste the subsequent picture into MacWrite or similar programs which have a maximum width of a single "page," this may cause problems. If Use Full Screen is unchecked, the plot is displayed in a "standard size" Macintosh window, even though a larger monitor is present.
In standard operation, PlotView draws the "plot" to the screen while it is being interpreted. In High Resolution Mode, the interpretation is performed onto a hidden "canvas," and only the "wristwatch" cursor is visible; the plot appears when the process of interpretation is finished.
In High Resolution Mode, the "actual" plot occupies an area approximately four times larger than the screen. This high resolution copy is used for printing, and, if Full Size is selected in the Picture Menu, will be saved to a file or transferred to other programs via the Clipboard.
The actual multiplier (how much bigger the high resolution plot is compared to a single page), which is four by default, can be modified if for some reason this proves desirable in your application. This cannot be done within PlotView itself, but instead is done by modifying the preferences file PlotViewô Prefs in the Preferences Folder in your System Folder. In this file you will find a section that looks like this:
[Paper Menu]
...
Multiplier=4
The multiplier can be changed from any number from 2 to 32; larger numbers produce a larger High Resolution plot. The preferences file is only read when the application is started, so if you modify the file, do so when PlotView is not running.
Input to PlotView, whether it comes from a text file or directly from the modem port, will have been generated by another computer program. That computer program will have known, or assumed, a certain paper size of the "plotter" for which it thought it was generating its output. In order for the screen picture produced by PlotView to retain the same aspect ratio as in the original drawing, it is essential that the "paper size" be set before a plot is interpreted. Selecting the proper "paper size" will close and then re-open the PlotView output window, making sure its aspect ratio matches that of the selected paper. If Use Full Screen is checked at the time that the paper size is selected, this window will occupy the largest possible area of the display screen; if Use Full Screen is unchecked, the display is confined to a standard Macintosh screen size.
Note that checking the paper size has no effect on files which are sent to an HP plotter from PlotView using the Export File to Plotter mode. This mode simply exports the original file, exactly as captured by PlotView, and does not modify it based on the selected paper size or any other menu selections.
Paper size cannot be changed while a plot is in progress.
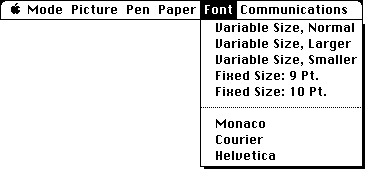
In its default Variable Size mode, PlotView adjusts the size of text on the screen in response to the incoming HP-GL commands. In some cases, this will produce extremely small characters. If you wish, you may fix the character size at 9 or 10 point. If you do, however, your characters will take up a different amount of space than they are expected to, and may overlap parts of the plot or other characters, or cause other difficulties (because the "pen" will not be where it is expected to be). If any difficulties are encountered in Fixed Size mode, revert to Variable Size.
Within the Variable Size, you have three options. "Normal" tries to adjust the font sizes on the screen to be the same, proportionally, as they would be on paper. But since this can never be an exact match, you have two other options - "larger" and "smaller." You can try all three to see which gives the most satisfying font rendering for your particular application.
The Font Menu only affects characters which are sent to the HP plotter as text. Some plotting programs actually draw out the characters as vectors; in this case, as far as the HPGL and PlotView are concerned, this part of the plot isn't text at all, but just a bunch of lines which happen to resemble text. No changes in the Font Menu will affect these "characters."
Up to three fonts are provided for use in representing text. Monaco is a monospaced, sans-serif font most suitable for use on an ImageWriter. Courier and Helvetica are optimized for the LaserWriter. Courier is a monospaced font with serifs, while Helvetica is a proportionally spaced, sans-serif font. If Courier is present in your System file, PlotView assumes you have a LaserWriter and defaults to Courier font, however, you may choose one of the others if you wish. If your System file does not have Courier, PlotView assumes you have only an ImageWriter, and automatically uses Monaco font; in this case, these three font choices will not appear in the Font Menu.

Communications settings can be changed at any time when using PlotView.
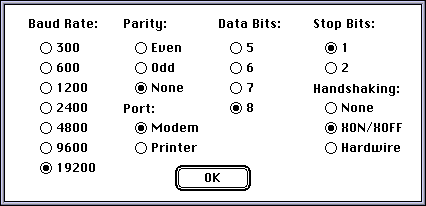
Uses standard settings for the RS-232 communications channel, that is, those that are typically used in communications to Hewlett-Packard plotters. These settings are a baud rate of 9600, no parity, 8 data bits, 1 stop bit, modem port, and XON/XOFF handshaking.
Allows selection of communications settings other than the standard ones, using a series of buttons shown in Figure 5. Baud rates from 300 to 19200 can be selected, parities of even, odd, or none, 5, 6, 7, or 8 data bits, 1 or 2 stop bits, modem or printer port, and three handshaking modes: None (software), XON/XOFF, and Hardwire. Click on the ìOKî button when you have selected the desired settings.
Copyright 1988-1997 by Stevens Creek Software
All Rights Reserved