
On Hand
User Manual

On Hand is used to collect information about items in an inventory, although it can also be used for some specialized functions like "pick and pack" and restocking operations. Each item in the database contains either a name, a barcode, or both. In addition to those, it will also allow you to add a note, set the quantity, and will maintain a record of the time the item was first added to the database and the last time it was modified. Finally, all items except for the name and barcode can have separate values for multiple locations. Thus you can perform inventory in five stores and keep separate track of the quantity at each (along with the possibility of a separate note for each and separate creation/modification dates).
Items can be added to the software directly, either directly or by barcode scanning, or they can be loaded into the software from a file on an SD card. Once data are collected, it can be saved back to the SD card as a simple text file. See the Input and Output sections below for details on the file format, which is a very flexible, user-configurable format.
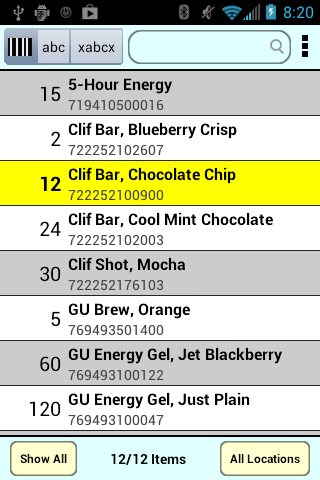
The main screen. On top, from left, are the three methods of searching the database, the search bar, and the menu button. Below that are the items, sorted in a user-specified order, and displaying information in a format which is also user-specifiable. On the bottom, options to control what items are displayed based on quantity, and what quantities are displayed based on the specific location of the item.
Quantities of each item can be changed in four ways. You can scan a barcode, which will typically increment the quantity by one (although it can be set to decrement the quantity as well, for packing operations). You can tap on the item on the screen one or multiple times to increment the count by one or more (if the item is not already selected — indicated by a yellow highlight — the first tap selects it, and the second and subsequent taps change the quantity). The third way, useful in some special cases, is to scan a 1-4 digit number, which the software will interpret as a quantity (e.g., scan a barcode that reads "100" and the quantity of the currently selected item is incremented by 100). And finally, to make large changes in the quantity, tap on the quantity itself (on the left side of the item). This will display a "calculator" which allows you to enter a number. You can then add or subtract that number from the current quantity, or use an equals sign to set the quantity to that number. Remember, no matter which method you use, you will be changing the quantity at one particular location. If you are just doing inventory at a single location, you can ignore this feature, leave the location (lower-right button on the screen) set to "All Locations," and there will only be a single quantity for each item.
Quantities are typically integers but they are not restricted; using the "calculator" method of changing the quantity, you can set the quantity to a fractional value if you choose.
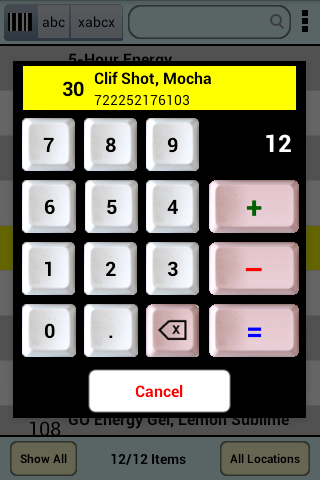
Tap a quantity to display the calculator and change the quantity by large numbers.
The software lets you track inventory at just one location, or at multiple locations. To use the multi-location feature, set the current location using the button at the lower-right (which reads All Locations when no specific location is set), adding new locations as appropriate. You can also set the current location (and add a new location, if it doesn't already exist) by scanning a barcode which starts with the characters LOC- or LOC_. Those characters are stripped out of the barcode, so, e.g., if you scan a barcode reading LOC_STOREROOM, the location is set to "STOREROOM".
To facilitate manual operation (without a barcode scanner), there is a search feature at the top of the screen which allows you to search by barcode, by the start of the name (indicated by "abc"), or by one or more characters found anywhere in the name (indicated by "xabcx").
Barcode scanning is accomplished using a Bluetooth barcode scanner. Any Bluetooth barcode scanner capable of working in "HID" (Human Interface Device) mode (a mode in which the scanner effectively acts like a Bluetooth keyboard, passing characters to the software), which includes virtually all Bluetooth barcode scanners, will work. Consult the manual of the scanner for information on how to make sure it is in "HID" mode, and for information on how to "pair" the scanner with your Android device.
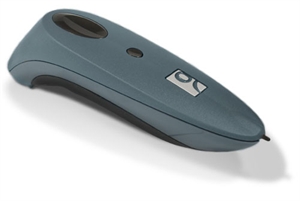
Typical Bluetooth scanner (Socket CHS 7c)
To access the menus for the software, tap the "overflow" indicator. There are a large number of ways in which you can customize the functioning of the software, which are found under Settings. When you select Settings, you'll see three groups of settings:
- Scanning
- Scan Action: There are three possibilities for an action when you scan a barcode which is in your existing database:
- Increment Count: Find the item in the database, highlight it, and increment its count
- Find Only: Find the item in the database and highlight it, but don't change its count
- Decrement Count: Find the item in the database, highlight it, and decrement its count
- Unknown Codes: If you scan a barcode which is not in your existing database, there are three possible actions:
- Add to List: Add the item to the list and set its count to one
- Add and Edit: Add the item to the list, set its count to one, and bring up the "Item Editor" screen to allow you to enter a name and note for the item.
- Ignore: Do not add the item to the list.
- Search Database: If this box is checked, when you scan a barcode, the software searches the database to see if the item already exists; if it does, the Scan Action above is performed; if it doesn't, the Unknown Codes action above is performed. If this box is unchecked, then any scanned barcode is simply added to the database, even if that same barcode already exists in the database. This is appropriate if you want to have duplicate barcodes, or if you are simply collecting a series of barcodes and don't need the software to waste time searching the database everytime you perform a scan.
- Number Scan: With this box checked, if you scan a barcode which contains four or fewer digits, and each of them is a number (that is, a barcode between 0000 and 9999), the software will interpret this as a number and increase the count of the highlighted item in the database by that amount.
- Play Sounds: If this box is checked, the software will "ding" when it matches a barcode you scan with something in your database, and "buzz" if it doesn't match and you have Unknown Codes set to Ignore. It will also play appropriate sounds when files are input and output.
- Modifying the Scanned Barcode: There are several settings which let you modify the scanned barcode in various ways before it is used by the software. These are:
- Scan Check Digit: With this box checked, when you scan a barcode the entire barcode will be read. If unchecked, the check digit (the final digit) will be removed.
- Convert Bookland->ISBN: Barcodes on books are typically Bookland codes, containing 13 digits. If you want to collect the ISBN information (a 10-digit number derived from the full barcode), check this box.
- Filter Barcode: This setting, together with the Filter Start and Filter End values, lets you specify exactly which characters of the "scanned" barcode are used by the software. Filter Start should be self-explanatory. If it is 3, for example, the first two digits or characters of the barcode are ignored by the software, and the "effectively scanned" code starts with the third digit or character (note for the programmers among you - the index starts at the typical "human" index of 1, not the "programmer's index of 0).. Filter End is a little trickier, because it can be positive or negative. If it is positive, you count from the start of the barcode, so a value of 6, for example, will cut off any characters after the sixth one. If it is negative, you count from the end of the barcode, so a value of -2 will cut off the final two digits of the scanned value. A subtle but critical modification to this description is that the filtering always occurs after any action specified on the check digit with the Scan Check Digit setting. So if Scan Check Digit is OFF, Filter Barcode is ON, and Filter End is -1, the final digit will be removed, just as if Scan Check Digit were ON and Filter Barcode were OFF. But if both Scan Check Digit and Filter Barcode are ON, then Scan Check Digit will remove the final digit and Filter End=-1 will remove the next digit from the end. Some examples, given a barcode that reads 012345678905:
Scan Check DigitFilter BarcodeFilter StartFilter EndResultON OFF n.a. n.a. 012345678905 OFF OFF n.a. n.a. 01234567890 ON ON 0 -1 01234567890 ON ON 0 11 01234567890 ON ON 1 8 12345678 ON ON 3 -3 45678 OFF ON 0 -1 0123456789 OFF ON 0 11 01234567890 OFF ON 1 8 12345678 OFF ON 3 -3 4567
- Scan Action: There are three possibilities for an action when you scan a barcode which is in your existing database:
- Display
- Sort Order: There are four ways you can sort the items in your database:
- By Barcode (alphanumeric):
- By Barcode (numeric): Alphanumeric and numeric sorting are identical if all your barcodes have identical lengths and they only contain numbers. If they are different lengths, however, "9999" will sort before "10000" if you sort numerically, but after "10000" if you sort alphanumerically.
- By Name: self-explanatory
- By Original Order: This order puts the items in the order in which they were added to the database. This can be useful if you want to perform an inventory manually (i.e., without scanning) and you have the items in the database in the same order in which they appear on the shelves, and thus you can just walk down the shelf ticking off items as you go down the list on the screen. This is also an appropriate order if you are simply collecting a series of barcodes; this way, each new barcode will appear at the bottom of the list, rather than being sorted somewhere into the middle of the list.
- Display: You have a variety of ways to configure what is displayed on the screen, either using one or two lines for each item:
- Barcode Only
- Name Only
- Barcode, Name
- Name, Barcode
- Name, Note
- Show Quantity: With this box unchecked, the display of the quantity is removed. This is appropriate when all your quantities are one (e.g., you are just collecting barcodes) and have no need to see a bunch of "1's" on the screen.
- Default Barcode: This comes into play when you use the search feature of the software. If you are dealing with assorted barcodes, it won't be relevant, and you should leave it blank. But if all your products are made by one company, that generally means the first digits — as many as 9 out of the 12 UPC-A digits — will be the same. Rather than requiring you to enter each of these digits in the search box before you get to the "interesting" digits, you put the "constant" digits into the Default Barcode setting. Now when you tap the search box, those digits are automaticallly filled in. If you want to search for something else, however, you can simply erase them.
- Sort Order: There are four ways you can sort the items in your database:
Four other items in the main menu are fairly straightforward:
- Add Item - Displays a screen allowing you to enter a name, barcode, and note for a new item which will be added to the database. To modify or delete a specific item already in the database, perform a "long press" (hold your finger down on the item), and then choose either "Edit" or "Delete" from the popup item which appears.
- Zero All Quantities - If the location is set to a specific location, this item will zero all the quantities at just that location; if the location is "All Locations," quantities at all locations will be set to zero. You will be given a chance to confirm that you really want to do this, because this action is not reversible.
- Delete All Items - All items in the database are eliminated. You will be given a chance to confirm that you really want to do this, because this action is not reversible.
- User Manual - Displays this user manual and, if you haven't already done so, gives you an opportunity to register the software with Stevens Creek Software. Google does not provide us with any information about you, and registering (which involves only your name and email address) allows us to keep informed about new developments in the software. Rest assured this information will never be shared with anyone else, nor used for any other purpose. You can read our privacy policies here.
Input
Tapping on Settings and then on Input/Output will give you a variety of options for input and out. For Input, the two relevant ones are:
- Use Dropbox - if checked, you'll be asked (once) to give Dropbox permission to allow access by your app. For more about setting up a free Dropbox account, read the Appendix.
- Input Method - There are three methods available to input files of information into the software; select the one which you prefer
- SD Card - files must be put into an On Hand folder (which you need to create) at the "top level" of the SD Card
- Dropbox - In your Dropbox folder (which may be on your desktop, or only on the Dropbox website), you will find a top-level folder called Apps, and in that folder a sub-folder entitled On Hand BT (the name of our iPhone app; the Android app uses the same folder, which actually allows you to share files between the two versions of the software).
- http - Use this to read files from a publicly-accessible site on the Internet. This method requires two additional settings in the Input section:
- URL - the URL of the web site, e.g., www.stevenscreek.com
- Directory - the specific directory from which you want to read files. For example, enter android/On Hand Test (note that spaces are allowed) and you will have access to a test folder in which you can find two files, Stock.txt and StockWithQuantity.txt which have sample data you can read in for testing the software.
- ftp - if you want to use ftp (File Transfer Protocol) to read (and, under Output, write) files from a password-protected location on the Internet, you also need to scroll down to the FTP section of the Settings screen to enter four pieces of information:
- URL - the URL that hosts your ftp server, e.g., ftp.stevenscreek.com
- Directory - the specific directory at that server where the files will be found. This might be something like ftp/anon/On Hand if you are using an ftp subdirectory. If the file is in the main "www" directory of a website, it may actually be something like www/htdocs/On Hand. Details are very much configuration dependent.
- Username
- Password
Once your method is set, tapping Input will show you a list of files accessible in the appropriate location according to your chosen Input Method. You'll have a choice to either Replace current database with the data that you are reading in, or to Append to database.
Configuring the Input File
Configuration screens for the input and output files let you
specify exatly which items are included in the file, and in what order.
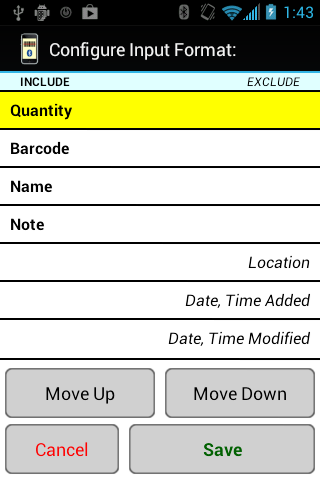
To transfer a file containing your inventory into the software, you'll need to create one or more text files. The format for those files is one item per line, but after that its format is under your control. Tap the Configure Input Format button on the Input screen, and you'll see a list of seven possible items - Quantity, Barcode, Name, Note, Location, Date,Time Added, and Date,Time Modified. There are also two column headers, one labelled "Include" and the other "Exclude". Items on the left (under "Include") are expected to be found on each line. If that item isn't something that is part of your file, tap on it, and it will move to the right under "Exclude" (and vice-versa). Finally, when an item is selected, you can also tap the Move Up or Move Down button to move that item up or down in the list. So for example, if you have a file that contains only a list of barcodes and names, set all the other items to "Exclude," and then, depending on whether your file contains barcode first and then name or vice-versa, make sure those two items appear in the proper order on the list.
The Location item needs more explanation. If you are doing a multi-location inventory (multiple stores, multiple warehouses, multiple floors, etc.), you may have want to download a file which contains the starting quantity for each different location. In this case, you will have multiple lines containing the same item (name, barcode), but a different quantity and different location on each line. This is actually most typically useful in uploading data (output), so we'll give a specific example in a minute.
If there are more than one item on each line (for example, barcode and name), the items can be separated by Tabs (the tab character), or by commas (a "CSV" or comma-separated values) file. Note that if you use commas, if the item itself (the name typically) contains a comma, then the item must also be surround by quotation marks, e.g., "Bread, White". This is standard for CSV files, and if you create this file by, for example, exporting it from an Excel spreadsheet, that's how it will appear. The software will automatically detect whether the items are separated by tabs or commas, so you don't need to tell it which it is.
The file must be a simple text file, not a Word file or an Excel file but a file composed of plain text. One subtle issue is the something called the "encoding" of the file (you can read about this in detail here). If your file contains "plain" characters using the standard Latin alphabet and standard punctuation, you don't need to worry about this. If, however, your file contains accented characters, "smart" punctuation (e.g., curly quotation marks, em-dashes), or is written using some other alphabet (Cyrllic, Chinese, Arabic, whatever), then the file must be "UTF-8" encoded. Again, read the linked chapter for more about this.
Once the file format is set, you won't need to change it until and unless you want to import a file using a different format. All you need to do is to tap on the file you want to import, and it will be read in.
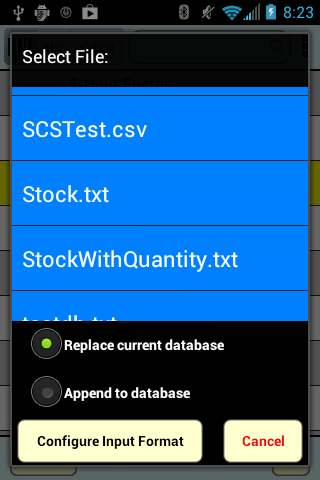
Selecting a file to import
If your Input Format asks for a larger number of items than are actually found on any given line in the input file, the missing values are set to default values. If the Input Format asks for fewer items than the software finds on any given line, the extra information in the input file is ignored. The only problem occurs if you attempt to read information in to an incorrect field. For example, if you set the Input Format to expect a quantity as the first item on a line, and it finds something which is not a quantity, an error will occur.
Here are some examples, where -> represents the Tab character:
Example 1: Barcode and Name are in the "Include" column (in that order), and all other items are in the "Exclude" column, and you have specified a Tab separator
Clif Bar, Chocolate Chip->722252100900
Clif Bar, Blueberry Crisp->722252102607
Clif Shot, Mocha->722252176103
5-Hour Energy->719410500016
Example 2: Barcode and Name are in the "Include" column (in that order), and all other items are in the "Exclude" column, and you have specified a Comma separator
"Clif Bar, Chocolate Chip",722252100900
"Clif Bar, Blueberry Crisp",722252102607
"Clif Shot, Mocha",722252176103
5-Hour Energy,719410500016
Note that in example 2, it would be acceptable to enclose "5-Hour Energy" in quotes, but fields which contain commas (like the first three lines) must be enclosed in quotes.
Output
As with Input, tap Configure Output Format to configure precisely which items will be included in the output file (see above for the description of how that works). Filename is the name of the file that will be output by the software. If you set Auto Filename to "On", the filename will be automatically generated, or you can leave that off and enter whatever filename you choose. Even with Auto Filename set to On, you can still override the name by entering a different name, although if you leave the File screen and then return to it, the automatically generated filename will reappear.
There are several options for the output:
- What location(s) to output: If "All Locations" is set as the location on the main screen, you will only be given the choice to upload data from all locations. If a particular location, say "Storeroom," is selected on the main screen, then on the Output screen you will see two options, one reading All Locations, and the other reading "Storeroom Only."
- What quantities to output: Here your two choices are All Quantities and >0 only.
- Output only modified data: The software constantly keeps track if the quantity of a particular item has been changed, and if so, the precise date and time of that change. When you output data, the "modified" status is reset. So checking Modified Items Only will include in the output file only those items modified since the last time you output the data. Note that this is location specific. This means that if you output data from one location, the "modified" status of other locations will not be reset until those locations too are output.
A number of settings affect the output file. On the Settings screen, you'll find these in the Output section:
- Output Method: The software can save data to the SD card, send it via email, output to Dropbox, or upload it to a website via ftp (file transfer protocol). If you choose ftp, you'll need to set various parameters in the FTP section of the settings, as described above in the Input section.
- Email To: If you are outputting data via email, you can fill in the address you want the email sent to if you fill this in.
- Sort by Location: If you output data for all locations at the same time (and assuming that you have data for more than one location), the standard is that the data are found in the output file in the same way they appear on the screen, with the details of that item at each location appearing successively before the next item. Checking Sort by Location will output all the quantities at one location, then all the quantities at the next location, etc.
- Auto-Filename: Checking this will automatically generate a filename for the output. You can still override the name by erasing it and entering a different name.
- Date/Time Format: Internally, the software always keeps track of the creation date and most recent modification date for each item to the nearest second. When you output the data, however, you have the choice between two formats — date only, or date and time (with the time only shown as hours and minutes, not including the seconds).
- Field Separator: When you output the information, it is output as a text file with the various pieces of information about each item (quantity, barcode, name, etc.) separated either by tabs or by commas ("CSV" or "comma-separated values"). For most purposes, either will work fine; for example, either format can be easily imported into spreadsheet software.
- Line Ending: Each line of the output can be terminated with a character or characters which is most appropriate for the type of computer or platform on which the output data will be used. If you will be reading the data on a Unix or Android platform, terminate each line with a "line feed" (LF). For Macintosh or iOS, a CR ("carriage return") is appropriate, and if the data are destined for a Windows system, use CRLF ("carriage return, line feed"). All of these terms date from the use of typewriters, and are completely anachronistic in the age of computers, but are nonetheless still relevant.
As noted above under Input, all files output by the software will be "UTF-8 encoded" (read more about that in the Appendix). Files which contain only "plain" characters (simple letters and numbers and basic punctuation) will be identical to "ASCII" files and you will have no problem reading them with any software. Files which contain "special" characters (accented characters, characters in non-Roman alphabets, "smart" punctuation) will require that you read them with software capable of reading UTF-8 files. Again, consult the Appendix for details.
Special Operations
Shipping ("Pick and Pack")
Here's how to use the software to help in packing orders for shipment:
1. Prepare a file containing the items (barcodes, names, and quantities) to be shipped. This file can contain information about multiple orders (using customer name, Order#, or other identifying information). For one order, the file might look like this (as above, -> represents the Tab character):
12->Clif Bar, Chocolate Chip->722252100900
24->Clif Bar, Blueberry Crisp->722252102607
12->Clif Shot, Mocha->722252176103
40->5-Hour Energy->719410500016
To put two orders in the same file, you'll need to add the Order# (or customer ID or whatever), like this, where 72567 and 72568 represent two orders for two customers:
12->Clif Bar, Chocolate Chip->722252100900->72567
24->Clif Bar, Blueberry Crisp->722252102607->72567
12->Clif Shot, Mocha->722252176103->72567
40->5-Hour Energy->719410500016->72567
36->Clif Bar, Chocolate Chip->722252100900->72567
36->Clif Bar, Blueberry Crisp->722252102607->72567
48->Clif Shot, Mocha->722252176103->72567
20->5-Hour Energy->719410500016->72567
2. On the Input screen, set the "Include" column to include the appropriate items in the appropriate order – Quantity, Name, and Barcode in the first example, and Quantity, Name, Barcode, and Location in the second (remember, "Location" is just a way to identify a subset of items – it can be an actual location, or it can be something else, like a customer or order# in this case). Input the file.
3. On the Settings screen, in the Scanning section, make sure Scan Action is set to Decrement Count.
4. In On Hand, set the display mode on the lower-left of the screen to >0.
5. Set the location to the first order (72567 in this example), either by selecting it from a list of existing locations, creating it as a new "location," or scanning a CODE128 barcode reading LOC_72567.
6. The screen should display a list of the items and quantities needed for the first order. As each item is packed, scan it and the count will decrement. When the appropriate number of items has been packed, the count will reach zero and the item will disappear from the screen. When all items have disappeared from the screen, the order is complete.
7. Repeat steps 5 and 6 for each order in succession.
Restocking
Here's how to use the software to help in creating restocking orders:
1. Prepare a files containing the items which should be stocked, along with their appropriate stocking levels, for one or more customers. Those files will look identical to the examples above in the Shipping section.
2. On the Input screen, set the "Include" column to include the appropriate items in the appropriate order – Quantity, Name, and Barcode in the first example, and Quantity, Name, Barcode, and Location in the second (remember, "Location" is just a way to identify a subset of items – it can be an actual location, or it can be something else, like a customer or order# in this case). Input the file.
3. On the Settings screen, in the Scanning section, make sure Scan Action is set to Decrement Count.
4. Set the location to the first order (72567 in this example), either by selecting it from a list of existing locations, creating it as a new "location," or scanning a CODE128 barcode reading LOC_72567.
5. The screen should display a list of the items and quantities which represent how many of each item should be on the shelf. Scan an item, and then continue to scan (or tap the screen) to decrement the count, one for each item on hand. Since the number started at the desired number, the number that remains will be number that needs to be reordered to bring the stock level up to the desired level. If an item does not appear on the shelves at all, that's fine. You won't be able to scan it, and the number will remain as it is in the file, that is, the restocking amount.
6. Repeat steps 5 and 6 for each order in succession.
7. Output the file, which will now contain exactly the quantities of each item to be reordered to bring the stock levels up to the desired amount.
On Hand © 1999-2013
Version 1.0 for Android
Stevens Creek Software
www.stevenscreek.com