Birdwatcher's Diary™ for iPhone
from Stevens Creek Software
Latest released version: 2.0.2
Go to the iTunes store to purchase a copy of the software
Version history and known problems
Birdwatcher's Diary™ from Stevens Creek Software is the perfect birdwatcher's field companion. In seconds, you can make a note of birds you see or hear, including time and exact location (both automatically recorded), and additional field notes if you wish. Later, you can review the sightings, save them on your iPhone or iPod/Touch for later reference, and upload the recorded information to desktop software or online databases like eBird. Birdwatcher's Diary™ is designed to be useful for your "big day" efforts, Christmas Bird Counts, and for your everyday birding outings alike. This manual will introduce you to the features of the software, which include:
Registering your copy of the software
When you use the software for the first time, you are asked to register the software with us. Doing so entitles you to technical support on the software, and will help us keep you posted about updates to the software, and also provide an opportunity for you to suggest future enhancements of the software. We hope you will take the time to do that so we can best support you (we get no information about our customers from Apple, so if you don't register, we have no way of knowing who you are). If you don't do so the first time you run the software, you can always register later by tapping the "i" (information) icon on the upper-right of the Input/Output screen.
This manual explains all the features of the software in complete detail. If you want to get started quickly, just to get a feel for things, you may wish to jump now to the Quick Start section at the end, and then return here later to learn about the software more completely.
Configuring the software
Some aspects of Birdwatcher's Diary, ones you aren't likely to need to change very often, are configured in the iPhone (or iPod/Touch or iPad) Settings application. We'll discuss each of these settings in the course of this manual. When you see the name of a parameter in this manual shown in Bold Italics, you'll know it's a parameter that you set with the Settings application.
The Main Screen
The main screen that you see when you open the software, looks like this:
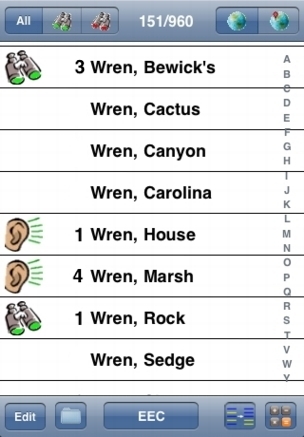
The central part of the screen displays a scrolling view of the birds in your list (we'll discuss how a list is installed later in the manual). The left-most part of each line is the key to the sighting. A binoculars icon indicates you have seen the bird on this trip. An ear shows you heard the bird, and, obviously, no icon at all is a bird you have not seen or heard. The numbers shown (in this example) are all 0 or 1. On some bird trips ("Big Day" birdathons, for example), numbers aren't actually of interest, but simply whether you've seen or heard the bird. To turn off the display of the numbers (and make a little more room for the names of the birds), set Show Quantity to Off (remember, the fact that Show Quantity is in Bold Italics means that you do so in the iPhone Settings app). On other occasions, like Christmas Bird Counts, the quantities are essential, so you'll want Show Quantity set to On in those cases.
To "tick" a bird, just tap the name of the bird. If you are counting birds, repeated ticks will increment the count, one for each tap (in a minute we'll discuss how to increment the count by a large number). On your first tap, the software assumes you have seen the bird and displays the "seen" icon (the binoculars) next to it. If you actually only heard the bird, you have three seconds to tap on the binoculars which appear (not on the name of the bird) to change it to the "heard" icon (the ear). If you do see the bird later on, tap on the ear to access the Edit Sighting screen (discussed below) to change it back to a "seen" bird.
Another configuration option, Display, determines what is displayed on each line. The screen above shows the simplest display, with only the Name of the bird in each frame. There are two other options. Name, Note uses two lines to display not only the name of the bird but also a note you have entered about the bird. This might be a reminder to yourself about the song ("Rosita, rosita, roseet"), a helpful visual ID reminder ("spectacles"), or anything else you have added. The third option, shown in the next screen, is Name, Time, Location. Here, we see that of the four birds ticked so far on this trip, Bewick's Wren was seen at "GRWCP" (more on locations later) at 9:17 am, House Wren heard at MMR at 8:26 am, and so on (as will become obvious if not already, these were recorded during a "big day" birdathon on 4/17/10).
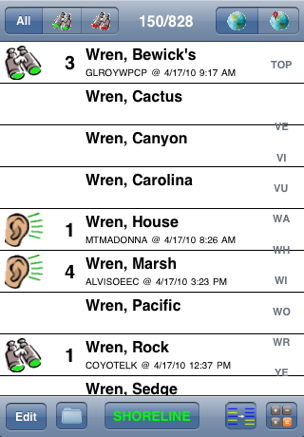
Down the right-hand side of the list is a standard iPhone feature, something we named "Intelliscroll™" when we began using it years ago in our PalmOS software. If you look at the first screen above, you'll see the letters go from A to Y (no Z because there aren't any birds on this list beginning with "Z"). That's the typical way you'll see things on the iPhone, for example, in the Contacts app. But Birdwatcher's Diary goes one step further with Enhanced Intelliscroll™, shown in the second picture. Here, we see what happens when we actually tap on the "W" in the first version. Instead of continuing to display the full A-Z (or A-Y) set of letters, Enhanced Intelliscroll expands the list to include two-letter combinations not only of the letter you tapped ("W"), but also the letter before ("V") and the letter after as well (but since there are no birds starting with "X", you don't see that). The purpose of this is two-fold. First, when you have the full A-Z display, it's common to "miss" and actually tap a letter one above or one below the one you really wanted. Enhanced Intelliscroll allows you to quickly recover from that "mistake" by simply tapping the letter you really wanted. And second, when you have a list of 960 items (here, the birds of North America taken from the list of the American Birding Association), tapping one letter still leaves you with as many as 50-60 birds, of which you're really only looking for one. Rather than scrolling through seven or eight screens to find the bird you want, tapping a two-letter combination will get you that much closer.
Which brings us to the question of sorting order. On the bottom right of the screen, this is the Sort icon: ![]() . If you tap it, a list will slide onto the screen giving you four options for sorting the list of birds: First Name, Last Name, Original Order and Time. The list in the screen shots above is ordered by Last Name. This ordering has its pros and cons. For scrolling, as we have just been discussing, a lot of birds start with "SW" (all the Swallows) or "WA" (all the warblers), or many other two-letter combinations. So even with the two-letter Enhanced Intelliscroll, you still may have to scroll through a few screens to find the bird you want. That's the con. The pro is that you don't have to remember that a "Dipper" is really an "American Dipper" or that a "Starling" is really a "European Starling"; you just have to think of the common one-word name of the bird in order to find it. If you're a bit more of an expert, though, you won't have any trouble thinking "American Dipper" or "European Starling," and in that case, you might want to simply sort by First Name. There are many birds with the same first name as well, of course ("American" this or "Black" that or "Lesser" something else), but the duplications aren't nearly as many as when sorted by Last Name. Use whatever works for you.
. If you tap it, a list will slide onto the screen giving you four options for sorting the list of birds: First Name, Last Name, Original Order and Time. The list in the screen shots above is ordered by Last Name. This ordering has its pros and cons. For scrolling, as we have just been discussing, a lot of birds start with "SW" (all the Swallows) or "WA" (all the warblers), or many other two-letter combinations. So even with the two-letter Enhanced Intelliscroll, you still may have to scroll through a few screens to find the bird you want. That's the con. The pro is that you don't have to remember that a "Dipper" is really an "American Dipper" or that a "Starling" is really a "European Starling"; you just have to think of the common one-word name of the bird in order to find it. If you're a bit more of an expert, though, you won't have any trouble thinking "American Dipper" or "European Starling," and in that case, you might want to simply sort by First Name. There are many birds with the same first name as well, of course ("American" this or "Black" that or "Lesser" something else), but the duplications aren't nearly as many as when sorted by Last Name. Use whatever works for you.
If you do choose Last Name sorting, there is one more subtlety. If you look in the index of some bird books, you'll find, e.g., Black-crowned Night-Heron listed under "N" and Western Scrub-Jay listed under "S"; in others, you'll find them listed under "H" and "J" respectively. Birdwatcher's Diary provides you with both options, using the Sort "–" as " " setting. If On, "Scrub-Jay" becomes two words and will sort as "J'; if Off, "Scrub-Jay" is treated as one word as sorted as "S".
The other two sorting options are really not optimal for while you're doing the ticking, but become appropriate when you want to review or output a list of the birds you've seen. Original Order shows the list in the order in which it was read into the software (again, details on that later). Typically, that list will be in Taxonomic Order, so Original Order will really be Taxonomic Order, but it isn't necessarily so. Time shows the birds in the order you've ticked them (with unticked birds at the bottom). This is useful if someone in your group has been keeping a written list of birds, and you want to compare your electronic list with their written list. You can, of course, quickly switch back and forth between the sorting methods.
The top line of the screen looks like this:
![]()
On the left are three grouped icons which determine what we display on the screen below. All shows us the complete list of birds, the "green-eyed binoculars" show only the birds we've seen or heard on the list, and the "red-eyed binoculars" show the birds we haven't seen or heard. This is particularly useful for "big-day" efforts towards the end of the day, when you want to review the birds you still "need."
In the center of the line are two numbers. The first (151 in this example) represents the number of birds recorded (or, if the "red-eyed binoculars" are highlighted, not recorded) on this trip at all the different locations you've visited, while the second (960 in this example) represents the total number of birds on the list. Your full master list does not have to include the entire list of North American (or British, Venezuelan, etc.) birds, it might just be a list of, say, 200 target birds you might possibly expect to see on a particular trip. Obviously, the fewer the birds on the full list, the easier it is to quickly find and tick them off. Once again, we'll discuss later in the manual how you install such lists into the software, but the key point here is that you are not limited to a single master list, but can use as many as you like to make your recording easier.
On the right-hand side of the top line are two planet icons, one plain, and one with a red "pin." When the first is highlighted, the list displays your sightings at all the locations you've visited on this trip. Highlighting the second shows only the sightings at the current location. Now the first number in the center of the line will show the number of sightings at that particular location.
The bottom line of the screen looks like this:
![]()
In the middle of this line is the most important item, a button showing the abbreviation of our current location ("EEC" in this example). Tapping on the button brings us to the Location screen, and allows to select the relevant location, or add a new one. This is an essential part of the operation of the software. Every time you move to a new location (that is, a new "named" location, not just a new position within the same park or preserve), you need to tap this button and change the location, so that sightings are properly recorded as belonging to that location.
Tapping the Edit button puts the master list into edit mode, and now you'll see this:
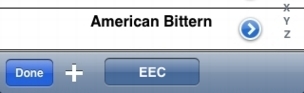
Now we have three options. Done puts us back into normal display mode. Tapping the + icon will allow us to add a new species onto our list, in case we started with a shorter list of target birds and suddenly have a vagrant on our hands. Tapping on the blue and white arrow (or, actually, anywhere in that particular rectangle) lets us view or modify the information about that species using the Edit Species screen that will be discussed below (this is not the information about a particular sighting of the bird, but just about the species itself).
The "Folder" icon takes us to the Input/Output screen, where we can read in a master list of birds and/or past sightings, and also output the data back to the desktop (more on this later).
We've discussed the Sort icon, and the final icon on the right end of the bottom line is the Calculator icon: ![]() . This icon only appears if, as in the screen shots pictured so far, you are displaying the number of each bird seen. When you are displaying numbers, each tap on the bird increments the count. But what if you are doing a Christmas Bird Count and a flock of 45 Cedar Waxwings flies overhead? You aren't going to tap the screen 45 times! Instead, you tap the bird first to select it (and increment its count by one), and then tap the Calculator icon and you'll see this:
. This icon only appears if, as in the screen shots pictured so far, you are displaying the number of each bird seen. When you are displaying numbers, each tap on the bird increments the count. But what if you are doing a Christmas Bird Count and a flock of 45 Cedar Waxwings flies overhead? You aren't going to tap the screen 45 times! Instead, you tap the bird first to select it (and increment its count by one), and then tap the Calculator icon and you'll see this:
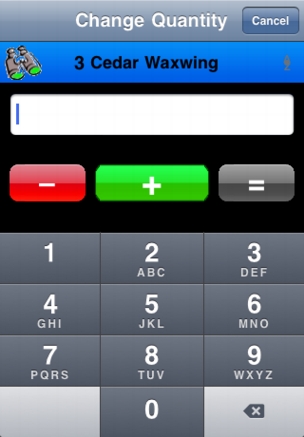
Now you use the screen like a typical calculator. Tap 4 then 5 then + and 45 will be added to the current count for that bird, and you'll return to the main screen showng 48 Cedar Waxwings. The minus (—) button is there if you make a mistake and want to subtract out a quantity, and the equals sign (=) is there if you simply want to set the number to a certain number. Maybe you had already counted two Canada Geese, and then suddenly you turn and you realize there are probably 125 total. You could do the mental math and add 123, and just enter 125 and then =. The result is the same.
The Bird (Species) Screen
As mentioned above, tapping Edit on the main screen allows you to then tap the name of a bird to modify the information about that species (not about a sighting of the species), or to tap the "plus" icon ![]() on the bottom line to add an additional species or "pseudo-species" (e.g., "Gull sp.") to your master list. You'll see this screen, either blank if you are adding a new species, or already filled in (with the top reading "Edit Species Info") if you are modifying an existing entry in the list:
on the bottom line to add an additional species or "pseudo-species" (e.g., "Gull sp.") to your master list. You'll see this screen, either blank if you are adding a new species, or already filled in (with the top reading "Edit Species Info") if you are modifying an existing entry in the list:
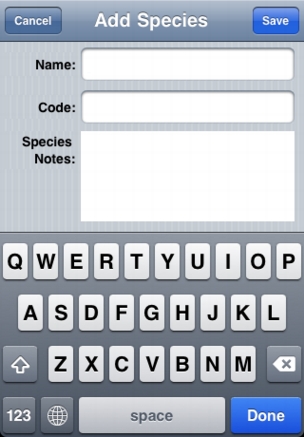
The Name of the species is just that. Do not enter it in "Last Name, First Name" order; if you typically sort in that mode, the software will take care of things for you. The only restriction in entering the name is that, if you do want to enter a generic name like "Gull sp." or "Dowitcher sp.", do so exactly like that, with a space and then the letters "sp" and a period (rather than, e.g., "Gull, sp." or "Gull (sp.)" or any other variation). This is because, when the software sorts the names in alphabetical order by last name, it knows to look for "sp." at the end and ignore it, so "Gull sp." will be sorted with the gulls and not with the sparrows.
The Code is a place for a code such as the common 4- or 6-letter codes in use for bird identification, or any other coding system you want to use. Birdwatcher's Diary does not actually use this information itself, but if you are exporting the data to other software which requires a code to properly read the information, then it will be essential.
Finally, Species Notes is a place for you to insert notes about the species which you'll find useful (notes about a particular sighting are entered on a different screen described below). As mentioned above, you might add notes about the bird's song or call, its appearance, its behavior, or anything else of interest (perhaps you're a photographer, and you want to add a note like "need photo" as a reminder). One display option allows you to show this information on the main screen. Your Species Notes can be as extensive as you like, but if you display them on the main screen, only a small space is provided. On the Species screen itself, however, the box you see pictured above is a scrolling box which accomodates as much text as you want to enter.
The Save and Cancel buttons are self-explanatory.
If you are modifying information about an existing species, you'll see at the bottom of the screen a button labeled Delete species from master list, which does just that after requiring confirmation. This might be of use if you want to prune out birds from a longer list that you are never likely to see, in order to make the software more responsive.
The Location Screen
The quickest way to get to the Location screen is to tap on the location button in the bottom center of the main screen. Alternatively, if you are in the mode where you are displaying sightings for the current location only, with the icon of the planet with the red pin highlighted ![]() then tapping on that icon again will also display the location screen:
then tapping on that icon again will also display the location screen:
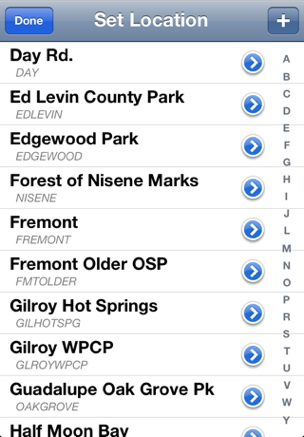
To select a location for your trip, just tap on the name of the location, using the alphabet key which appear down the right-side to scroll quickly to the location of interest if you have many of them. To modify the details of a location tap the "detail disclosure" icon (the white arrow in the blue circle) to the right of the name. To add a new location, tap the + button. When you do either of those things, you'll see this screen, titled either "New Location" or "Edit Location", as appropriate:
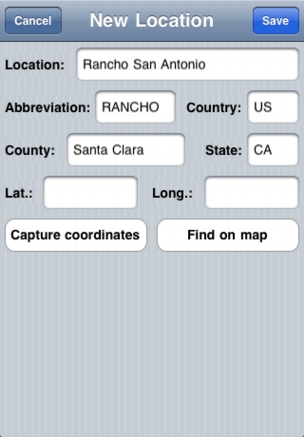
The Location name can be as long as you want. The Abbreviation is used on the bottom center of the main screen, which allows enough space for about 9 characters, although 4-8 is probably optimal. The Abbreviation is what is saved with each sighting, so when you add a location, give it a bit of thought, since you won't be able to change it. We recommend using uppercase letters only, but this is not mandatory. Country, County, and State are provided mainly for the ability to export that information to external software; for now, anyway, Birdwatcher's Diary makes no use of this information.
Finally, we come to the coordinates of the location — Latitude (Lat.) and Longitude (Long.). Depending on your hardware, there are two different ways to obtain this information (actually three, since for some locations you probably can look up the coordinates online and just type in the values). If your unit is equipped with GPS, and/or is in a location where triangulation from either WiFi signals or cellular signals is sufficiently accurate, and you are currently at the location in question, tap Capture Coordinates to capture the latitude and longitude. If your unit isn't appropriately equipped, or you are setting up the locations at home before your trip occurs, the second method is to tap Find on map. This method will display a Google Map (which means your unit will need to be online, either via WiFi or cellular connection) like this:
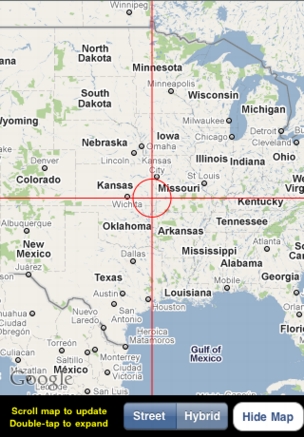
Now you'll use standard scrolling and zooming techniques to zoom in on the location of interest. Note that in addition to putting two fingers on the screen and spreading them apart to zoom, you can also just double-tap on the screen. As you scroll and zoom, the cross-hair cursors move with you, until you finally end up with something like this:
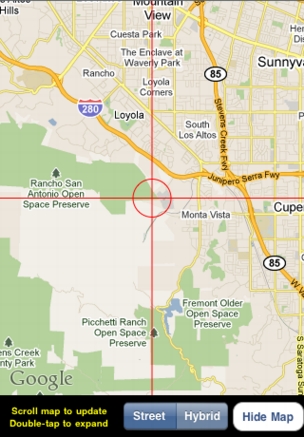
Where you center the location is up to you. We prefer to center it on the parking area for a particular location, but you could place it in the center of the park or lake itself if you prefer. When you're satisfied, tap Update Coordinates, and then Hide Map to return to the main Location screen where the latitude and longitude will now be filled in with the values from the map.
Finally, tap Save to save the information about the new location.
The special location "NONE":
It's impossible to create a "location" to correspond to every single place you spot a bird you want to record. Perhaps you spot an Osprey while you're driving on the highway. You could create a "location" named "Hwy. 280", but then maybe you'll need another one named "Hwy. 85" and another one named "Hwy. 101". Besides, "Hwy. 280" might be 70 miles long, so as a location, it's not very specific! You simply can't create a new location each time, and really need to set up locations only for your "main birding spots," typically local parks and open space preserves, plus probably one called "Home". So what to do about the other sightings? Birdwatcher's Diary automatically includes a "location" named "None", which of course doesn't mean you were nowhere where you made the sighting, but simply that it wasn't at a "named" location. "None" is always displayed on top of the list of locations. You can delete (using the standard iPhone "sideways swiping motion" on the name, followed by tapping the Delete button which appears) or rename (using the Edit Location screen) any of your other locations, but "None" is permanent (ensuring that there will always be at least one "location").
The Sighting Screen
To display (or modify) information about a particular sighting, tap on the binoculars or ear icon to the left of the name of the bird (except within the first three seconds of adding a sighting, in which case tapping on the binoculars ("seen") changes to the ear ("heard only")). You'll see this:
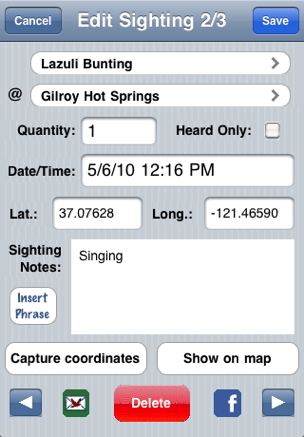
The top line shows the name of the bird and the sighting location, which can't be modified. Quantity shows how many you have seen or heard at this location. Heard Only is a checkbox; tap on it to change it to a checked box if it should have been a heard-only identification; tap again to change it back to unchecked (and hence, seen). Date/Time shows when the bird was first ticked. If you entered it belatedly, and want to change the information to reflect the proper date and/or time, tap in the box. Instead of actually editing the text itself, you'll be presented with a "date/time picker," which lets you scroll the dials to select the correct date and time. Lat. and Long. can be entered directly, can be captured if you are currently at the location using the Capture coordinates button, or can be found using the Show on map button in exactly the same way as was described above for setting the coordinates of a location. See below for a discussion on recording coordinates.
If you already captured the coordinates of the sighting, tapping on Show on map will show the precise location of the sighting, like this:
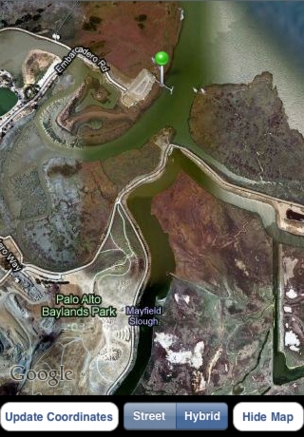
Here, using a Hybrid map, we can see this sighting was made while standing on the dock at the end of Embarcadero Rd. Tap Hide Map to return to the Sighting screen.
Back on the Sighting screen, there are two more features. Delete Sighting, which will require a confirmation from you, is self-explanatory. And finally, the Sighting Notes. Different from the Species Notes about the species itself, these are notes about this particular sighting — was the sighting a "flyover," or "sitting on a nest," or a "2nd-year bird," or "mating," etc. You can enter as much in this field as you want to, and you can do so using the keyboard. To make entry of notes faster and easier, Birdwatcher's Diary provides you with a stock list of words and phrases, a list you can add to as you wish. Using this list, entering notes about a sighting can be done simply by picking one or more phrases from a list. Just tap on Insert Phrase, and a scrollable list of phrases will appear:
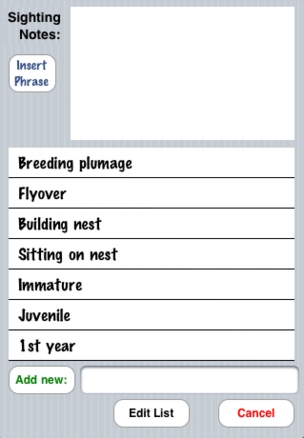
Tap on any phrase and it is inserted into the Sighting Notes. Tap on another phrase to insert another note, separated automatically by a comma, or tap in the Sighting Notes field to use the keyboard to enter your own words. To add your own word or phrase to the list for frequent use in making notes, enter it in the box at the bottom, and tap Add new. Finally, to delete phrases from the list or to reorder them so that the words and phrases you use most appear at the top and don't require you to scroll, tap the Edit List button and the list will look like this (and the Edit List button will change to read Done):
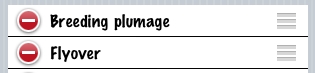
Tap the minus sign on the left side to delete the item, or use the "handles" on the right side to move an item up or down to reorder the list. Tap Done when you are finished modifying the list.
When you have recorded the same species at multiple locations during a single trip, which sighting you are viewing or editing on the Sighting screen depends on the currently active location (the one displayed on the bottom of the main screen). If that location is one where you recorded the bird, then that is the sighting that will appear on the Sighting screen. If the active location is not a location where the bird was recorded, then the sighting which will appear on the Sighting screen will be the first sighting of that bird. To see other sightings, use the left and right arrows on the bottom of the screen (left takes you to earlier sightings, right to later ones). The relevant arrow buttons will only appear when you have more than one sighting of the bird. For example, if you have two sightings, and you are looking at the first one, only the right arrow will appear. Tap that to look at the second sighting and the right arrow will disappear (because there is no third sighting) while the left arrow appears (to take you back to the first sighting).
If you do modify a sighting, don't forget to tap the Save button; just moving to a new sighting does not save any changes you made.
A note about multiple sightings:
In general, Birdwatcher's Diary records the details (time, coordinates) of only one sighting at each location. If you tap the name of the bird on the main screen multiple times, the quantity is incremented, but the coordinates and time are not changed and only correspond to the very first sighting. In some cases, however, you may wish to record the coordinates and time of every sighting. Perhaps you are doing a survey of all the Bluebird boxes in a particular preserve, or want to record the location of every Burrowing Owl burrow. Setting the Multiple Sightings setting to "On" activates this mode. With Multiple Sightings enabled, every tap on the name of the bird records a separate sighting and not a change in quantity. To change the quantity for a particular sighting, you must use either the Calculator method of changing quantity or the Edit Sighting screen.
Recording Coordinates (Latitude/Longitude):
Birdwatcher's Diary provides three different modes for recording the precise coordinates of each sighting, controlled by the Lat./Long. setting. All Sightings uses either GPS (if present, as it is on the iPhone 3G and 3GS and the iPad with 3G but not on the original iPhone, the iPod Touch, or the iPad with WiFi only) or WiFi or cell tower triangulation to pinpoint the coordinates (latitude and longitude) of each recorded sighting (either the first sighting at each location or all sightings, depending on the Multiple Sightings setting).
You may not want to record the precise location of every bird. Perhaps you only want to record "special" birds, like a Pileated Woodpecker or a Bald Eagle. In that case, set Lat./Long. to Manual. In this mode, when you want to record the coordinates of a sighting, you edit the sighting as described above, and use either the Capture coordinates or the Show on map button to record the coordinates. Other sightings adopt the general coordinates of the location itself.
The third mode is called No Location Sightings. With named locations, you will at least know you saw the bird at Arastradero Preserve, or Rancho San Antontio, etc., and, if you have set the coordinates for those overall locations, the software will know approximately where the sighting occurred. But when the location is set to the special value "None," the software has no information about where you are, so there are no approximate coordinates (the coordinates of the location itself) to rely on. So if you set Lat./Long. to No Location Sightings, when and only when you have the "location" set to "None," coordinates of each sighting will be automatically captured and recorded. When you are at any named location, No Location Sightings functions exactly in the same way as Manual, that is, it does not record coordinates for any sighting automatically, but of course you can always do so manually for a bird of interest.
Of course you can always modify or update the coordinates of any sighting, no matter what the mode you have chosen, using the Capture coordinates or the Show on map buttons.
If you keep the iPhone (iPod/Touch, iPad) turned on, then the location is constantly updated, and will always be available, but this will use up battery power (a fully-charged iPhone 3GS will last about four hours). If you turn on the unit as you are about to record a sighting, then, depending on your location (for example, under thick tree cover), it may be several seconds or considerably longer before a precise location is available (of course it will also take a second or two for you to find the bird on the list). So that you'll know the status, the color of the text on the bottom of the screen showing your current location changes color based on the current accuracy of the reading, compared to the value of Max. Inaccuracy, which you can set to values of 100 meters, 250 meters, 500 meters, or 1000 meters (For the metric-challenged, a meter is approximately one yard; 1000 meters is approximately 0.6 mile, and for the technically-minded, this is really "precision," not "accuracy"). If the inaccuracy is 150% or more of your desired accuracy, the text will appear in red; between 100 and 150% and it will be yellow, and if it is less than or equal to your desired accuracy, the text will be green. If you are not currently in a mode where you are recording coordinates (either Manual mode, or No Location Sightings mode and a location other than "None"), the text is white.
If you are recording sighting coordinates automatically, and you tap on a bird when the text is red or yellow, the software will decline to record the coordinates, notify you that it is doing so, and give you three options: OK will leave things as they are (with no specific coordinates recorded for that sighting), Try Again will re-measure the location and attempt to get better accuracy, and Record Anyway will record the location, even though the accuracy is worse than you desire. Be forewarned that if you do record an inaccurate reading, you may get strange results! Even with a GPS-equipped iPhone, while standing on a ridge, we have seen the location marked as many miles away (presumably the unit got its location from cell phone towers in its line of sight before the GPS "kicked in" to get a correct reading).
Depending on the kinds of places you bird, and the density and proximity of cell-phone towerss, you may find that capturing coordinates (either automatically for each sighting or manually for special sightings) is insufficiently accurate to be of any use whatsoever unless your unit is equipped with GPS. If your unit does not have GPS, you most likely will find that, outside of urban settings, only the Manual mode of recording coordinates, and only the Find on Map method of specifying the coordinates, is of any use.
Mapping all your sightings
We saw on the Sighting screen how we can display on a map the exact coordinates of a particular sighting, and on the Location screen how we can display the coordinates of that location itself. If we go to the Location screen after having recorded a bunch of sightings, and now tap the Show on map button, we'll see something different than we saw before:
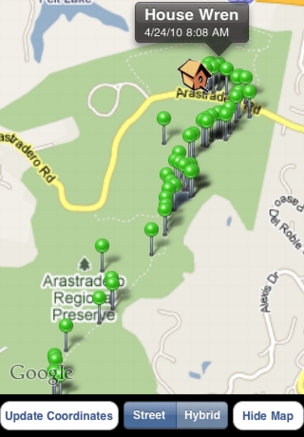
In this view, the "home" coordinates of the location are shown by a Bird House icon. Green pins mark the location of birds which were seen or heard. Tapping on any pin shows a label which includes the name of the bird (with an "(H)" at the end if the sighting was a "heard-only" sighting), and the date and time of the sighting. The map is automatically scaled so that all of the sightings will fit on screen. Of course you can zoom in on the map and view the map in a "hybrid" mode too, like this:
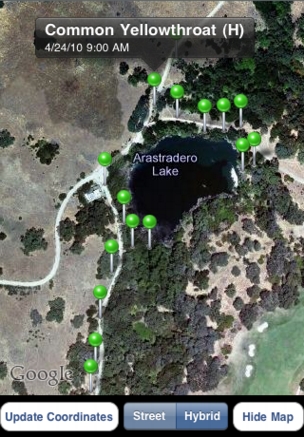
Birdwatcher's Diary doesn't allow you to save one of these screen maps. However, you can do a "screen capture" of any screen on an iPhone by holding down the power button on the upper-right (top) of the unit, and then pressing and releasing the round "Home" button on the bottom front of the unit. A picture of the screen is then put into your photo library, just as if you had snapped it with the camera. When we get to the Output section of this manual below you'll learn how you can export information to Google Maps and Google Earth to view full-size maps you can view on your desktop.
Archiving: Saving, Recalling, and Generating Life Lists
Saving each day's sightings
The Folder icon on the main screen brings you to the Archive/Input/Output screen, which looks like this when in Archive mode (as selected on top of the screen):
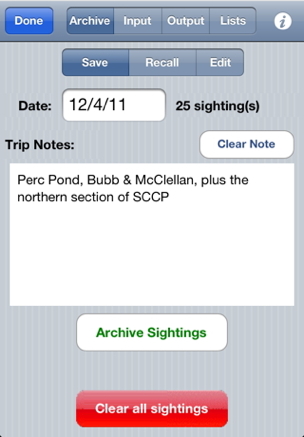
At the end of each day's sightings, we recommend visiting this screen. The software keeps track of the date of your most recent sighting, and it will be filled in in the Date field, although of course you can change it. The number of sightings for that day is displayed, which will help confirm that you've got the right day. Enter some Trip Notes to describe the trip, after (typically) first using the Clear Note button to erase the previous notes. Finally, tap the Archive Sightings button at the bottom to actually save the data into a file on the iPhone (it's automatically named so you don't need to provide a name). After you have saved your data, if you add or delete a sighting, or you decide to update the Trip Notes, just return to this screen and tap Save again; the updated data will replace the earlier data. If you're done with birding for the day, and have saved or outputted your data in one or more formats, feel free to go ahead and tap Clear all sightings to be ready for your next outing.
Recalling previous sightings
To recall previous sightings, tap the Recall button, and the screen's appearance will change so that it looks like this:
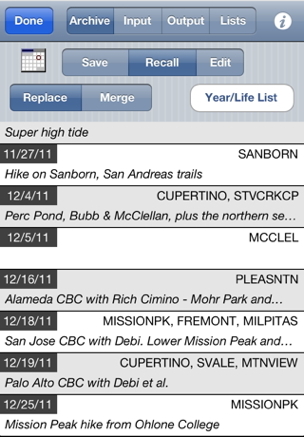
The main part of the screen is occupied by a list of your stored files in chronological order, latest at the bottom. The list will automatically scroll to the bottom when you first view it so you'll see the most recent sightings; scroll up to view earlier days. The screen shows the date of the trip, the one or more birding locations you visited during the trip, and the first part of your trip notes to help you decide which is the correct entry. Tapping any entry will recall the sightings from that day's trip. Replace or Append specifies what will happen when you recall the sightings. If Replace is selected, those sightings will now be the only sightings displayed on the main screen of the software, while if Append is selected, those sightings will be added to those already on the main screen.
Generating Life Lists
Instead of recalling just one day's sightings, you may wish to read in a group of sightings. Reading in all the stored data will produce a "life list," or at least as much of a life list as you have been recording with Birdwatcher's Diary. But you may wish to produce a life list which is restricted in some way – by date, by location, by state, etc., and Birdwatcher's Diary is designed to let you do that as well. To create any list (full or partial), tap the Year/Life List on the screen above and you'll see this screen:
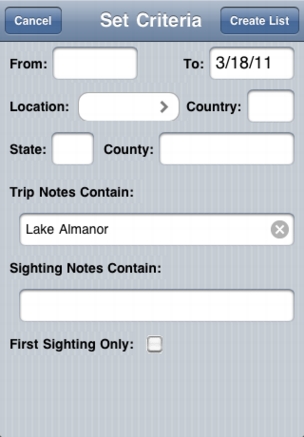
The From/To dates set the time period for the list that will be generated. Leave the From field blank to start with the oldest of all your saved data, and leave the To field set to today's date (which it defaults to) to include all sightings through the present, or change both of them to specify a particular date range (e.g., this month, this year). Location is the abbreviation of the location you want to restrict the list to (for example, assuming you've created a "HOME" location, enter HOME to generate a "yard list"). Country, State, and County should be self-explanatory. Trip Notes lets you restrict the recalled sightings to those which occurred on trips whose notes include that word or phase. In this example, we had a series of days of saved sightings which occurred during a trip to "Lake Almanor," although the actual locations for each day's sightings varied (e.g., LASSEN, WILLOWLK, ALMANOR, etc.). But because we entered "Lake Almanor Trip" in the notes for each day's sightings, this selection will recall all five day's sightings at once, thereby producing a multi-day trip list. And finally, Sighting Notes searches for particular sightings whose notes match the word or phrase you enter. For example, you might enter "Breeding Plumage," thereby producing a life list of all the birds that you've seen in breeding plumage (assuming you entered that phrase in the sighting notes for each of those sightings). Or you might enter "Photo" and produce a year or life list of all the birds you've photographed (again, assuming you entered the word "Photo" in the sighting notes).
You can use multiple criteria at once, so, for example, you can generate a list restricted to this year of all the birds you've seen in Santa Clara County which you have photographed.
Once you've entered your criteria (or not entered any criteria, in which case you are requesting a real "life list"), tap the Create List button on the upper right (or tap the Cancel button to change your mind). The software will generate the list, and also display a summary of what you've produced, like this:
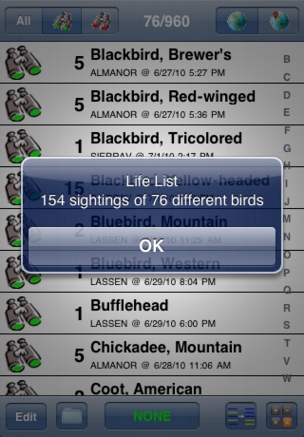
One subtle point on recalling data (and life lists, which are just a way of recalling more than one set of data at a time). If a sighting includes a bird which is for some reason no longer part of your master list, it will be added to the master list. Only the name of the bird will be added, however, not any of the other fields (4-letter code, order, or note).
Input: Reading in Bird Lists or Previous Sightings
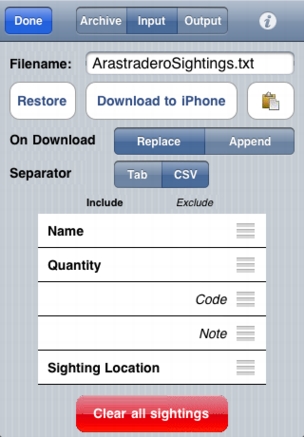
Selecting Input on the Archive/Input/Output screen puts you into Input mode, allowing you to read bird lists or lists of previous sightings from a website or your desktop computer:
You can input two different kinds of lists into the program — a master list of birds (which might be a complete list of birds for the state or country you are visiting, or a shorter list of expected birds), and a list of previous sightings recorded by Birdwatcher's Diary. The settings on the screen determine what you are doing.
There are three methods of inputting lists:
Download is the most complicated of the modes. You'll first need to set the Download Base URL (using the Settings app) to be the website or location on your computer where the file specified by Filename can be found. On a website, this might be something like www.stevenscreek.com/birdlists ("http://" at the beginning is allowed but not required). If you are downloading it from a Macintosh on the same local network as your iPhone, it will typically be of the form 192.168.1.xxx/~username, where xxx is the specific IP address of your computer on your network, and username is your user name (the name you use to log in to the computer). On a Macintosh, you can find this information in the System Preference "Sharing ". Click on Web Sharing, if it's not already activated, and you'll see something like this: "Your personal website, which is in the Sites folder in your home folder, is available at this address: http://192.168.1.xxx/~username". Enter that address (without the "http://") into the Download Base URL setting. With these settings, the software will try to download a file from the folder Macintosh HD:Users:username:Sites, so if you have a file named (in this example) ArastraderoSightings.txt in that folder, it will be read into your software.
When you download (input) information into the software, the On Download buttons choose whether it will Replace the information already in the software, or simply Append to it.
The file (or the information on the clipboad) must always be simple text (i.e., not a Word file or an Excel file but just plain text). If it has more than one piece of information per line, then you specify whether the information is separated by a Tab or a comma (CSV = "Comma-Separated Values").
Finally, there is the issue of just what information you are inputting. The possibilities are these: Quantity, Name, Code, Note, Sighting Location, Date/Time, Latitude, Longitude, and Sighting Notes. Which of these pieces of information are found in the file you are reading, and in what order, is controlled by the table which occupies the bottom half of the screen. Items on the left under Include are expected to be in the file, and items on the right under Exclude are not. To change the status of an item, just tap on the line. The order of items on the line is changed using the "handles" on the right side of each line.
When you are reading in a master species list, say a list of birds in your state, only three of these items apply — Name, Code, and Note. All others should be set to Exclude. In the simplest case you might simply have a file of bird names and nothing more. In this case, Name should be in the Include column, while Code and Note as well as all the other items (don't forget to scroll down; not everything fits on one screen) should be in the Exclude column (and Tab or CSV will be irrelevant since there is only one item per line). If you have a list which also includes 4- or 6-letter codes, make sure the code is on the same line as the name, separated by a tab or comma. Now put Code inton the Include column, below Name (assuming that it is to the right of the bird name on each line).
If you are reading in a list of a previous day's sightings, which is the case in the example in the screen shown here, then you'll need to make sure that the information you request on each line is precisely the same and in the same order that you output it from the software previously (as described in the next section).
Clear all sightings removes all sightings at all locations from the software, after requiring a confirmation. You'll typically do this at the start of each day of birding or at the end of a birding trip. Make sure you have uploaded (output) the recorded data before clearing it, because this operation is not "un-doable."
The Information ("i") icon on the upper-right gives you a choice of reading this online manual and registering your software with Stevens Creek Software (optional but allows us to provide you with support).
Bird Lists To Download
When you install the software, Download Base URL will be set to www.stevenscreek.com/iPhone/BirdLists. In this folder there are a number of bird lists you can download, by setting the Input Filename appropriately, making sure On Download is set to Replace, and only Name is set to Include. The current valid Filenames are UnitedStates.txt, California.txt, SantaClaraCounty.txt, and Britain.txt (hopefully all self-explanatory). Of course you can find lists of birds for many states and countries on the web, although in most cases you'll need to reformat them as simple text files before they are useful. If you can't find a place from which to download them, feel free to email them to us to add to this list on our website.
Output Your Sightings
Selecting Output mode on the Archive/Input/Output screen shows a related, but somewhat different screen:
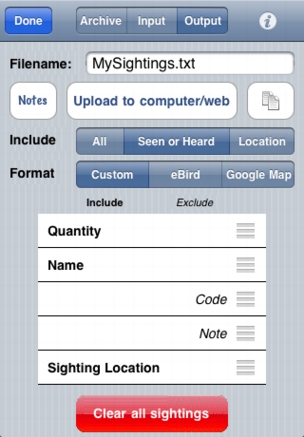
Let's start here with what we are outputting (uploading) and return to the how and where after that. There are three choices for what to Include:
Upload Format
The Format of your output has three choices:
In all formats, there is one additional piece of information which is output along with the individual sightings — your trip Notes. This is a place for you to record overall notes - the weather, your companions, or other general observations pertaining to the day as a whole. Tap the Notes button and a screen will appear allowing you to enter whatever you like.
When you select eBird, you'll see four new things used for transferring data to eBird:
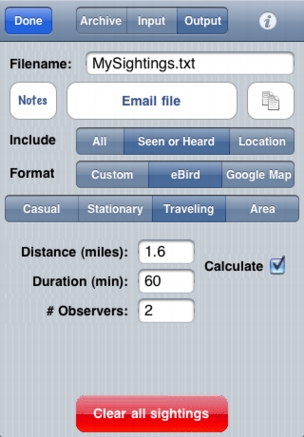
eBird has four "protocols" for reporting sightings – Casual, Stationary, Traveling, and Area. You can read the specifics at the eBird site, but for most typical birding outings, Traveling will be the protocol of choice. For the Traveling protocol, eBird wants to know the Distance you travelled and the time (Duration) you spent. You can enter these values manually or allow Birdwatcher's Diary to calculate estimates of those numbers by checking the Calculate box. The Duration calculation simply takes the time between your first sighting and your last sighting and rounds up to the nearest 15 minutes, which seems precise enough for eBird's requirements, and will work in all cases. The Distance calculation calculates the distance from one sighting to the next, which is obviously approximate since it assumes you walked in straight lines from one sighting to the next, but again, in most cases it will be perfectly adequate as an estimate (and of course if the estimates seem wrong you can simply uncheck Calculate and enter them manually.
Note that the manual entry will only work if you are uploading data to eBird for a single location. If you have data for multiple locations, and want to upload them all at once (that is, Seen or Heard is selected and not Location), then you must check Calculate to calculate the Distance and Duration at each location (if you don't, the same distance and duration will be uploaded to eBird for each location).
If you use the Area protocol, the word "Distance" will change to "Area", and only manual entry is possible (i.e., no automatic calculation).
# Observers is another parameter requested by eBird.
Upload Method
Now, for all these formats, how is this information being output from your unit? As with input, there are several choices:
No matter which method you use to upload, the order of the birds in the list will depend on the order in which they are sorted on the main screen. When you are ticking off sightings, you'll almost always want the list to be in alphabetical (either first name or last name) order. For output, however, you may well want the list in chronological or taxonomic order. If you do, don't forget to change the sort order before doing the output.
Viewing sighting maps on the desktop
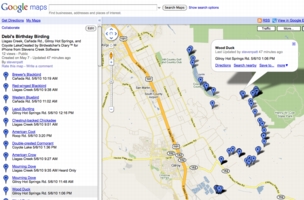
If you output data in the Google Maps format, you will have a file on your desktop which can be used to produce maps in 2-dimensional format (using Google Maps) and even 3-dimensional format (using Google Earth) through which you can "fly" and review your day's sightings. Here's the procedure by which you can use Google Maps:
Using Google Earth (which is a separate standalone application from Google, not accessed via your web browser) is even easier. There is only one constraint, which is that the file you upload (the Upload Filename) should end in ".kml" With this file on your desktop, and assuming you have downloaded and installed the Google Earth application, you'll simply double-click on the file to "fly in" to a 3-dimensional map of your sightings.
Creating and using custom bird lists
While Birdwatcher's Diary includes Enhanced Intelliscroll™ for what we believe is the fastest possible method of searching through long lists, for certain purposes, such as perhaps a Christmas bird count, a shorter list containing only the birds you might possibly see will be desirable, so that you'll be able to tick off the bird even faster. Here's how to create, and later use, a custom list.
To create the list:
To recall the list:
You now have a list consisting of only a smaller number of birds, providing much faster access to ticking. When you need to return to the complete list, just return to the File screen, select Input mode, and tap Restore. Or recall a different list, perhaps a state list rather than a county list. You can create as many lists as you find useful.
Now, why when creating the list did you sort the list in taxonomic order before you saved it? Because when you recall the list, "original order" is the order in which the names are read in from the file. So if the names were stored in, say, Last Name order, after recalling the list, Original Order sorting will not be taxonomic order, but rather Last Name order. In order to preserve the taxonomic order sorting, you need to make sure that when you create the list, that's the order in which the names appear.
File Sharing via iTunes
Beginning with iOS 4, it is possible to share files between computer and iPhone/iTouch. Files created on the computer can be installed in the iPhone, and files created on the iPhone can be transferred to the computer. In iTunes (version 9.2 or higher), when you select your iPhone in the left (under "Devices"), and then select the Apps tab on the top of the screen, on the bottom portion of the screen you'll see a section entitled "File Sharing."
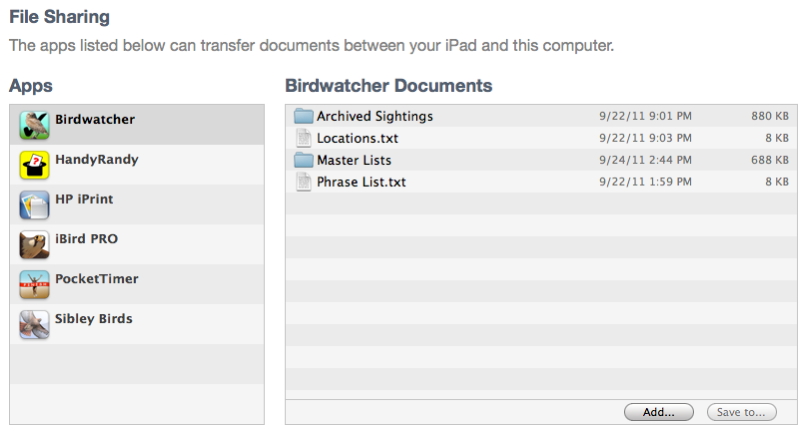
On the left will be a list of applications which support file sharing; Birdwatcher's Diary (labelled "Birdwatcher") will be one of them. Select "Birdwatcher", and in the right-hand column you'll see a list of the files on the iPhone that you can upload to your desktop. Locations.txt is a tab-delimited file of your locations including all associated information (state, coordinates, etc.). Phrase List.txt is a list of your stock phrases for use in sighting notes. And Archived Sightings is a folder containing a series of files, one for each day's sightings that you have archived, named using a "YYYYMMDD" format (e.g., 20100713.txt). To upload any of these, select it, tap the Save to... button, and specify the desktop computer location where you want the file or folder stored. At this time, iTunes doesn't support opening folders, so the entire Archived Sightings folder must be uploaded at once, and not just a single file of sightings.
To transfer a file into the iPhone, tap the Add button and select the file from your computer to transfer to the iPhone. You might, for example, share your Locations or Phrase List file with a friend who could then install the identical list in their copy of Birdwatcher's Diary. Or you might transfer your Phrase List to your computer, add a bunch of phrases to it, and then transfer the revised file back to the iPhone, rather than having to enter the new phrases on the iPhone.
File transfer can also be used as an alternate method to transfer bird lists into the software. Prepare the bird list in a text file on your computer exactly as described above in the Input section, and, using the Input section of the Files screen, configure the Include/Exclude table appropriately. In the Settings app, set the Download Base URL to "local" (without the quotes) or "iTunes" (whichever makes most sense to you, they'll both work). Use file transfer in iTunes to move the file into the iPhone, set the Download Filename on the Input screen to the name of the file (you can omit ".txt" if your file ends with that), and tap Download to iPhone).
Finally, file transfer can be used for standard output of custom, eBird, or Google map files, in lieu of email, ftp, or clipboard. On the Output section of the Files screen, do everything as described above, but set the Upload Base URL to "local" or "iTunes". Tap the button which should now read Save File to iTunes, and the file will be saved to the place where you can transfer it to your desktop. Unfortunately at this time Apple provides no way to delete those files, so you may wish to always use the same name (or series of names) to save the file, so that as weeks and months pass you'll just keep overwriting the files (which you've presumably already transferred to the desktop), rather than accumulating more and more files.
A note on file formats: The files created by Birdwatcher's Diary are text files, but they can be of two different types. If your information (location names, sighting notes, etc.) contain only "simple" characters (like a-z), the files that you transfer to the computer, and the files you will transfer back to the iPhone, are simple ASCII text files. If the information contains accented characters (e.g., ñ or é), then Birdwatcher's Diary saves information as Unicode text files. The text editing software on your computer will most likely read both types of files; this is true for simple text programs like TextEdit on the Macintosh, or more complex word processing programs like Microsoft Word (on Mac or Windows). The trickiest part is that, if you modify files on the computer and then want to transfer them back to the iPhone, you must save them in the proper format (ASCII or Unicode, depending on the contents of the file, and note that this should be "Unicode-16"
if you are given a choice, not "Unicode-32" or "Unicode-8"). Most modern programs will give you a choice of the format in which to save the file, but you need to pay attention. As far as the contents of the file, you should be able to discern the format of the files fairly easily, which are tab-delimited text files. If you add or remove information from those files, take care to preserve the format.
Inputting data into eBird
Once you have a file on your desktop or laptop computer, as described above, here's how to import it into eBird:
Here's a quick step-by-step guide to getting started.
Visit the Stevens Creek Software Home Page
Visit the Stevens Creek Software iPhone Software Support Page
© 2010 Stevens Creek Software