
Latest released version: 3.4
Purchase a copy of this software
The main screen of the software looks like this:
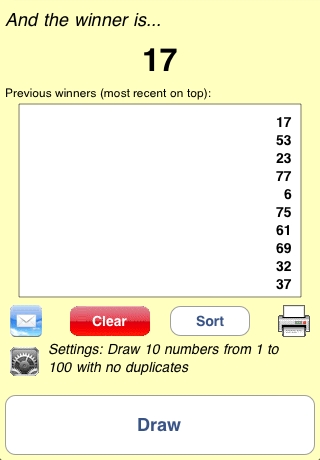
From top to bottom, we see the most recently drawn "winner" (17 in this example), a scrolling list of the most recently drawn winners (with the most recent on top), an Email button to email the results, a Clear button to erase the list (highlighted in Red to signify its destructive and irreversible result), a Sort button to sort the list, a Print button to print the resutls, a Settings button which is used to adjust the settings, a description of the current settings, and a large Draw button to initiate the selection of a new winner or winners (10 at a time in this example).
A rapid shake of the device (lasting for at least 1/4 second, with several shaking motions) is equivalent to tapping the Draw button.
Tap the Settings button to display the Adjust Settings screen, on which you adjust the criteria used for the selection. Here's what it might look like:
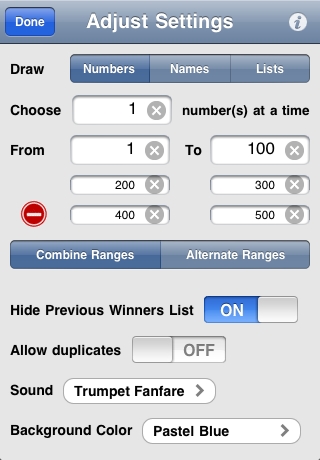
From top to bottom, we have:
Done returns to the main screen to allow drawing more picks.
Draw Numbers/Names/Lists selects between choosing numbers, names from your Contacts (address book), and items from user-created lists.
Choose N number(s) at a time lets you adjust how many random numbers (or names or items from a list) are chosen with each tap of the Draw button on the main screen. If you want to draw 50 random numbers or names or items, you don't need to draw them one at a time!
From...To sets the limits for the selection of numbers.
+ or – lets you add or remove additional ranges (discussed below, in conjunction with the Combine Ranges/Alternate Ranges option).
Hide Previous Winners List, which is only relevant if you are only choosing one winner at a time, removes the box on the main screen which displays the previously selected winners, and expands the region available to display the latest winner. This allows the latest winner to be displayed in a very large font, which is especially useful if you are drawing a winner in front of a group like a classroom or a conference room.
Allow duplicates controls whether the software allows the selection of numbers or names which have already been selected, or not. In the example above, with duplicates allowed, you can draw an indefinitely large number of numbers. If Allow duplicates were set to Off, then you could only draw 100 numbers, at which point you would have drawn all the numbers from 1 to 100 and no more would be possible.
Sound gives you a choice of sounds to play as the winner(s) is chosen. If you draw more than one item at a time, the sound only plays once, not N times! If you don't want a sound to play, select None from the list of choices.
Background Color gives you a choice of background colors for the main screen.
Information (the "i" icon on the upper right) gives you a choice to read the online manual, as well as to register the software. Registering your copy of Handy Randy with Stevens Creek Software allows us to provide better support to you, so we encourage you to do so.
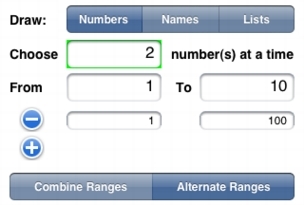
There are times when you need to pick random numbers from multiple ranges. In a running race, for example, the elite runners may be wearing numbers 1-25, the 10K runners numbers 100 to 575, and the 5K runners numbers 1000 to 1250. Now if you want to award a "door prize" to someone at random, you need to select a number from one of those three ranges with equal probability. Here's how you do it. First, tap the + button seen in the screen above just below the word "From." That will add one range, and the screen will now look like this:
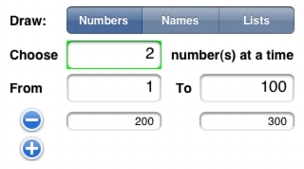
A second range appears and the + next to that range changes to a –, and another + button appears. Tapping the – button will eliminate the second range, returning to a single range only. Tapping the + button will reveal a third range, like this:
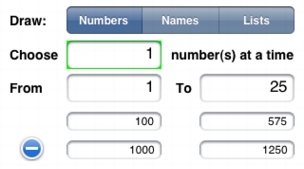
Now you see a – sign next to the third range only, because if you want to eliminate ranges, you always have to eliminate the last one (the third if there are three ranges, the second if there are only two). Now that you have the number of ranges you want, change the From/To values of the ranges by tapping in the respective boxes and entering the desired numbers to adjust the ranges as desired (1-25, 100-575, 1000-1250 in the example above).
Incidentally, if you accidentally enter numbers in the wrong order (the "to" number is lower than the "from" number), the software will rearrange them. If you accidentally enter ranges which overlap (e.g., range two is 100 to 300, and range three is 200 to 400), the software will automatically combine them into a single range.
Any time there is more than one range, an additional option button appears on the screen: Combine Ranges/Alternate Ranges. The discussion in the previous section assumed you had the selection set to Combine Ranges, which selects a number or numbers from the different ranges as if they were one large range (but with gaps where no number is allowed).
There is another way to draw numbers from multiple ranges, and that is by alternating them by tapping the Alternate Ranges button. If you select Alternate Ranges, then the ranges are used in turn, so in the picture below, the first pick will occur using the range 1 to 10, the second pick will use the range 1 to 100 (note that overlapped ranges are perfectly permissable in this mode), the third pick will again use the range 1 to 10, and so on.
Using Alternate Ranges insures that equal numbers are drawn from each group, so in the race example above, it would draw an equal number of winners from the 1-25 group, the 100-575 group, and the 1000-1250 group. Or you might use one of the "ranges" to represent a particular prize: 1 for the best prize, 10 for the least expensive, with the second range representing the winner of that prize. Or you might use one number to represent a chapter and the second a verse for a random Bible reading.
If you have two ranges, and you pick two numbers at a time in the Alternate Ranges mode, then the two are displayed on the screen as pairs, like this:
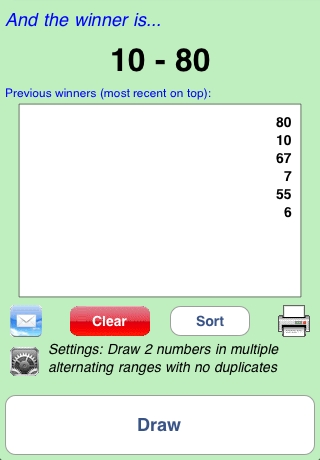
In this example, three pairs of numbers have already been drawn, with the most recent pair being 80 and 10 as shown on top. Likewise if you have three ranges and draw three numbers at a time, the numbers are displayed as "triplets" (e.g., "17-252-1051").
If you select Names on the top of the settings screen, a new element will appear on the screen showing you the group you have currently selected. To choose a different group, tap that name, and a list of the groups you have created in your Contacts application will slide onto the screen, along with the word "All." Select a group and names will only be drawn from within that group (perhaps one particular class of students if you are a teacher); select "All" and names will be selected from your entire Contact list. As with numbers, you can select one at a time, or multiple names at a time. Note that, unlike numbers, you no longer specify the "range" of the selection (e.g., "From 1 to 25"). When drawing names, the software automatically determines the number of members of the group that you select, and sets the range to the entire group. That is, if there are 37 entries in the "Family" group in your Contacts, the software will effectively be selecting a random number from 1 to 37, and then displaying the corresponding name.
If you select Lists on the top of the settings screen, a new element will appear on the screen showing you the list you have currently selected, or "New Group" if you haven't created any groups yet. Tap that item, and a list of the various "lists" that you have created within the application will slide onto the screen:

To create a new list, tap in the field reading "Enter List Name", enter the name, and tap the + button to add it to the list. The Done button finishes the process of editing lists, taking you back to the Settings screen. To delete a list, slide your finger across it to the right, and then tap the Delete button which appears.
The Edit Lists screen only creates the names of the lists. To add items to a list, tap the white arrow on the blue background on the right side of the list to which you wish to add items, and a new screen will appear:
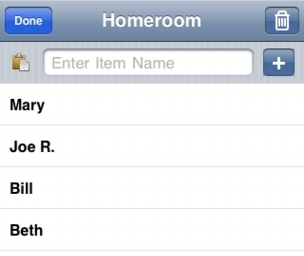
Similar to the Edit Lists screen, enter new items in the field reading "Enter Item Name" and tap the + button to add it to the list. The Done button returns you to the Edit Lists screen, and the Trash Can button will delete all the current entries in the list (perhaps you're a teacher, and its a new year or new semester and you still need a "Homeroom" list but the names of all the students have changed). To delete an individual item from the list, swipe your finger to the right on the item, and then tap the Delete button which appears (or swipe your finger to the left to cancel).
The final, and very important, feature on this screen is the Clipboard icon, which allows you to paste the contents of the list which you have copied from another application (Mail, Safari, Notes, etc.), rather than entering them yourself, one item at a time. Obviously this is a preferable method to use if you have many items on the list - the names of hundreds of students or attendees at a conference, for example.
If you use the clipboard method, items to be pasted must appear as text, one item per line (i.e., a "return" or "new line" separating each item). Getting information into Mail or Safari should be fairly self-evident; either email yourself the list, or create a web page containing the items. It's probably a bit less obvious how to get information into the Notes application. As we understand it, if and only if you have a Mac desktop (i.e., not Windows), you can sync data into the Notes application on the iPhone. There is no separate Notes application on the desktop, rather, it is a part of the desktop Mail application which, incidentally, you do not have to be actually using to use its notes feature. So open the Mail application and create a new Note containing the list of items (which you could in turn paste in from yet another application,, perhaps Excel or iWork.. Now, assuming you have checked the correct box in iTunes so that Notes will sync, do a sync of the iPhone. We have noticed that sometimes it seems to take two such syncs before the new note shows up on the iPhone, so if you don't see the note appear on the iPhone, try syncing again. Now on the iPhone you'll be able to go to the Notes app, do a Select All and then Copy on the list, and finally go paste them into Handy Randy as described above. We think you'll find this easier in practice than it is to say.
Here's an example of drawing a Bridge hand (13 cards) using this technique (don't forget to set Allow Duplicates to No!):
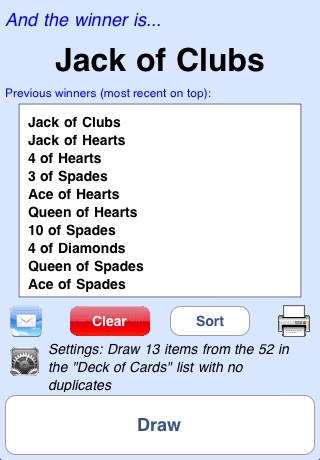
One subtle issue concerns sorting of the list. The Sort button sorts alphabetically. In this list of cards, then, sorting would produce a rather strange order. If you wanted it to sort by suit, the items in the list would have to read, e.g., "Hearts, King" or "Clubs, 4" rather than "King of Hearts" and "4 of Clubs." Likewise if your list contains names of people. When you select names from your Contact list using the Names option, the software knows which is the First Name and which is the Last Name and sorts by Last Name. But items on a list are just that, items on a list. So if your list contains names of people, and you want to be able to sort them in a way that you'll be able to find them more easily, you might want to enter items in the list as, e.g, "Smith, Fred" rather than "Fred Smith".
There are two other options for getting names into the list "in bulk." If you enter an item name which begins with "http://" (or "https://") and ends with ".txt" or ".csv" or ".htm" and then tap the + button, the software will attempt to download the file from the Internet (or from a local computer acting as a "web server"; for more on that read this document). You can test this out by entering http://www.stevenscreek.com/iPhone/carddeck.txt to download a list of cards in a deck. Note that this file must be a "plain text file" (not, for example, a Microsoft Word document) with one item per line). Alternately, if the name of the item does not start with "http://", but does end with ".txt", then the software will look for the file not on the Internet, but in your iTunes file sharing area. To load a file into iTunes for access by the software, open iTunes with your unit plugged in, tap the Apps tab, scroll to the bottom to the File Sharing area, tap on Handy Randy, and then tap the Add button and select the file to add to the unit in a place where it is accessible to Handy Randy. Note that in both these cases, the filename you enter is case-sensitive.
If you don't have access to a website on which to put the file, you can make use of a free service called Dropbox™. You can read more about Dropbox in this document, but for purposes of this application, the process will go like this once you have established your account, and installed the Dropbox software on your computer (not on your iPhone or iPad, although you can do that as well):
Click here to get a free Dropbox account
Your settings and your previously drawn winners are always saved when you leave the program and restored when you return; use the Clear button when you want to start with a clean slate.
Visit the Stevens Creek Software Home Page
Visit the Stevens Creek Software iPhone Software Support Page
© 2008-22 Stevens Creek Software