TripLog/1040™ for iPhone and iPad
from Stevens Creek Software
Latest released version: 3.1
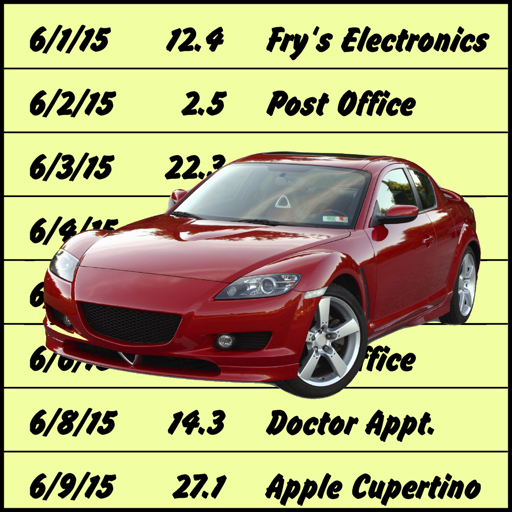
TripLog/1040 from Stevens Creek Software, the software that pays for itself, tracks car mileage which can be used as a deduction on your income tax return, or alternatively used to get reimbursement from your company. Your iPhone or iPad, always by your side (or in your pocket), is the perfect tool to keep track of this valuable deduction. Record your mileage before you even get out of your car!
Mileage may be deducted for:
These miles are tracked separately (medical and relocation are grouped together), because the IRS deduction for each of them is different (in 2008, the deduction is 50.5 cents per mile for business miles driven for the first six months of the year and 58.5 cents per mile for the last six months of the year, 19 cents per mile driven for medical or relocation purposes for the first six months and 27 cents per mile for the last six months, and 14 cents per mile driven in service of charitable organizations).
You can also track mileage in a fourth category, but only those just mentioned actually become income tax deductions. Income tax returns (form 4562) have a separate line for "commuting miles," so you may wish to track those, but they don't create a deduction.
In addition to the mileage deduction, cars driven more than 50% for business purposes can also generate a Section 179 depreciation deduction for the cost of the car itself. Here again, TripLog is an essential tool providing documentation for that greater than 50% usage.
Parking fees and tolls paid in the course of driving mileage which is deductible are also deductible, and TripLog allows you to keep track of those as well.
NOTE: All this information applies to the United States; the details vary (considerably!) in other countries.
Customizable settings
Before we discuss the software itself, we need to start with a number of settings which are configured outside of the TripLog application, in the iPhone (or iPad or iPod Touch, but from this point on we'll only refer to iPhone) Settings application. All of these settings can be changed at any time, but a few of them should be configured before you make any entries in the software, since they affect what information you'll be saving with each entry. After installing TripLog in your iPhone, go to the Settings application, scroll down and tap the TripLog icon, and you'll see this screen (actually longer than the size of the iPhone screen, so you have to scroll down to see it all):
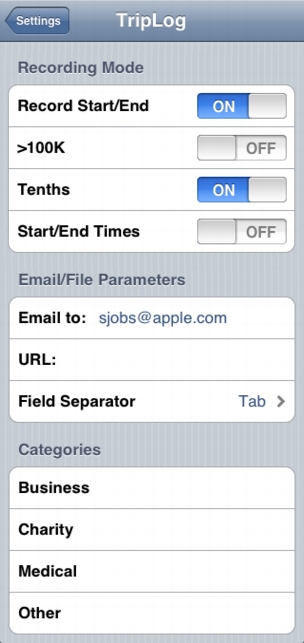
The top three labeled Recording Mode are on/off "toggles" which let you configure what is (and isn't) recorded:
It is particularly important that you set the Record Start/End and the Start/End Times values before you start recording trips with the TripLog software. To make sure that you do so, the first time you run the software, you will be asked what your preferences are for these two settings. The other settings can be changed later, as they become important to you.
The next five settings, labeled Email/File Parameters, let you configure the way the information is sent out from the software (these parameters will be discussed at greater length later in the manual):
The final area, Categories, lets you customize the names of the four categories used by TripLog. The only limitation here is that the names have to be short enough to fit on the buttons on the screen, but it will be fairly obvious to you if they aren't once you start TripLog. TripLog doesn't give any special role to any of the categories, so all four can serve any role you choose.
When we refer to any of these parameters from now on in the manual, we'll put the name of the parameter in Bold Italics, so when you see something in Bold Italics, remember that that is something you set not within TripLog itself but in the TripLog section of the Settings application.
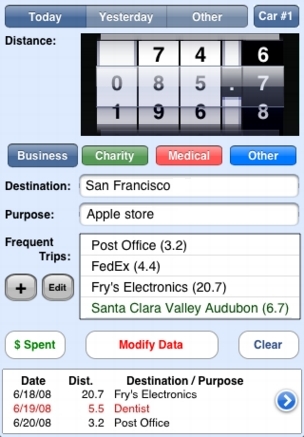
The Main Screen
The main screen of the software looks like this:
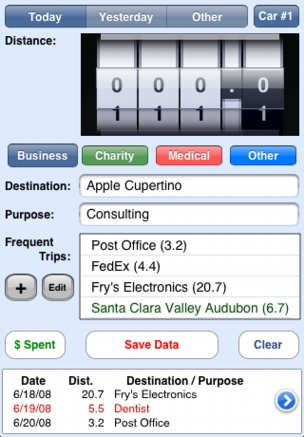
The data you enter is:
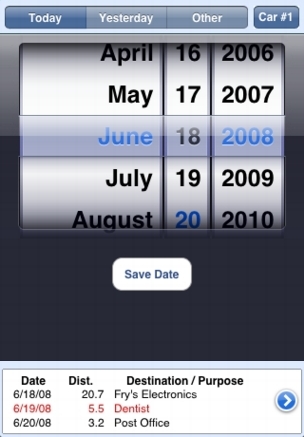
Date: On top, you choose the date. Generally you'll be entering data from today or perhaps yesterday so just tap the corresponding button. Today will automatically be selected so if you are entering today's trip no action is needed on your part. For other days, tap the Other option, and a "date picker" will appear allowing you to select the date (and then tap the Save Date button which is part of that screen, or tap Today or Yesterday to change your mind and just select one of those two choices instead).
The Start/End Times parameter allows you to optionally enter the starting and ending time for each trip. In this case, the day is automatically assumed to be today (of course you can change it, as we'll see), and the top of the screen will look like this instead:
![]()
When you start the trip, open the software and tap Record Start Time and the starting time will be displayed:
![]()
If you are recording in dual mileage (start/end odometer readings, rather than simply trip distance, as described below), then if you have to change the starting odometer reading at the start of the trip (because your last trip wasn't one you wanted to record), then when you change the odometer, the start time will be automatically entered, so in that case you don't even need to tap Record Start Time.
When the trip is finished, entering either the distance or the ending odometer reading will automatically record the ending time, but if that isn't correct, you can also tap Record End Time yourself to capture the time.
For both the start time and the end time, after the time is displayed on the button, if you tap the button again, a "date picker" similar to the one above will appear, but this time showing the time of day as well. In this way, you can change the time if for whatever reason the recorded time isn't correct.
Car: In the upper right is a button that lets you select the car used for the trip. If you're tracking the use of a single car, you can ignore this button. But IRS Form 4562 requires that you track business miles for different cars separately, so if this applies to you, and you need to change cars, just tap the button, and a choice of cars will slide in from the left, like this:
![]()
Tap the appropriate car (sorry, numbers only, no names), and then Done. The car selection will remain until you change it.
Distance: Dial in the distance for the trip. If it's a round trip, you can enter each leg separately, or treat it as one trip; it's up to you. Note that the distance is purposely dimensionless; you can track miles or kilometers, TripLog treats the distance simply as a number.
Some people want to (or need to) track the actual odometer readings - the reading at the start of the trip, and the reading and the end of the trip. If you set Record Start/End to "On", then the top of the screen will look like this:

To record the starting odometer reading, tap Start if it isn't already selected (as shown by its darker color) and enter the starting reading. TripLog automatically sets the Start setting to the End setting of the last trip you entered in your log, so if you are recording consecutive trips in the car, Start will already be correct. When you're ready, tap End and enter the final odometer reading. Note that when you actually save the trip, the data displayed on the bottom of the screen will display the trip mileage (end–start), but all the numbers are saved, as you can verify by examing the full log (as described below).
If you record every trip with TripLog, or at least consecutive trips, then you won't need to worry about recording anything at the start of the trip, because when you finish, the Start value will be automatically set to the previous End value. However, if you do not record consecutive trips, you will need to record the Start when you start the trip. To do this, start TripLog/1040, enter the Start value on the odometer, and then exit the application without tapping on Save Data (or leave the application running if you want, but don't worry if you have to exit it for a phone call or to use another application). The Start value you dial in at the start of the trip will be restored when you next enter the application, at which time you can enter the End value and the rest of the information (if you want, you can actually enter that at the beginning of the trip too; it too will be restored).
There are two other options for the odometer which you can configure in the Settings application: Record Tenths and >100K. You can turn off the tenths digit (making the other digits a little bit wider) if you don't choose to record with that precision, and you can turn on the 100,000 digit if your car is over that reading and you want to record the complete number. You don't actually have to do that even if you odometer is over 100,000, however; you can just record the last five digits. If your mileage goes past 100000.0 on a particular trip, don't worry, the software correctly senses the "rollover" and knows that if you go from 99990.0 to 5.0, that that was a trip of 15.0 miles. Or, you can record all the digits; it's up to you.
Tip for entering distances: Many people find a bit of initial difficulty at using the "spinning wheels" to enter distance. There are two things you need to realize to help make this process faster and easier than using a keyboard to enter the numbers: First, the numbers "wrap around." This means that if a particular digit reads "1" and you need it to read "9", you can go "up" two places (by dragging your finger down) rather than going "down" eight places. So you never need to go more than five places in either direction. Second, if you don't lift your finger, you can keep dragging outside the boundaries of the "odometer." Because the odometer is positioned near the top of the iPhone screen, in general this means it will be easier to drag your finger down (causing the wheel to go up), and in fact you can change through the complete range of ten numbers (0-9) before your finger hits the bottom of the screen, and without needing to use a "flick" motion causing the wheel to spin in a more uncontrolled fashion. So put your finger on the number and slowly (or as rapidly as you like) drag your finger down towards the bottom of the iPhone screen, and you'll be able to set each digit with speed and accuracy. In general, since you'll only need to change one or two digits, you can do this much faster than by tapping in two 12-digit numbers on a keypad. |
Note that it is possible to switch the recording mode (say you decide mid-year you need to save the start and end settings, but you didn't do that for the first half of the year), although generally it makes the most sense to set the mode before you start using TripLog.
There may be times you want to record a "trip" with distance of zero. Perhaps you just want to record the expense of a car repair, say. TripLog will let you record such a trip, but only after asking you to confirm that you do indeed want to record a trip of zero distance.
Type: Choose the type of mileage - Business, Charity, Medical, or Other. This setting will stay where you leave it, which means that if you are only tracking business miles (or only tracking charity or medical or other miles), you'll only need to tap this button once and never again for subsequent trips. The button you select turns a darker shade, and also gets slightly larger (as seen in "Business" in the image below) to provide two visual indications of the selected choice. The different colors used on this buttons (gray or black, green, red, and blue) are used elsewhere in the program to color-code your entries, so when you see a red entry, for example, it was a trip made for medical reasons.
![]()
The names of the categories (but not the colors) can be modified if you wish, using the iPhone "Settings" application (see below).
Destination: You must enter a destination, which can be a city, the name of a company, a building, or anything which will document to you (and the IRS) where you went.
Purpose: This is optional. If the destination is "branch office," whether you were going there for a meeting or to drop off a report or whatever is irrelevant to the IRS; it's obvious this was a business trip. But if the destination is "San Francisco," you'll want to add a purpose, e.g., "MacWorld" (or, you can just list the destination as "MacWorld San Francisco" and leave the "Purpose" field blank; again, it's up to you).
To enter destination and/or purpose, just tap on the desired field and a keyboard will slide onto the screen, like this:
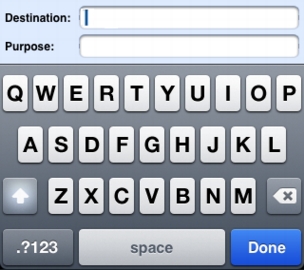
You do not have to dismiss the keyboard to go from one field to the other, so if you are entering a destination and a purpose, after you're done entering the destination, tap in the Purpose field, enter that, and then tap Done on the keyboard. If you don't want to enter a purpose, just tap Done when you're done entering the destination.
The Destination and Purpose fields both can contain as much text as you feel you need to enter; they are not limited by the width of the screen. The only limitation is that you cannot enter a "return" character in them, that is, they both are a single line each of text.
Editing these fields is accomplished using the standard iPhone technique. Hold your finger down on the field, and a "magnifying glass" will appear. Slide the magnifying glass to the left (or right) to position it in the text at the point where you need to make a modification or insertion.
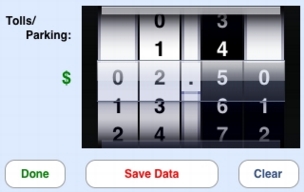
$ Spent: If you spent money on tolls or parking during the trip, tap this button and another "picker" will appear as shown here on which you set the amount you paid; tap Done on that screen when you are done. In language versions other than English, the label of this button will simply show the currency symbol (e.g., the Euro symbol).
Save Data: Saves the data in your mileage log.
Clear: Resets all the data you are in the process of entering except the "Type" setting. This won't normally be needed, because after you tap Save Data the data are automatically reset. The primary use for the Clear button is when you are modifying an entry (see below) and change your mind and decide it doesn't need modifying after all.
Frequent Trips:
You'll notice we skipped over one area of the screen, labelled Frequent Trips. This is the area where you save trips that you make regularly, so you can enter them with a single tap. To add a frequent trip to your list, enter the distance, the type, the destination, the purpose, and the $ spent (optional). You can enter a frequent destination (e.g., "Post Office"), or a frequent purpose (e.g, "Calling on customers"), but you must enter either the destination or the purpose (or both); both cannot be blank. The date is irrelevant. Now, instead of tapping Save Data to enter that trip into your log, tap the + button below the words Frequent Trips. The destination of the trip (and the mileage if it isn't zero) will now appear in the list to the right, which is a scrolling list that can contain as many frequent trips as you take - Apple headquarters, your company branch office, your dentist's office, and so on. Now in the future, when you make that trip, just set the date and tap the name of the frequent trip you took - the distance, type, destination, purpose, and $ spent for that trip will all be automatically set. If all the information is correct, just tap Save Data and the trip is added to your log. If anything is changed (you took a longer route than normal, or you managed to find free parking, etc.), just change it and then tap Save Data.
If you are recording in Start/End mode, Frequent Trips works exactly as you would expect. The distance saved with the frequent trip is the trip distance only, not the start and end settings, and when you tap one of the frequent trips, TripLog automatically adds the distance of the trip to the Start distance, switches to the End distance, and sets the End distance to the Start distance plus the frequent trip distance. For this to be correct, you'll want to make sure the Start odometer reading is correct before tapping the frequent trip.
To delete a frequent trip, you can swipe your finger left to right over the entry, then tap the Delete button which appears. You can also re-order your frequent trips (and delete them as well) by tapping the Edit button. When you do, the screen will look like this:
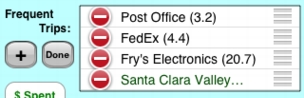
If you now put your finger on the gray horizontal lines on the right of any trip name, you can drag it up or down, so that your most frequent trips appear on top (note that, although the screen only provides room to display four frequent trips, this is a scrollable list, scrolled in the usual way with the flick of a finger). If you want to delete a frequent trip, tap on the red minus sign to the left of its name. A Delete button will appear on the right side; tap it to delete the trip. Note that this will not delete any entries for that trip in your log; it only deletes the trip from your list of frequent trips. So if you are no longer making trips to Fry's Electronics in this example, you can safely delete it from the list of frequent trips without affecting those trips you've already taken and entered in your log.
There is no mechanism for modifying a frequent trip (perhaps you realized the mileage is incorrect). Just delete it and re-enter it.
Looking at Your Log:
The last three trips you have entered in your log (at least, the date, distance, and destination of those trips; the type is also displayed indirectly because the trips are color-coded by type) is displayed on the bottom of the screen, where you'll immediately see them when you start the application. This way, you'll know immediately if you remembered to enter yesterday's trip, and you'll know to enter it before entering the latest trip. You can enter trips "out of order," so don't worry about that; the software automatically sorts them in chronological order (and only in chronological order; there is no provision to sort by other criteria).
To see your complete log, tap the right arrow (white on a blue background) in the lower-right corner of the screen, to the right of the "Latest" area. This will take you to a second screen on which your complete log is displayed. Here, all information about each trip (date, distance, type, destination, purpose, $ spent) is displayed in a scrolling list.
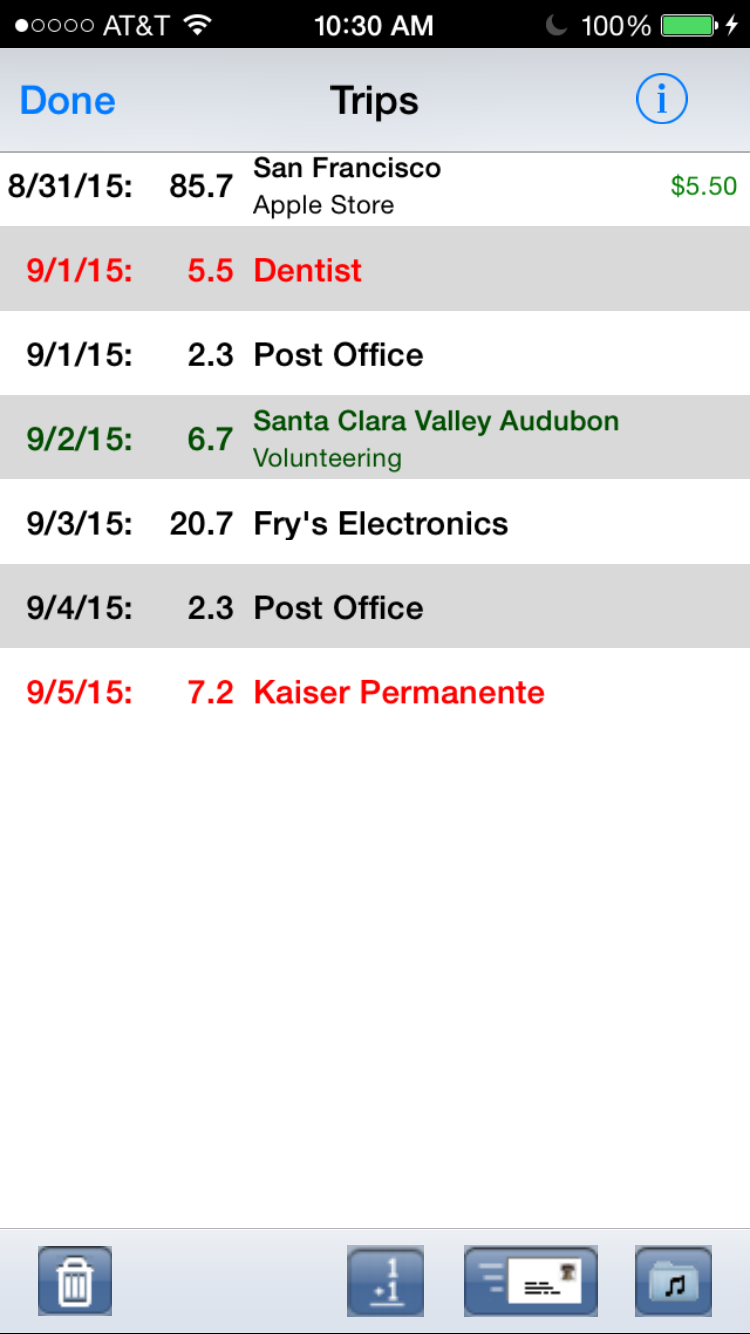
Each entry is displayed either on a single line (if there is no "purpose" entered for the trip) or two lines (if there is), color-coded by type. Tolls and parking costs, if any, are displayed on the right side (always in green, the color of money!). If you are recording start and end odometer readings, those two numbers will also be displayed as part of each entry. The list is, naturally, a scrolling list, so once it gets longer than the screen size, you can browse through it in the usual way. Tapping on the "status bar" (the line at the top of the screen with the time, battery status, cell or WiFi bars, etc.) scrolls to the top of the list.
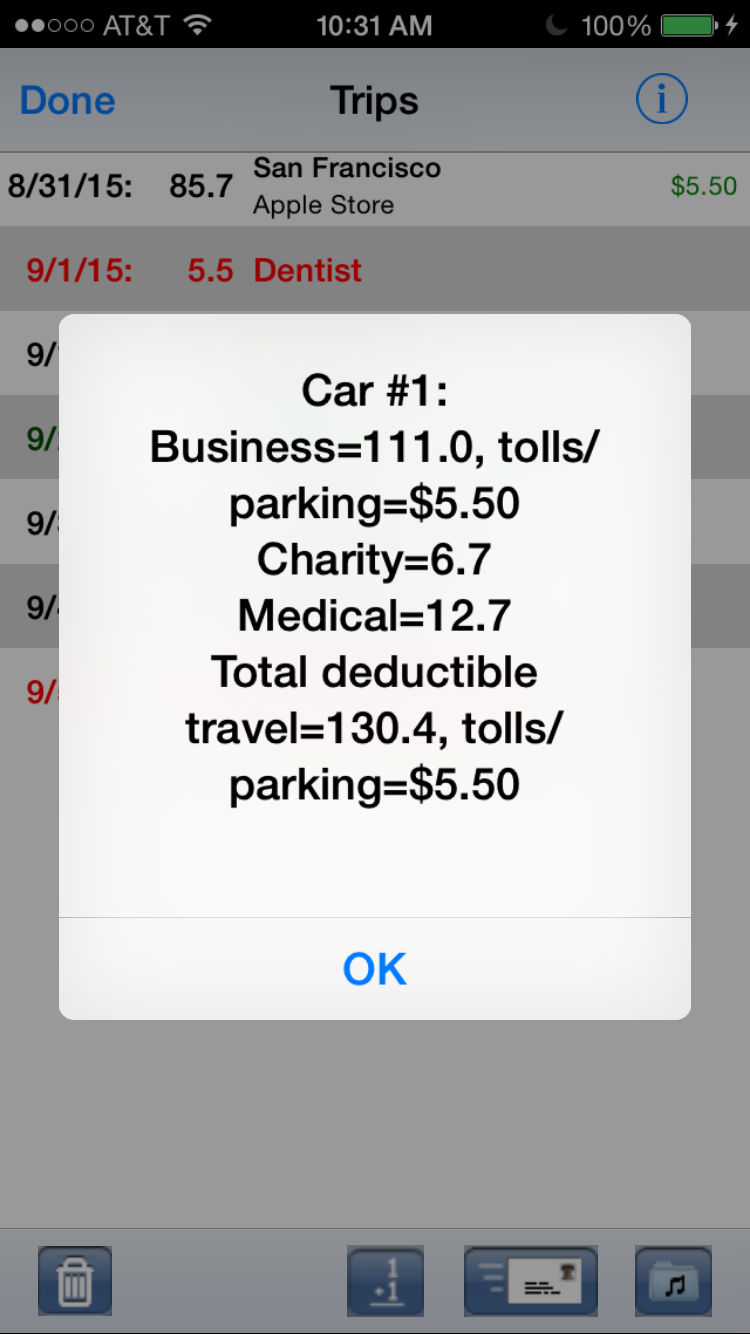
Tapping on any item on the screen takes you back to the main screen with the information from that entry populated in the various fields, allowing you to modify that entry. So in the example above, if you tap on the entry for August 31 where you drove to San Francisco, you'll see this:
Now you can change any aspect of the entry (the distance, type, destination, purpose, or $ spent), and then tap Modify Data, or, if you change your mind about modifying the entry, just tap Clear. You can also modify one of the latest three entries, the ones which appear on the main screen, directly from that screen. Just tap on the entry (it will change to italics to show that it is in the process of being modified), and then modify some aspect of it and tap Modify Data, or tap Clear to change your mind and leave the entry as is.
The "i" information icon: This icon on the upper-right-hand corner of the screen switches to the Safari web browser and opens this manual. It also gives you a chance to register the software if you haven't yet done so.
On the bottom of the screen are four icons. From the left, these have the following functions:
Trash Can: This is used for "large-scale" deletion of entries (to delete a single entry, simply swipe across it from left to right with your finger, and then tap the Delete button which appears at the right side of the entry). Tapping the Trash Can icon displays an alert with three options:
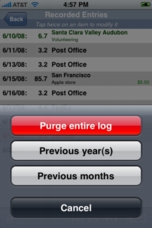
You can purge the entire log, the previous year or years assuming you have further use for them, leaving only entries from the current year, or likewise the previous months, leaving only the current month. All of these options (including deleting a single entry as described above) are not "un-doable"!! Please be sure you intend to do what you are doing! If you're not, that's what the Cancel button is for!
1+1: Tapping this icon lets you do a quick total of your mileage in the different categories, after first letting you select the time period for the totals from a variety of choices:
Transferring Data to your Desktop:
Two different icons, the "envelope" or "mail" icon ![]() and the "iTunes folder" icon
and the "iTunes folder" icon ![]() , provide you with three different ways to transfer data out of TripLog on the iPhone to your desktop. When you tap either icon, you'll see this screen:
, provide you with three different ways to transfer data out of TripLog on the iPhone to your desktop. When you tap either icon, you'll see this screen:
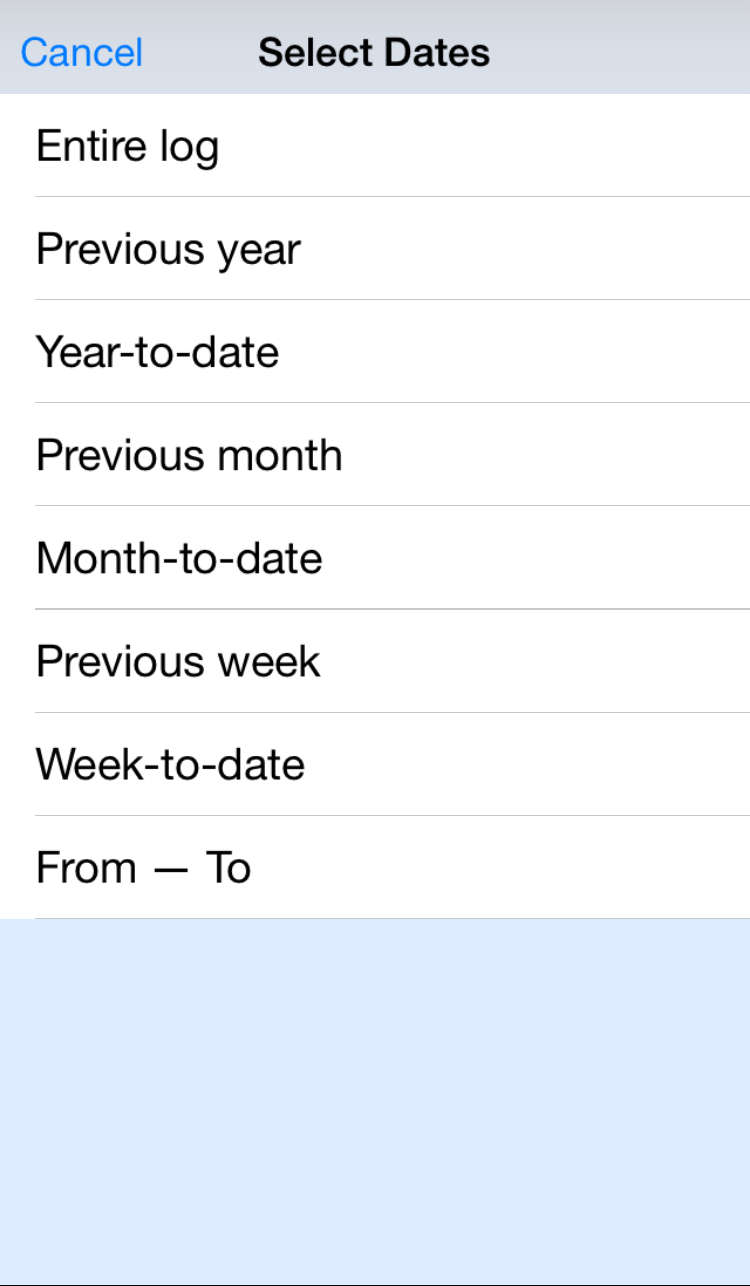
You can select a fixed period (e.g., "Year-to-date") or you can specify your own period by tapping "From — To" and dialing in the starting and ending dates on the two "date wheels" which appear on the top and bottom of the screen. Checking or unchecking the "Include Totals in Output" box on the bottom of the screen controls whether or not the totals are included in the output along with the daily entries.
Transferring Data via Email
So how do we get three ways to transfer data with only two icons? The envelope icon ![]() actually gives you two different ways to email your data, depending on the value of URL in the TripLog section of the Settings application. If the value of URL is blank, then once you select a date range on the screen above, an email is created with the log as a attachment to the email, which will be put in the Outbox of your default account in the iOS Mail software. If Email to is filled in, then the "To" field of the email will be filled in as well, and you need only tap Send (this assumes that you have set up and activated the Mail application on your iPhone). If Email to is blank, then you'll need to fill in the "To" field before tapping Send. Note that if you want to routinely email your log to multiple addresses (say, to yourself and to your accountant), you can do that; simply enter multiple email addresses in the Email to field, separated by a comma. In most cases, the email will be sent out immediately from the Mail software (in the background), but if it isn't for some reason (perhaps you're not online), you may need to go the Mail software at some point so that it does get sent.
actually gives you two different ways to email your data, depending on the value of URL in the TripLog section of the Settings application. If the value of URL is blank, then once you select a date range on the screen above, an email is created with the log as a attachment to the email, which will be put in the Outbox of your default account in the iOS Mail software. If Email to is filled in, then the "To" field of the email will be filled in as well, and you need only tap Send (this assumes that you have set up and activated the Mail application on your iPhone). If Email to is blank, then you'll need to fill in the "To" field before tapping Send. Note that if you want to routinely email your log to multiple addresses (say, to yourself and to your accountant), you can do that; simply enter multiple email addresses in the Email to field, separated by a comma. In most cases, the email will be sent out immediately from the Mail software (in the background), but if it isn't for some reason (perhaps you're not online), you may need to go the Mail software at some point so that it does get sent.
If you are not using the Mail application on you iPhone, or you prefer not to leave TripLog in order to email your log, there is a second method of emailing provided. This method may also be required because there may be limits to the size of the email that can be sent by the iPhone Mail application. To use this alternate method, the value of URL must be filled in with the name of an executable Internet script capable of implementing the "GET" method (if this doesn't mean anything to you, don't worry about it) which will read your data and forward it as an email. An appropriate script is setup on the Stevens Creek Software server, whose URL is http://www.stevenscreek.com/triplogmail.cgi. There are a few drawbacks with this script. First, we can't guarantee it will be available forever. Second, it is possible that, for whatever reason, your system may not accept email from stevenscreek.com. And third, your data will be passing through our server, and this may violate your company policy.
For all these reasons, if at all possible, we encourage you to put a script on your own server (if you have one!). Unfortunately, we aren't in a position to help users with this. If you need help, please consult your system administrator if you have one. And if you aren't able to implement this on your own server, of course you can use ours. This script can be placed either on a regular server or on a secure server; as long as the URL starts with the letters "http," TripLog will acknowlege it as a valid URL and attempt to execute it. Of course if the URL is entered incorrectly or otherwise fails, you'll see an error message of some sort. If a valid URL starting with "http" is not found, then TripLog will use the method described above of sending the information in an email via the iPhone Mail application.
Here are the two sample scripts you can download, as appropriate for your system. Of course they can be modified:
If you write your own script, the output of the script should be plain text, not HTML, because it will be displayed by a simple iPhone "Alert" window, not by a web page as with the output of many scripts. The script will receive three input parameters whose function should be self-explanatory: "email," "subject," "and "body."
The "email" parameter of the script will be filled in with the value of the Email To setting. If Email To is blank, the software will instead include a "user" parameter in the script, which will be filled in with the "name" of the device (e.g., "Joe's iPhone").
The email format is a simple text format, one entry per line, and the different fields of the entry separated by tabs. If you didn't fill in the "Purpose" field, it appears as a dash "-". Because of the use of tabs, this may (or may not) show up in a well-formatted, easily readable form in your desktop email software. However, with a simple copy and paste, you can transfer your entry to a word processor, spreadsheet, or database, with the tabs used to properly align the information into columns.
Transferring Data via File Sharing
The third method of getting data from TripLog back to your desktop is Apple's File Sharing (requires iPhone OS 4.0 or higher), which is done via the desktop iTunes software, which in turn explains why it is accessed by this icon: ![]() When you tap that icon, you'll get to choose the period of time as shown above, and when you do, a file named either AutoLog.txt or AutoLog.csv will be saved to the file sharing folder, depending on whether your value of Field Separator is Tab or CSV (comma). Now in iTunes (version 9.2 or higher is required) on your desktop, when you select your iPhone in the left (under "Devices"), and then select the Apps tab on the top of the screen, on the bottom portion of the screen you'll see a section entitled "File Sharing."
When you tap that icon, you'll get to choose the period of time as shown above, and when you do, a file named either AutoLog.txt or AutoLog.csv will be saved to the file sharing folder, depending on whether your value of Field Separator is Tab or CSV (comma). Now in iTunes (version 9.2 or higher is required) on your desktop, when you select your iPhone in the left (under "Devices"), and then select the Apps tab on the top of the screen, on the bottom portion of the screen you'll see a section entitled "File Sharing."
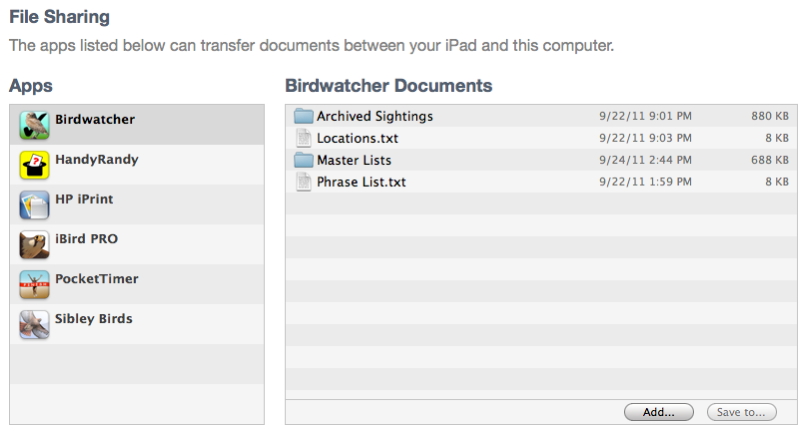
On the left will be a list of applications which support file sharing, including those of our applications which have been so enabled. Click on TripLog, and in the right-hand column you'll see the file you just saved. Select it, tap the Save to... button, and specify the desktop computer location where you want the file stored. You should be able to open this file with any program capable of reading or editing text, and to import it into any spreadsheet or database program, with no problems.
Internationalization
TripLog/1040 includes English, Spanish, French, Norwegian, Swedish, Finnish, Portuguese, Dutch, and German screens. Any user wishing to see a future version customized in a different language is encouraged to email us for a list of phrases to be translated. We also welcome any suggestions for corrections to the existing translations. We do not anticipate translating this manual, especially given the likelihood that anyone reads the manual anyway!
We greatfully acknowledge the Norwegian translation by Morten Presterud Røvik, the Dutch translation by Sander van Goor, the Portuguese translation by Paulo Antonio Ribeiro, Swedish by Jonas Jireteg, and German courtesy of Volker Heicappell and Marcus Trübendörfer.
Disclaimer!
TripLog/1040 is a tool for recording mileage. It does not offer tax advice. If you want to understand the possible value of mileage deductions on your income taxes, or the rules and limitations which govern them, please discuss these issues with your accountant and/or lawyer. Stevens Creek Software makes no claim for this software other than that you can use it to keep a record of your mileage.
Visit the Stevens Creek Software Home Page
Visit the Stevens Creek Software Support Page
© 2008-2015 Stevens Creek Software