PocketTimer Pro™ for iPhone
from Stevens Creek Software
Go to the iTunes store to purchase a copy of this software
Watch a movie showing the software in action
Latest released version: 2.2
Version history and known problems
PocketTimer Pro from Stevens Creek Software is a compete race timing software product, allowing you to time and score races of various types (running, cycling, sailing, rowing, etc.) and post results directly to the web. Running on the iPhone, iPod Touch, or iPad, it features:
The software consists of four main screens - Timer, Categories, Racers, and Results, which are selected by the four "tabs" along the bottom of the screen:
![]()
You'll be interacting primarily with the Timer screen, but we'll start by looking at the Categories and Racers screens because those are the things you'll set up in advance of the race.
The Categories Screen
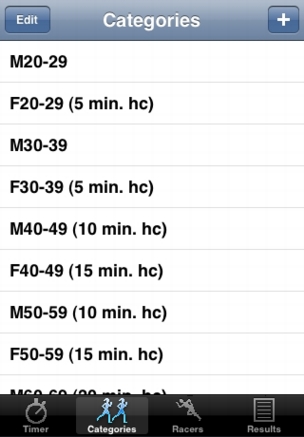
The Categories screen displays a list of the categories (which might also be called "divisions" or "age groups", depending on the kind of race in question) which you have created, like this:
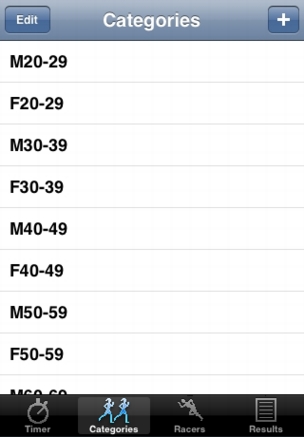
The Edit button in the upper left puts the screen into an edit mode, which allows you to delete categories or reorder them. The + button takes you to the screen where you can enter new categories:
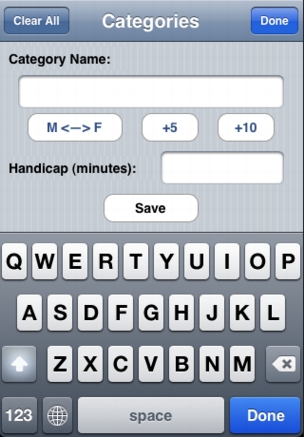
On this screen you enter a Category Name and, optionally, a Handicap in minutes. The Category Name is completely "free-form," any text which describes the name of the category/division/age group is acceptable. The Handicap, which is a number which will be subtracted from the racer's recorded time, is typically used in two different cases. In some races, one group of racers may start early, before the "official" start, like the wheelchair racers in a marathon or 10K race. In this case, the number entered in the Handicap field should be negative, so that when it is subtracted from the recorded time, it will add to the time. The other typical case occurs in triathlons, which use wave starts in which different age groups start at intervals, e.g., 5 minutes apart. In this case, the number entered for that age group should be positive, so that when subtracted it will decrease the time recorded for racers in that age group compared to those who started "with the gun" at "time zero."
After entering the Category Name (and optionally the Handicap), tap the Save button to save the new category (don't tap the Done button in the upper right until you are finished entering all the categories). After you have entered one category, the three buttons in the middle of the screen can be used to make entry of other categories go more quickly. M<->F changes the letter "M" to "F" (and vice-versa) in the name of the category. So if you enter a category "M20-29", tapping M<->F will change the name to "F20-29", which quite likely will be the next category (don't forget to tap Save). The +5 and +10 buttons take any number found in the name of the category and increment it by 5 or 10, respectively, as appropriate for 5- and 10-year age groups. Using the previous example, where the name now reads "F20-29", first tap M<->F and then tap +10 and the name will now read "M30-39". Tap Save, then tap M<->F and Save again, and you will have saved "F30-39".
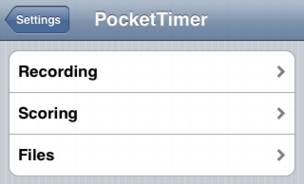
Entering categories in this way "by hand" is simple enough, but if you prefer, you can also download a list of categories from the web (or from a computer running a web server; we'll discuss all this is a special section below). In the Settings application on the iPhone, you'll find a section for PocketTimer. One section of the Files section of that screen will look like this:
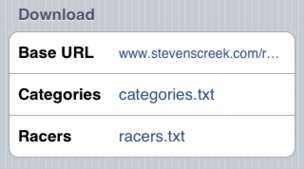
The Base URL describes the website and folder in which files containing list of the categories and the racers (discussed in the next section) are contained. For example, if your website is www.myrunningclub.org and you want to organize the results for a particular race in a folder named our5k, the Base URL might be www.myrunningclub.org/our5k. Categories contains the name of the file containing the categories (categories.txt by convention but you can name it anything, you simply specify it in the Settings application), which must be a simple text file with the name of each category and, optionally, a tab and an integer or real number (e.g., "5" or "-30.0" or "0.5") with the handicap for that category, one category (and optional handicap) per line.
To use the download feature, if you have entered categories, you first need to delete them, using the Clear All button on the upper left of the Categories screen (you'll be asked to confirm that's what you want to do). Once you have, or if you never entered any categories, the button in the upper left will read Download. Tap that button and, if you have the Base URL and Categories settings configured properly in the Settings application, the categories from that file will be downloaded into the application.
This screen, for example, is what we see once we download a categories.txt file containing 10-year age groups for a triathlon, with 20-39 year-old males starting first, 20-39 year-old females starting 5 minutes later, 40-59 year-old males starting 5 minutes after that, and so on:
Further on in this manual, in the Results section, we'll discuss how the software can create an automatic "Masters" category for all the entrants above a certain age.
The Racers Screen
The Racers screen displays a list of the racers (which might be people's names, or the names of boats, or other things, depending on the kind of race in question) which you have entered, like this:

The list of racers (or entrants, if you prefer) can be displayed in a number of ways. In the image above, the names are displayed in alphabetical (by last name) order. In this mode, an alphabet down the right side of the screen, which contains only the letters corresponding to names actually in the list, can be used to quickly scroll to that section of the list. You can also scroll to the bottom (by tapping the highlighted "Racers" tab at the bottom of the screen, or to the top by tapping the words "Name/Division" at the top of the column.
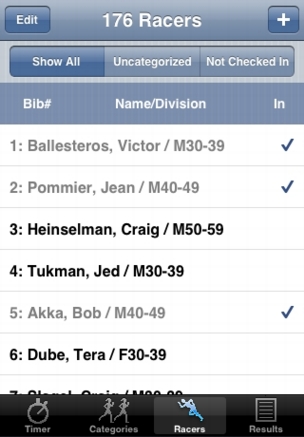
To switch to a display in Bib# order, tap "Bib#" at the top left of the list:
Again, you can scroll to the bottom by tapping the "Racers" tab, or to the top by tapping "Bib#" again.
This display shows another feature of the Racers list. If you want to use the software for check-in, you simply tap the name of an entrant, and the name turns to light-gray. If you are in Bib# display mode, you'll also see a checkmark at the right side of the line (the checkmark isn't used in Name display mode because it interferes with the vertical alphabet list). If you make a mistake, tap the name again and the name will turn back to black and the checkmark will disappear.
At the top of the list you'll see three more choices. Show All displays all the entrants. Uncategorized displays only those entrants whose category doesn't correspond to one of the entries in the list of categories you established on the Categories screen. Typically this will be due to an error or incomplete information about the entrant, and may be something you want to correct, which is why you can quickly find those people, like this:
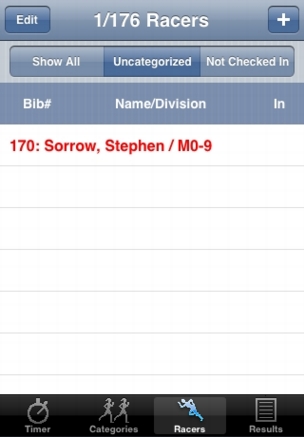
Uncategorized entrants, whether displayed by themselves when you tap Uncategorized, or as part of the complete list when you tap Show All, are always displayed in red to make them stand out.
The third option is to display only those entrants who are Not Checked In. In this mode, names will gradually disappear from the list as they checked in, making the list shorter and shorter and making it easier and easier to find people's names as they arrive.
So far we've discussed displaying the names of racers already entered. To add a new racer, tap the + button and you'll get to this screen:
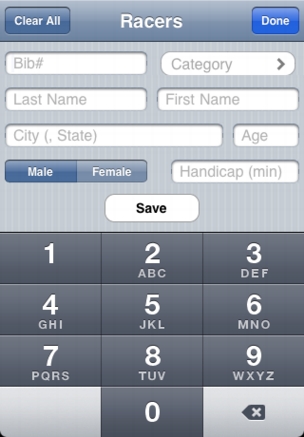
The software requires you only to enter a Bib#, but other information is obviously desirable. Sex is always either male or female; if that doesn't apply to your race (perhaps the racers are boats, not people), just ignore that. The City (, State) field is actually just an additional piece of information which is only used in the displayed results to help identify the racer. Many races like to identify entrants by City and, if they are from out of state, with the state as well, but this field could also be used to list someone's team or anything else about them. The various fields are entered with a keyboard (numeric keyboard for the Bib# and Age, and regular keyboard for the other fields), with the exception of the Category field. When you tap that field, a list of the available categories will appear; tap on the appropriate one to select it.
The Handicap (min) field is provided so you can have individual handicaps for racers in lieu of the category handicaps which were discussed in the Categories section. There are two common situations where this is used. First, in long races like ultramarathons, there is often an "early start" for the slower runners. For these runners, enter a negative number in the Handicap field representing the number of minutes before the official start that they started. The other situation arises in time trial races, where every racer starts at a fixed time (typically one minute) apart. Here, all the racers after the first one would have a positive number in the Handicap field. Note that individual handicaps supercede category handicaps; if you enter an individual handicap for a racer, any handicap time associated with the category of that racer is ignored.
When you are done entering information, tap Save (if you mistakenly tap Done, thinking you are Done, you will be reminded that you haven't actually saved the information yet). After you save one entrant, all the information will be reset except the Bib#, which will be automatically incremented by one, since it is common when adding entrants (e.g., on race day) for the numbers to be sequential. Of course you can change it if the number is different.
A few races use special alphanumeric bib #'s. For example, the top ten women in a marathon might be given numbers F1-F10 to make them stand out. PocketTimer Pro doesn't allow for this at this time (it may in the future). If you are timing such a race, what we recommend is to replace, e.g., F1 with 1001 (assuming there are less than 1000 entrants), so when you want to record the time for racer F1 as she crosses the finish line (which we'll be discussing in the next section), you'll enter "1001" to match the "pretend" number.
You can also modify an entrant. From the main Racers screen, tap the Edit button in the upper left, then tap the name of the racer you wish to edit. The screen above will appear, only this time with the existing information for that racer filled in. Make the necessary corrections, tap Save, and the racer's information will be updated. In that case you won't need to tap Done, because you'll be automatically returned to the main Racers screen.
Downloading Racers
Most races have most, and in some cases all, of their racers registered prior to race day. In this case, the simplest thing to do, as with categories as discussed above, is to download them into the software from a file which is either on the race website, or on a local computer running a web server (again, to be discussed below). The information goes into a simple text file (racers.txt by convention but you can name it anything, you simply specify it in the Settings application), one racer per line, with the different pieces of information about each racer separated by tabs: Bib# - Last Name - First Name - City (, State) - Sex (initial, M or F) - Age - Category - Handicap. If information isn't available or isn't relevant to your race, just leave it blank, but the tab can't be omitted, except at the end (that is, you can leave off the final Tab and the Handicap if there is no individual handicap for that racer). So if, for example, you don't know the City for a particular entrant (or you don't care), there will be two tabs between the First Name and the Sex.
To download the list, you go to the Add Racer screen above (tapping + from the main Racers screen), and first, if there are any racers on the list, tapping Clear All to clear the list. Now the button in the upper left will read Download (if there were no racers entered, it will already read Download); tap it to download the list of racers.
The Timer Screen
Once the categories and racers are set up (and you can add to or correct these later if you realize there is a problem), you're ready for the meat of the program - timing and scoring a race. The timing screen looks like this:

On the top are displayed the running time (0:00 in this image because we haven't started the timer yet), the current place, and, in much larger numbers, the Bib# of the racer you are about to record. Below that are the buttons used for recording. Start is used to start the timer; once it starts, the label on this button will change to Record and it will be used to record times as racers cross the finish line (or pass through a checkpoint; the software works at any time check point, obviously). The numeric buttons are used to enter the Bib# of the racer as they approach (if possible) or cross the finish line; as you enter them, the number will be displayed above, and, as we see in the example below, if that number corresponds to a racer in the list, the name of that racer will be displayed as well. This not only helps as a quality control (if a man's name appears and a women is approaching the finish line, you'll know something is wrong), but can also be used to announce the approaching runner to the crowd, if you choose. We'll discuss below how tapping on the right part of ths line of the screen (where the name appears or would appear) can be used to "pre-record" a Bib# for subsequent time recording.
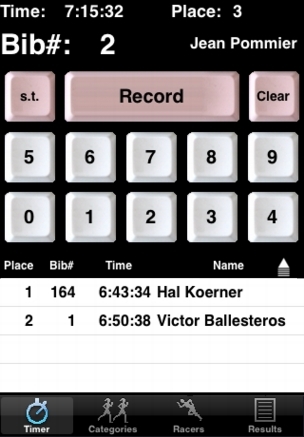
In this example, two runners (Hal and Victor) have already crossed the finish line; their names and other information are displayed in a scrolling list at the bottom. Runner #2 (Jean) is approaching the finish line, and we already know who he is; we can also see in the upper right that he'll be in 3rd place when he finishes. When he crosses the line, we'll tap Record to capture his time.
s.t. stands for "Same Time" and is used when two racers cross the finish line in a tie. Since you can't enter two at once, enter one of the two racers' bib# and then tap Record as they cross the line. Now enter the second bib#, and tap s.t., which will record the time for the second runner using the previously recorded time. Clear erases any bib# you are entering to allow you to correct it (there is no backspace; Clear simply erases the number and lets you start over. In practice, since the numbers are usually only a few digits, that seems simpler anyway).
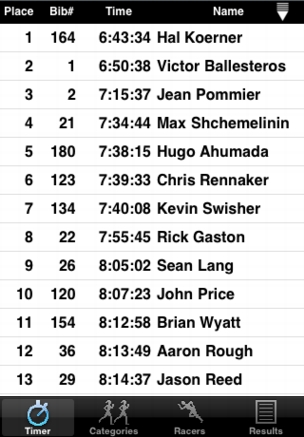
The list of finishers appears at the bottom. The most recent four are always shown, but you can of course scroll the list to see all the finishers. Beginning with version 1.2, on the top of the right-hand side of the list of finishers, to the right of the word "Name," you'll see a "pull-up" icon. Tapping on this icon will expand the list of finishers to a full-screen view, to allow easier review of the thirteen most recent finishers. In this mode you cannot do any recording of new finishers, since the relevant area of the screen is hidden. In this view, the icon changes to a "pull-down" icon; tap it to revert to the normal display with only four finishers and the timing screen showing to resume normal timing operations.
The list of recorded times serves a variety of purposes, but one of them is for making additions and corrections. Sometimes, a racer crosses the finish line without their number showing. Just tap Record to record the time. Now, when you have a moment, tap that entry on the list at the bottom, and the Modify Entry screen will appear:
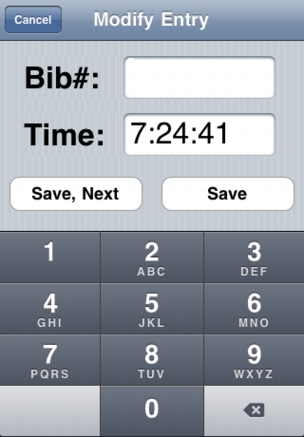
Enter (or correct) the Bib# as you wish, or, if relevant, change the time (perhaps you realize you were 5 seconds late on this finisher for some reason). When entering times, ignore the colons, just enter a number, e.g, "72441"; the colons will be filled in later by the software. Tap Save and the correction will be made. You can also use this technique if you completely missed a finisher and are entering them "post-facto", perhaps from a written list that someone else was compiling. Just tap Record on the main screen to record whatever time it reads, then tap the entry and use the Modify Entry screen to enter the desired Bib# and Time. Unless you are modifying the very last recorded time, you will also see the Save, Next button. Tapping this will save the modification to this entry and move on to the next one for modification. This is particularly useful when you have a series of entries with just recorded time, and a series of Bib#'s to enter for them.
Note that if you modify the time (not the Bib#), when you return to the main Timer screen the times will be resorted automatically.
Pre-recording Bib#s
Beginning with version 2.0, a new "pre-recording" feature lets you record multiple people approaching the finish line before they actually finish (this assumes you either have someone with a walkie-talkie several hundred yards from the finish relaying information to the finish line, which is a common practice, or someone with binoculars at the finish line, or some other way to know the BIb#'s of the approaching finishers). This feature might be used for several reasons. One would be to allow the finish line to announce the approaching finishers; another would be that you anticipate a close finish, and entering and recording multiple bib#'s in advance will allow you to more quickly record the precise finish times.
To use this feature, first you need to turn on Pre-Recording using the PocketTimer section of the iPhone Settings application. Now, after you tap in a bib#, a name will appear to the right of the bib# on the screen. Instead of tapping the Record button, which will also record the time, tap on the name (or where the name would appear even if no name appears), and the bib# will be recorded with a time of zero. In addition, a special Record button will appear on the entry on the recorded times list, like this:
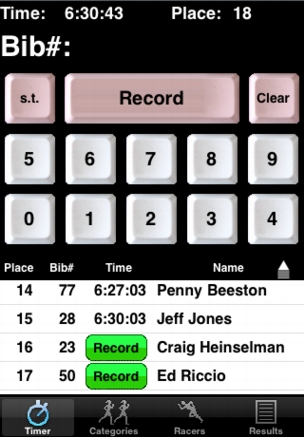
Here, Penny and Jeff have finished and been recorded. Craig and Ed have been spotted approaching the finish line. First the timer tapped in "23" and then tapped on Craig's name which appeared to the right of the Bib# (on the top of the screen), and then did the same for Ed. Now we see the two special Record buttons, one each for Craig and Ed. At this point there are actually three Record buttons active (there is no limit). When Craig finishes you need only tap his own Record button to see his time change to his actual time, and likewise for Ed. But if, while the two are approaching the finish line, someone else appears from out of nowhere and passes them, you can still use the regular Record button (along with the numeric buttons) to record their bib# and time while waiting for Craig and Ed.
The special pre-Record buttons are still present and active if you expand the recorded times to full-screen as described above. One potential use for this would be for a short race, perhaps a track race or even swim meet, where there are a limited number of entrants who all finish quite close together. Once the race starts, you could enter the numbers of all the entrants, then expand to full screen where you will have access to up to 13 separate pre-Record buttons, one for each entrant (more than 13 with scrolling). Now as each one finishes you need only tap their own Record button, without needing to tap any numeric buttons at all, which will allow you to record extremely close finishes.
Recording the Same Bib# Two or More Times
A new feature in version 2.0, controlled in the Settings application, lets you specify whether the recording of the same bib# two or more times is allowed or not allowed, and, if it is allowed, whether you will be warned (with a buzzer sound) and/or the duplicates highlighted on the recorded times list (using a yellow background). Not allowing duplicates is an option, although we don't recommend it. If you have recorded bib#23 earlier in the day, and are trying to record it again, it may be true that the new entry would be an error, but it is equally possible that the earlier entry will be in error. Hopefully you'll correct that later, but if you don't allow duplicates, you won't be able to record the later, correct entry at all. So we don't recommend not allowing duplicates, but it's up to you.
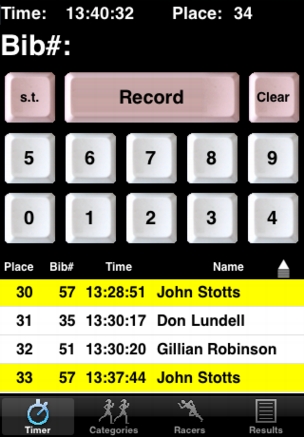
In the example above, we have set the software to highlight duplicates. Here, what we can see is that bib#57 was entered twice. Either the first or the second was an error; once you determine which it is (based on, e.g., collected bib tags, a written backup record, or just memory), just tap on the erroneous entry to modify it as described above.
In ths example, both duplicates are visible, but usually that won't be the case. Beginning with version 2.1, to aid in making corrections, when you see a duplicate like this, you can tap on the area of the timer line displaying the Bib# (57 in the example above) and the software will scroll up to show you the previous duplicate (if there are more than one, repeating will scroll up again); if you have already scrolled the list and are looking at the first entry of the duplicate number, tapping on the number will scroll down to show you the next duplicate entry.
As far as the warning and the highlighting, we would recommend it if and only if recording duplicates indicates a mistake. As we'll see below when we discuss scoring, you may well want to record the same person twice. Perhaps it's a 100-mile race consisting of two 50-mile loops, and you'd like to keep a record of the first lap. Or perhaps it's even a multilap race. Obviously, in this case, you won't want the iPhone giving out a warning buzz every time you record the same person on a new lap.
Offsetting the Time
There are a few things about the main Timer screen which aren't obvious on first glance. First is the ability to offset the time. Let's say there's a long race, and you as the timer didn't arrive until hours after the start. No problem (as long as someone was there to note the start time). Start PocketTimer Pro whenever it's convenient, and, to make the time match the "official" time, put your finger down on the main Timer screen in the upper left on the word Time and hold it there for three seconds or more, then let go. You will be asked if you want to offset the time. If you answer "Yes," the Offset Times screen will appear:
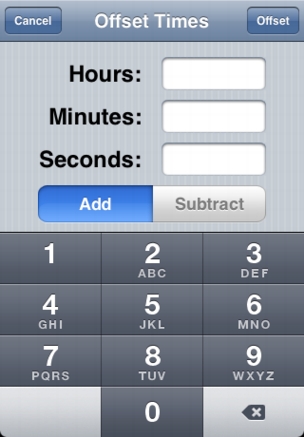
You can enter in a value of hours, minutes, and/or seconds that you want to add to or subtract from the displayed time. So if you just started the timer, and the race started four hours ago, you would enter "4" in the Hours field and make sure the selector reads Add and then tap Offset in the upper-right. When you do that, if you have recorded any times already, they will also have four hours added to the recorded values, reflecting the new, correct starting time. Use the Subtract mode if for some reason the displayed time is actually more than the correct time.
Other "tricks" on the Timer screen: scrolling, stopping the time, clearing the times, and recalling old times
As you record times, the display on the bottom of the Timer screen always scrolls to show you the more recent four times recorded. You can of course scroll in the "normal iPhone way" using a flick of the finger. You can also scroll to the top of the list by tapping just above the recorded times on the word Place (not the "Place" in the upper-right), and you can scroll to the bottom by tapping on the already selected Timer tab at the very bottom of the screen.
When you start the timing, a message will pop up telling you how to stop the timer, which is accomplished by pressing your finger down on the Record button (a time will be recorded when you do so; don't worry about it) and holding it down for three or more seconds. When you let your finger up, you'll be asked to confirm that you really want to stop the timer. Assuming you answer "Yes," the timer will stop.
To erase the recorded times, you press your finger down on the Clear button and hold it down for three or more seconds. When you let your finger up, you'll be asked to confirm that you really want to erase the recorded times.
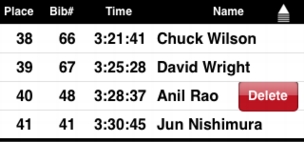
To delete one recorded time, you use the standard iPhone "gesture" which is to swipe your finger across the entry, after which a Delete button will appear on the right edge of the entry, as seen below. Either tap that button to delete the entry, or tap anywhere else on the line to change your mind and remove the Delete button.
It is possible to recall previously recorded times that you have uploaded to a file. Perhaps you want to re-score a race you had previously scored, but need to make a correction or something. To do this, you must first clear any existing times as described in the previous paragraph. Now, press your finger down on the word Time above the table on the bottom (not the word "Time" in the upper-left of the screen) and hold it down for three or more seconds. When you let your finger up, you'll be asked to confirm that you want to download times. If you do, the software will use the same "base URL" that it used to download categories and racers (described earlier), adding to it the file name for the times, also from the Settings application (times.txt by default, but you can of course change the name). The format of that file is again a simple text file, one entry per line, with a bib# or a "?" if the bib# is unknown, a tab, and the time in the "colon" format (e.g., 2:23:15). If you are downloading files that you previously uploaded from PocketTimer Pro, you will typically want to download the "raw times" file, which are the times as recorded before adjusting for handicaps (see later in the manual for elaboration of this subject).
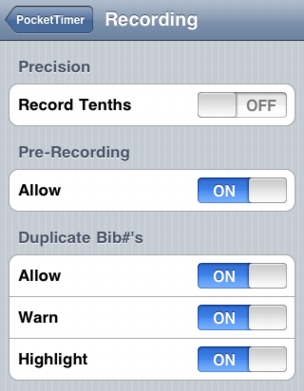
When you record the times, there are two choices - recording to the nearest second, and recording to the nearest tenth of a second. You select which mode you prefer using the iPhone Settings application under Recording, as you do with settings controlling the handling of duplicates and the ability to pre-record finishers:
The Results Screen
The Results screen displays a list of the racers (which might be people's names, or the names of boats, or other things, depending on the kind of race in question) which you have entered, like this:
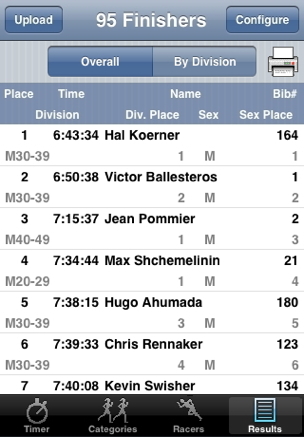
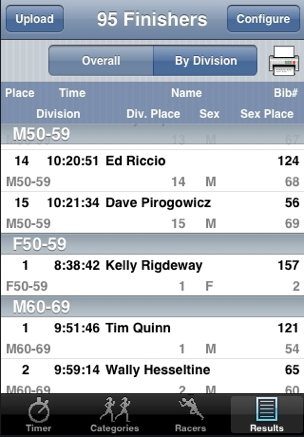
The two modes of display of the finishers are Overall, are shown above, and By Division, as shown below. Results are automatically calculated when you switch to the Results screen, so you can do so at any time during the recording of the finishing times - the displayed results will always be up-to-date. Some might wonder why we use up valuable space to display the Bib#, which after all isn't really part of the results. It isn't, of course, but when errors are made in recording, very often the Bib# will be the tipoff. You may have recorded "181", but when you look at the results, you might see that that number belongs to a 60-year-old woman who is unlikely to finish in the top 10, and realize that you meant to record "180" or perhaps "18" instead.
In Overall mode only, tapping on the Results tab at the bottom of the screen will automatically scroll to the bottom of the list, and tapping on the word Place on the table header will scroll to the top. In By Division mode, tapping on the Results tab at the bottom of the screen scrolls down one division each time you tap.
Exclusions and Automatic Masters Division
Many races have two related although independent needs. One is to exclude the top N (typically 3) overall finishers from their own age division, and the second is to create a "super-division" of "Masters" out of all the age divisions over a certain age (typically 40) and then often excluding those winners from their own age division. Beginning with version 1.1 of PocketTimer Pro, these options are available, and are configured in the Settings application (as well as the scoring of duplicates, described in the next section):
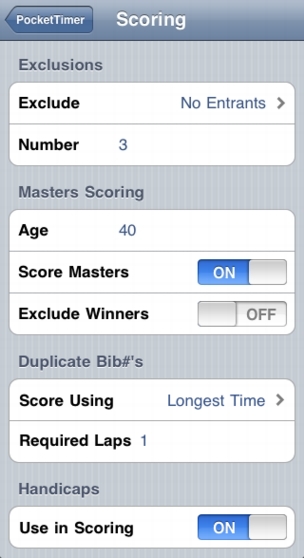
The Exclusions section has two settings. The Exclude setting has three choices: No Entrants, Top N Entrants (typically used for "sex-neutral" races like sailboat races but could be used for any race), and Top N Male,Female which excludes both the top N male finishers from their age group and the top N female finishers. The Number, obviously, is the number of such finishers to exclude (and is ignored if the Exclude setting is No Entrants).
In the Master Scoring section you have three things to set. Age is the minimum age to be part of the Masters division, and is taken from the Age value of each individual entrant, not from the Category description, which might be something like "M40-49" which includes the age but the software does not consider this information, only the entrant's age. Score Masters will create and score the Masters category if set to On, and Exclude Winners will exclude those Masters division winners from age group placings if it is set to On.
In the Handicaps section, you have the option to turn off scoring via handicaps. The software normally will adjust recorded times by division or individual handicaps, typically to correct for different starting times of the different divisions. But in some cases (such as when the handicaps originate from another reason and not from different starting times), you may wish to score the race both with and without handicaps. You can only do one at a time, and to switch from one to the other, change Use in Scoring from On (to use the handicaps) to Off (to score using the raw recorded times).
Scoring Duplicate Entries
In the Settings application, assuming you have allowed the recording of two or more entries for the same bib#, you'll find four options for scoring the race with those duplicates. You can score the race using only the shortest or longest time for that bib#, you can score the race using the Nth time (where you also get to specify "N"), or you can score the race using all the recorded times for the same bib#. The last two are perhaps the most likely. If you have just a single-lap race where any duplicate entry indicates an error in recording, you hopefully are able to catch the error on the Timer screen. But if you don't, it's probably a good idea to score the race using all the times. Now the same person will show up multiple times in the results, which is of course wrong, but hopefully you'll notice it there, and even if you don't, you'll at least know that someone finished in that spot.
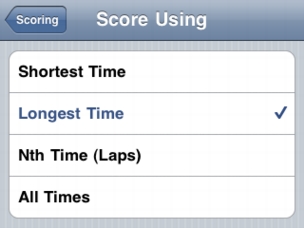
The "Nth time" scoring is ideal for multi-lap races. If you have a 5-lap race, set N to 5 and, when you score the race, only those entrants who have been recorded five times will show up in the results. You can even score the race multiple times, once with N=1, again with N=2, and so on, so you'll have a record of the standings after each lap (great for posting to the web while the race is still in progress).
Uploading the results to the web
At any time during or after the race, you can upload the results directly to the web (assuming you have a phone or Wi-Fi connection to the web!). Some key parameters for doing so are found by tapping Configure on the upper right of the Results screen.
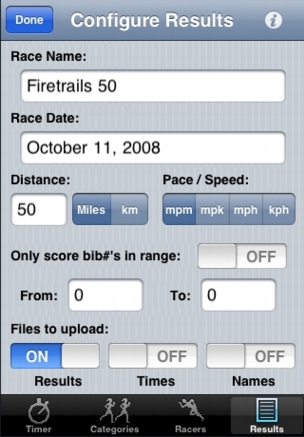
The Race Name can contain anything you want. Tapping on Race Date will display a "date picker" allowing you to select the date. These two pieces of information will be used in the header of the web page that is created. Set the Distance in miles or kilometers and the Pace/Speed in minutes per mile (mpm), minutes per kilometer (mpk), miles per hour (mph), or kilometers per hour (kph), which are used to calculate the pace or speed of the finishers in the race for the posted results (pace or speed is not displayed on the iPhone itself, only on the uploaded results).
The next section of the Configure Results screen affects not the display of the results, but the results themselves. In many cases, multiple races of different distances or other differentiation (e.g., varsity and junior varsity) are run simultaneously over the same course. If the two simultaneous races are differentiated by Bib#'s (e.g., the 10K runners are numbered 1-499 and the 5K runners are numbered 500-999), then it is possible to time both races simultaneously with a single copy of PocketTimer Pro, and then score them separately. To do so, toggle the Only score bib#'s in range to On, and then enter the the From and To Bib#'s to define the range to be scored. When you tap Done, the results will be recalculated to reflect only those racers. Switch back to configure, change the From and To numbers, and when you tap Done this time you'll see only the finishers from the second race.
Uploading files also requires some configuration in the iPhone Settings application, in the Files section.

The Base URL for the upload can be a little tricky. In most web hosting sites, the "base" location for ftp (ftp="File Transfer Protocol" which is what must be used to upload files to a website) is not the same as the base location for the http files (the "web content"). A typical (but not universal) setup is found on the stevenscreek.com website. If there is a "raceresults" subdirectory at www.stevenscreek.com, the "Base URL" for http access that folder is www.stevenscreek.com/raceresults. To get to that same directory via ftp, the Base URL is ftp.stevenscreek.com/www/htdocs/raceresults. Again, this is not universal, but it is common.
Downloading files from a website via http requires no special access. Uploading files, however, requires a User Name and a Password, which you must enter. And finally, the actual name of the files to upload for the results and the times.
Exactly what files are uploaded is specified by the three "on/off switches" at the bottom of the Configure Results screen. You'll presumably want to upload the results themselves, setting the first switch to On. The second switch will also upload a separate file of just the Bib#'s and times. You can use this file to import into some desktop race scoring software, perhaps, and you can also use it later if you want to download those same times back into PocketTimer Pro. The final switch, Names, uploads the file of names. This would be relevant if you entered new names at the race site (rather than simply downloading the complete file of names from the web), and you want to upload those new names (along with the old ones) back to the web so you'll have a permanent record of those. If you are uploading results multiple times for a race (for example, after every few finishers), you might want to set the Names to On for the first upload, and then turn it off to save uploading time. Likewise, you might want to leave Times Off, and only turn it On for the final upload.
Once you have the upload settings configured, you can initiate the upload at any time by tapping the Upload button on the upper-left of the Results screen. All uploading is done "in the background," so you can immediately get back to recording finishers if you initiate an upload while the race is in progress. The software won't let you start another upload until the first one is finished, and when an upload finishes, you'll hear a "whoosh" sound to let you know it's done.
Times are uploaded in two different formats. Raw Times are the actual recorded times for each racer, while Final Times are the times after adjusting with division or individual handicaps.
The format for the upload of the results is fixed, and includes the overall results as well as results by sex and results for each category (division, age group). An example of the output from a real race can be seen at http://www.stevenscreek.com/raceresults/firetrails08/results.htm. The output is perfectly standard HTML, which means that after the race, from a computer running, for example, Dreamweaver, you can edit the file and modify the header or footer, split it into multiple pages, etc., as you wish.
For all the uploaded files, you can specify the Line Ending so that the file will be most easily read or displayed on the computer to which you are sending it.
Emailing the files
For those who have trouble setting up an ftp capability, or who simply seek an alternative, it is possible to email the output files (results, times, and/or racers) as attachments in lieu of using ftp (beginning with PocketTimer Pro version 1.0.2). To do this, set the Base URL to the email address to which the files should be mailed (e.g., "fred@aol.com"). Each file will be attached to a separate email, with the subject line indicating the name of the file. The files will be emailed from "pockettimer@stevenscreek.com", so be sure that email address is on your "approved" list so the email doesn't end up in your spam or junk folder. PocketTimer Pro uses the presence of the "at" symbol (@) to decide how to upload the results. If an "@" is present in the Base URL, the Base URL is taken as an email address and the files are emailed (and, in that case, the User Name and Password entries in the Settings are ignored). If no "@" is present in the Base URL, PocketTimer Pro assumes the Base URL is indeed a URL, and attempts to ftp results to that folder.
Downloading or uploading files to a local webserver
If you don't have the ability (or desire) to put your categories.txt or racers.txt files on an actual website, or if you don't want to upload the results to an actual website, you can also do these things using a computer, as long as it can be accessed from the iPhone, and as long as it is running web server software. Here, we present the technique for doing so from a Macintosh computer. Windows users will have to figure things out for themselves.
On a Mac running OS X 10.5, go to System Preferences and select Sharing. Activate Web Sharing. The computer displays two pieces of information, like this:
Your computer's website: http://192.168.1.101/
Your personal website: http://192.168.1.101/~username
Typically, you'll want to use the second format. If you use Safari on your iPhone, and enter http://192.168.1.101/~username, you'll be looking at the file Macintosh HD:Users:username:Sites:index.html (where "username" is, obviously, not literal but rather your user name on the computer). Create a folder in your Sites folder named, for example, raceresults, and then you can put the categories.txt and racers.txt into that folder to download, setting the Download Base URL in the Settings application for PocketTimer Pro to http://192.168.1.101/~username/raceresults
Activating FTP for uploading to a local webserver: With a Macintosh, if you bought a new computer with OS 10.5 or 10.6 installed, you only need to go the Sharing portion of System Preferences, turn on File Sharing, click the Options button after selected File Sharing, and make sure Share Files and Folders Using FTP is checked. On Windows, there are various free and paid FTP servers you can install; FileZilla is one such program.
As with "regular" web sites, when you want to upload results (and/or times and/or names) back to the local computer, the base URL for upload is different than the one for download. In the example above, to upload race results back to the same folder, you would set the Upload Base URL to 192.168.1.101/Sites/raceresults. Note that you do not need the "~username" part in the name, because the User Name (and Password) are entered separately, but you do need to specify the "Sites" folder in addition to the "raceresults" sub-folder.
If you upgraded to OS X 10.5 from an earlier OS, there can be problems with permissions. This page describes what you need to do to make your system work. Even after you do that, you may still have problems with files uploaded by ftp from PocketTimer Pro. The default settings in Mac OS will allow you to view those files on that same computer, but if you attempt to view them from another computer via a web server, their permissions will be wrong. This probably won't affect you (since mostly you'll be uploading results to "real" web sites which don't have that problem), but if it does, you can solve the problem like this:
Some of this (particularly when your computer isn't correctly configured to begin with) is a bit tricky, and unfortunately we cannot offer any help in this area. But if you already have a website for your race or club or company or team, the person who deals with the website shouldn't have any problems setting things up there.
Using the Clipboard to Transfer Information
In a number of cases, "over-the-air" transfer (either via cell phone or WiFi) won't be possible, and a direct connection to a tethered computer will be the only way to transfer results. Beginning with version 2.1, the three pieces of information (Results, Times, and Names) can also be transferred by way of the iPhone clipboard (one at a time). To do this, set the relevant filename(s) — specified by Results, Recorded Times, and Racers in the Settings application — to the word "Clipboard" (or "clipboard"), without the quotes. Now, assuming you also set to "On" the correspond switch under Files To Upload on the Configure screen (again, only one at a time if you intend to transfer more than one such file to the clipboard), when you tap the Upload button, the relevant information will be placed on the Clipboard. From there, you can transfer it into any other application, but for use in a local sync, we recommend using the Note field of either a contact in the Contacts application (you might first create a dummy contact called "Race Results" if you like) or of an entry in the Calendar app (where the race you're timing may already be found, so just add the information into the Note field of that entry). Now, after a sync, you can go to the corresponding desktop application and copy and paste the information into another application, e.g., a text editor, a spreadsheet, etc.
For transferring results only, you should not use the iPhone Notes application. This application transforms the text in ways which will make the HTML contained in the results information incorrect. You can use the Notes application to transfer the times or names information if you like; that information isn't HTML and isn't altered.
Swapping data via File Sharing
Beginning with version 2.2, PocketTimer Pro supports exchange of data between computer and iPhone / iPod Touch via Apple's File Sharing. Use of this feature requires iOS version 4.0 or higher, and iTunes version 9.2 or higher. This method of sharing files between computer and iPhone is in some ways more cumbersome (because it requires that your iPhone is directly connected to your computer) than the methods described above, but for many people will also be much more straightforward and less "techy."
To access file sharing, with the iPhone or iPod Touch attached by cable to the computer, open iTunes, select the unit in the left-hand column under "Devices," and click on the "Apps" tab. Scroll to the bottom to view the File Sharing section. Select "PocketTimer" (Apple restricts the length of program names in some places) and to the right you will see a list of files which can be shared between computer and iPhone.
To download fils from the desktop into the iPhone:
To upload files from the iPhone to the desktop, follow these steps:
All files are uploaded using an encoding called UTF-8 which allows multiple character types (not just Latin and Latin with accented characters but Chinese, Arabic, or anything else) to be contained in the file. Downloaded files (files input into PocketTimer Pro) can be encoded in ASCII, UTF-8, or UTF-16 (sometimes called Unicode). For more on encoding, see this file.
Reading the Manual and Registering the Software
On the upper-right of the Configure Results screen you'll see an "information" ("i") icon. Tapping it will give you two choices (plus Cancel). One will take you to this online manual, which is configured so it can read be optimally on your iPhone. The second takes you to a web page on our web site which allows you to register your copy of PocketTimer Pro for iPhone. Be sure to do so at some point, so we can provide you with the best possible support.
Tips and Tricks
Some obvious things:
Some less obvious things:
Visit the Stevens Creek Software Home Page
Visit the Stevens Creek Software iPhone Software Support Page
© 2008-2010 Stevens Creek Software LLC